<center>
# Integrating AI models into Zulip bots using FastAPI: Part 1
<big>
**Migrating the Zulip’s bot server from Flask to FastAPI.**
</big>
*Written by [Cesar Uribe](https://github.com/curibe) and [Juan David Arias](https://github.com/juanArias8). Originally published 2023-01-31 on the [Monadical blog](https://monadical.com/blog.html).*
</center>
Robotic Process Automation is a term for when virtual robots (bots) are used within the tech infrastructure of a company to perform automated, digital tasks. Bots are like little computer soldiers that are recruited to perform the repetitive and tedious tasks that we all dread.
The appeal of bots is obvious – who wouldn’t want to be like Iron Man, offloading all the boring crap to J.A.R.V.I.S., leaving you free to unlock your true potential as a gadget-building genius? Of course, a fully automated, intelligent, world-saving butler-bot (botler?) like J.A.R.V.I.S isn’t quite within our reach just yet, but we imagine a pared-down corporate J.A.R.V.I.S as bot that can do stuff like:
* Provide a succinct summary of what was discussed in a particular stream from a chat platform -- no more reading through 2,300 inane messages to catch up just because you took a couple days off!
* Translate content in a simple and integrated way, making communication smoother for multinational teams – this one’s like C3PO, but without the crippling neuroses.
* Generate accurate quotes for clients based on the number of available staff and the skills required for a particular project.
* Autocompleting or fully writing messages and emails based on what’s needed in a particular context.
Sounds awesome, doesn’t it? Well, it’s possible to create a bot that can complete these tasks, if we integrate it with artificial intelligence. Over the next three posts, we’ll show you how to do that by making use of the FastAPI framework for creating bots on the Zulip messaging platform. You’ll start by implementing your own bot in FastAPI. Then, you’ll implement an N-tiers architecture that will make the integration of new features easier. And finally, you’ll use the HuggingFace platform to integrate different AI models to the bot.
This post is the first of the series. Here, you’ll learn how to create a Zulip bot following its documentation and tools. Once you understand how to test and use a Zulip bot, you’ll learn how to quickly migrate it from Flask to FastAPI.
Let’s begin!
## Setting up an example bot
Before creating the bot using FastAPI, let’s test one of the example bots found in [Zulip's repository](https ://github.com/zulip/python-zulip-api.git). First, you’ll need to set up your development environment. According to the [documentation](https://zulip.com/api/running-bots):
1. Add a new bot to your Zulip account by going to your Zulip client app > settings icon > personal settings > Bots (https://zulip.com/help/add-a-bot-or-integration) > click on the “Add new bot” button
2. Select the type of bot (generic, incoming or outgoing webhook). In this case, an outgoing webhook.
Feel free to play around with a generic type bot, but be aware that for the example with FastAPI, we’re going to use an outgoing webhook type. You can find more information on the difference between the options [here](https://zulip.com/help/bots-and-integrations#bot-type).
3. Set a name and an email to the new bot. The email doesn’t have to correspond to a real email; it can be fictitious.
4. Set the Endpoint URL field as https://localhost:5000. We’ll change it later.
5. Add an avatar image (optional).
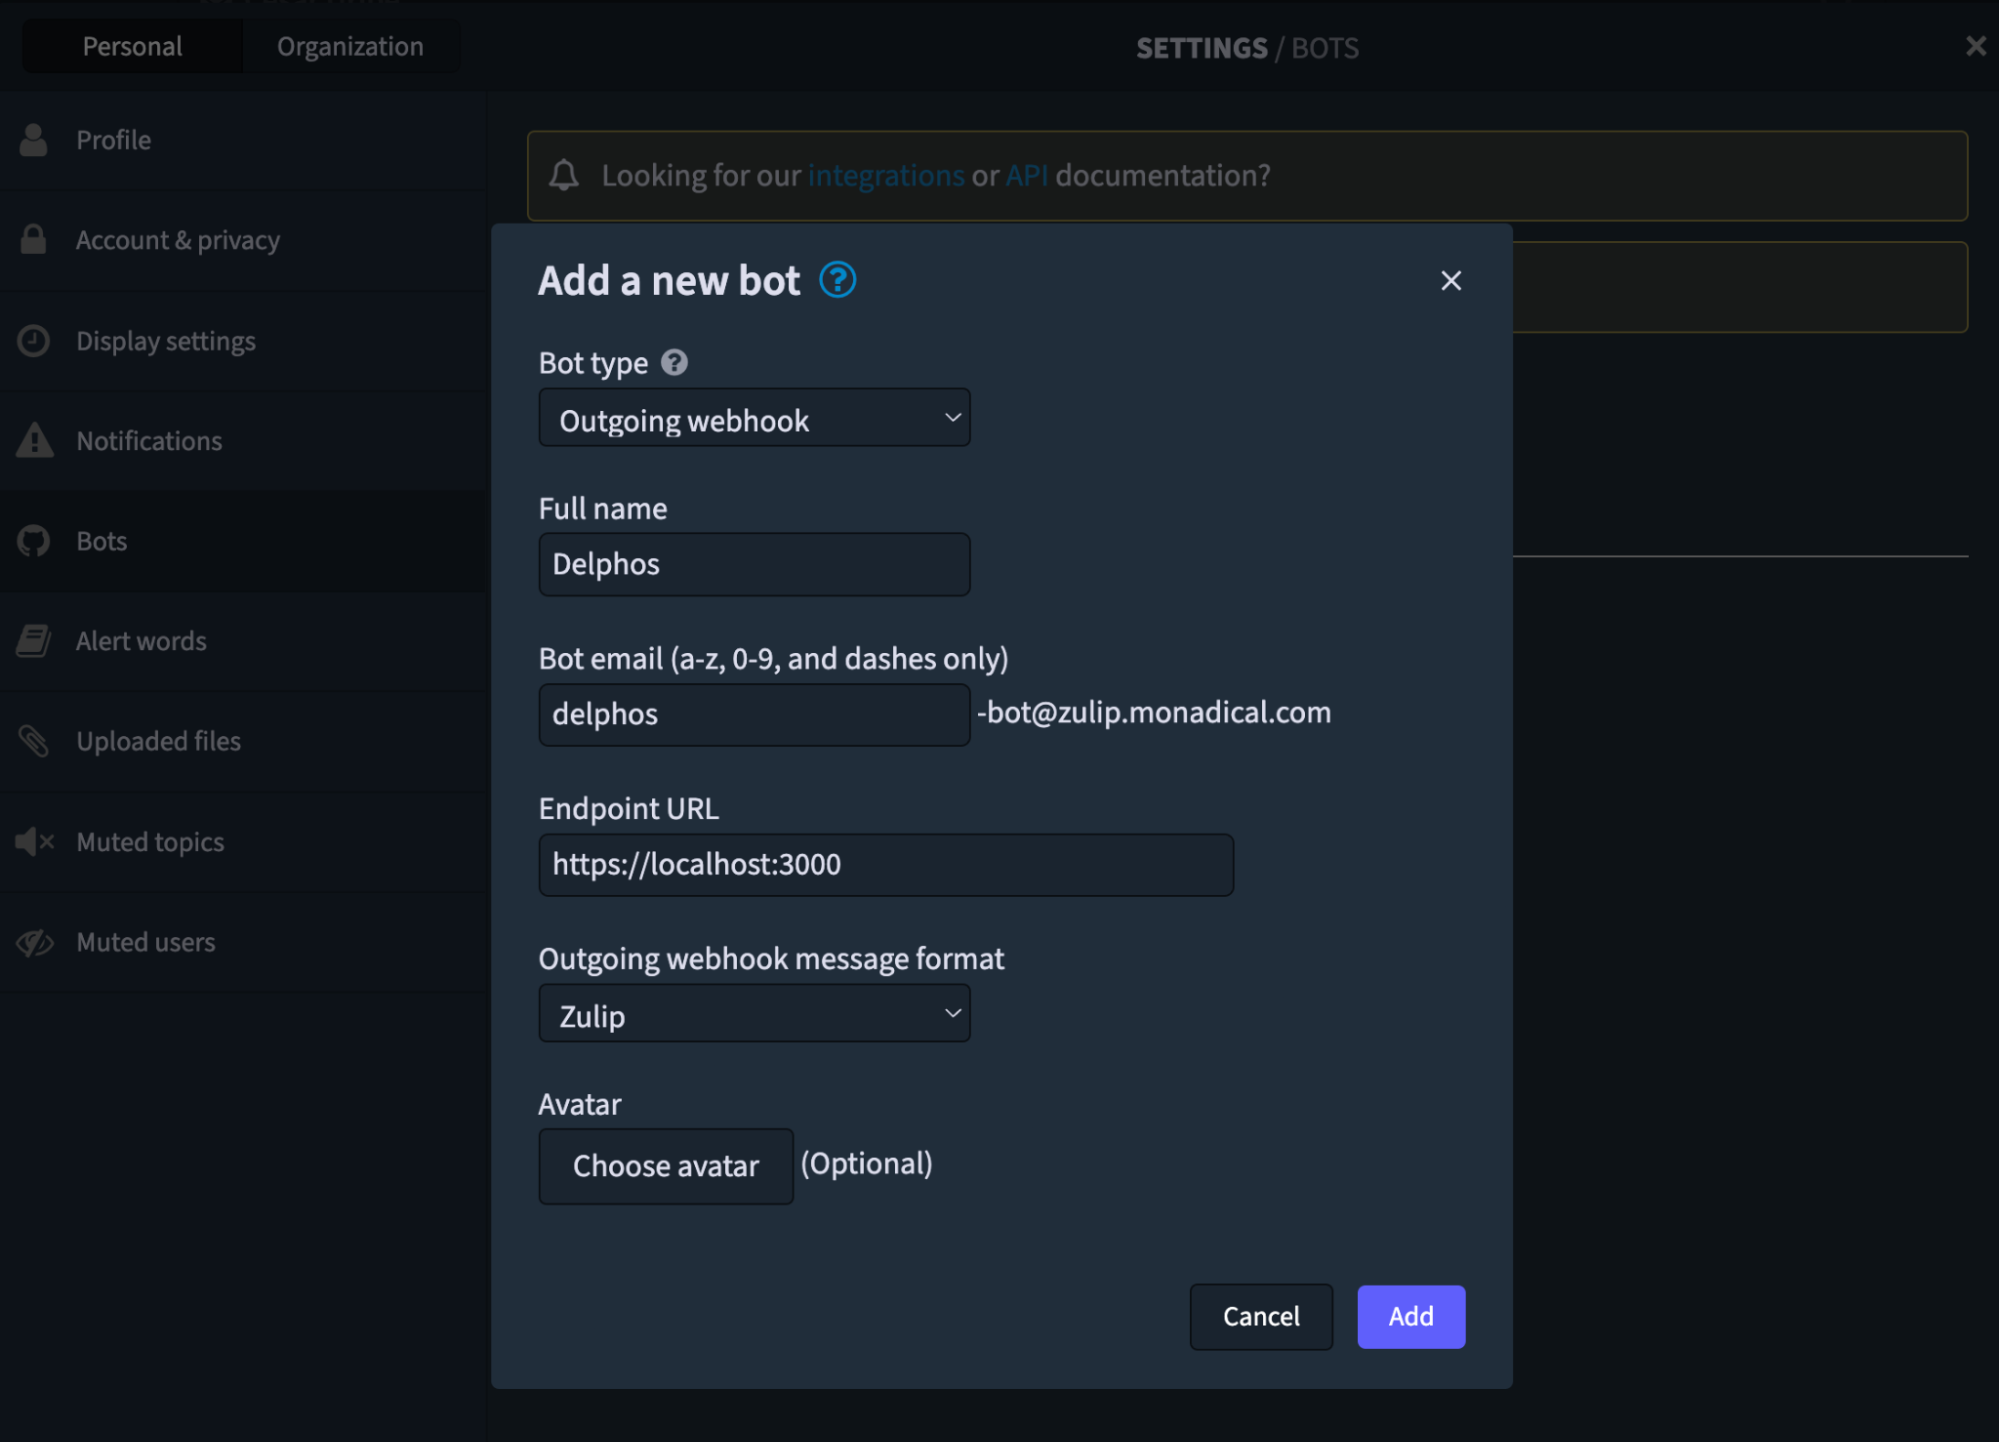
6. After creating the bot, download the `zuliprc`file by clicking the download icon under the bot card. This file contains the information about the bot and an API key that will be used as the authentication token between the Zulip client and the bot server.
7. Clone the [bot’s examples repository](https://github.com/zulip/python-zulip-api/tree/main/zulip_bots/zulip_bots/bots). From a terminal, run the command `git clone git@github.com:zulip/python-zulip-api.git`.This will create a new directory `python-zulip-api` with a list of example bots that you can refer to, and use as samples to build your own.
8. Move the `zuliprc` file you downloaded in step 5 to the `python-zulip-api` directory with the command `mv /path/to/zuliprc python-zulip-api`. Now let’s move to the `python-zulip-api` folder with `cd python-zulip-api`.
9. Install the requirements and dependencies inside the `zulip-python-api`. To do so, run the command `python3 ./tools/provision` from a terminal. This will install all dependencies in a virtual environment. Dependencies include the following tools: `zulip`, `zulip_bots` and `zulip_botserver`. The `zulip_botserver` is a Flask server that’ll allow us to run the server bot and expose it to the clients.
10. Activate the virtual environment. Once the installation of the dependencies is complete, execute the command `source ./zulip-api-py3-venv/bin/activate` to activate the virtual environment.
## Testing an example bot
Now it’s time to run a test example. Let’s start by testing the classic [helloworld example](https://github.com/zulip/python-zulip-api/tree/main/zulip_bots/zulip_bots/bots/helloworld) which which consists of the following code:
```python
from typing import Any, Dict
from zulip_bots.lib import BotHandler
class HelloWorldHandler:
def usage(self) -> str:
return """
This is a boilerplate bot that responds to a user query with
"beep boop", which is a robot for "Hello World".
This bot can be used as a template for other, more
sophisticated, bots.
"""
def handle_message(self, message: Dict[str, Any], bot_handler: BotHandler) -> None:
content = "beep boop" # type: str
bot_handler.send_reply(message, content)
emoji_name = "wave" # type: str
bot_handler.react(message, emoji_name)
return
handler_class = HelloWorldHandler
```
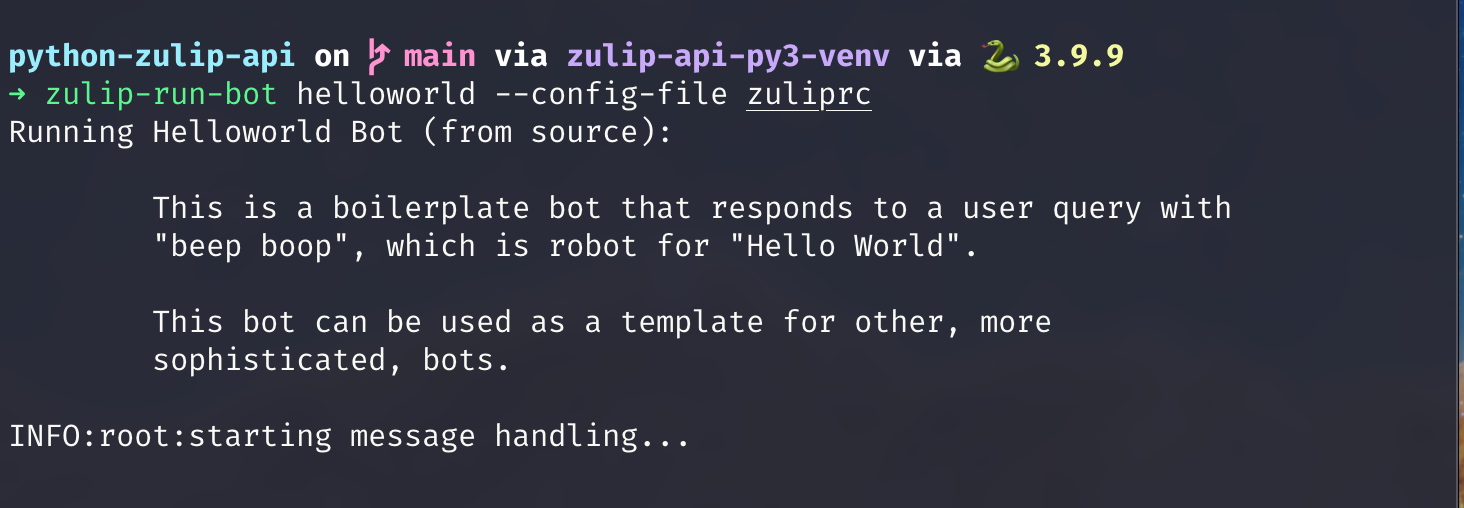
The bot above receives any message as input and responds by adding a reaction to the sent message and replying with the message `beep boop`. To run it locally, run the command `zulip-run-bot helloworld --config-file zuliprc` from a terminal:
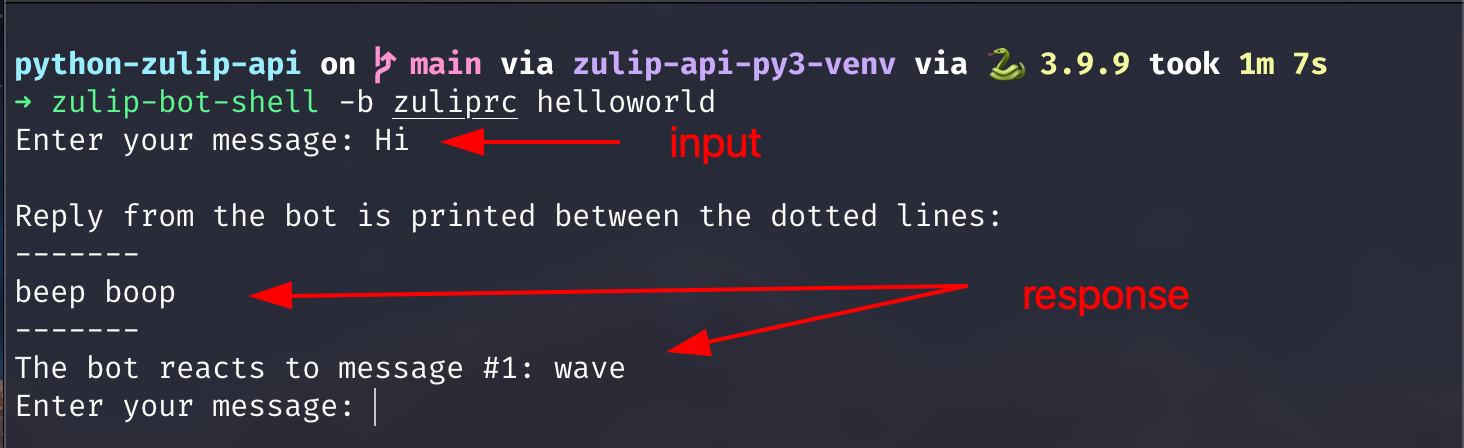
Or interact with it locally without having to create a server, like so: `zulip-bot-shell -b zuliprc helloworld`
We recommend checking out the different bots that the Zulip team offers, in order to familiarize yourself with bot coding and to see what’s already available. You can find them [here](https://github.com/zulip/python-zulip-api/tree/main/zulip_bots/zulip_bots/bots). There are converters, games, translators, search engines, and more.
As you can see, the only thing that’s needed to create a Zulip bot is to define a bot handler with the methods usage and handle_message. The remaining code corresponds to the business logic of the functionality you want to add to the bot.
To run the bot in a self-hosted server or in any cloud provider, execute the command `zulip-botserver -c zuliprc -b helloworld --port 8000 --host 0.0.0.0`
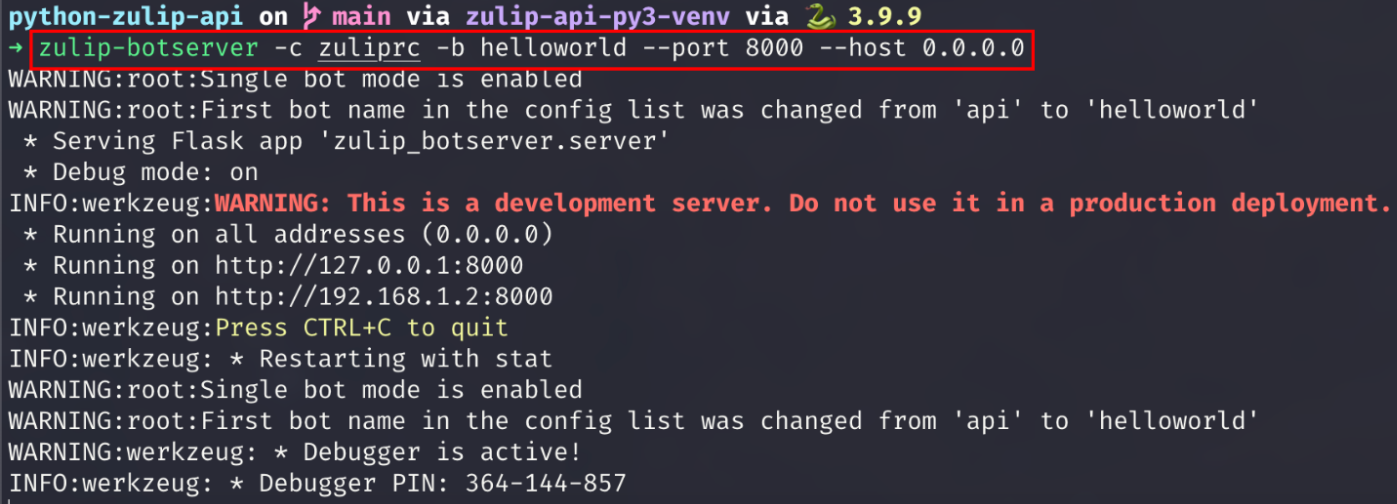
With the `zulip-botserver`, you can run more than one bot at the same time using only the `botserverrc` file. This is important to know in case you need multiple bots running on the same server. If that‘s the case, then you can deploy as many bots as you want on your own server by just using a good architecture in your system.
If you’re interested, you can find more information on that [here](https://zulip.com/api/deploying-bots#running-multiple-bots-using-the-zulip-bot-server). This `zulip-botserver`is the same Zulip file that you downloaded in the beginning. You just need to specify the bot’s name or the bot’s file’s custom path that you want to run, for example, `[helloworld]` or `[/your/bot/file/location/bot-file.py]`:
```bash
[helloworld] # or the custom path of your external bot: ~/Documents/my_bot.py
email=delphos-bot@zulip.domain.com
key=xxxxxkeyxxxxx
site=https://zulip.domain.com
token=xxxxxtokenxxxxx
```
Once you’ve run a couple of examples and feel comfortable by using them, you're ready to implement a Zulip bot with FastAPI.
## Setting up a bot with FastAPI
So far, we've used the initial Zulip example bot repository and executed one of their bots. The repository code that Zulip provides contains the structure to create and integrate a new bot, as well as several test examples, and a series of libraries that allow for the creation and management of the bots. The libraries also add functionalities for things like local tests, deployments, pull requests, etc.
This structure, while useful, is overly complex if what we want is to integrate a simple bot. So, we’ll only maintain some key concepts and redefine the structure in the new project we’re going to create.
In the next section, you’ll learn how to write your own Zulip bot server in FastAPI by migrating some Flask files to be FastAPI compatible.
The bot we’re going to create is named Delphos, this in reference to the city that housed [The Delphi Oracle](https://blogs.unimelb.edu.au/sciencecommunication/2021/08/15/the-delphi-or/) in Greek mythology, because our goal is for Delphos to be the source of all knowledge within our company.
## Migrating from Flask to FastAPI
While it's possible to implement the project from scratch, for ease, we're going to reuse some files from the Flask project and rewrite a couple of functions to be FastAPI compliant.
The `zulip-botserver` tool has two essential files that we’re going to use:
* [input_parameters.py](https://github.com/zulip/python-zulip-api/blob/main/zulip_botserver/zulip_botserver/input_parameters.py) is an implementation of [argparse](https://docs.python.org/3/library/argparse.html) which allows the server to receive configuration arguments when running the application. `argparse` is a Python module that is compatible with both Flask and FastAPI, so it’s not necessary to make changes to this file.
* [server.py](https://github.com/zulip/python-zulip-api/blob/main/zulip_botserver/zulip_botserver/server.py) is the entrypoint for the bot application. This file contains the code that creates the application, defines the POST endpoint, runs the application, and loads the system configurations. The file was initially written to run on Flask, but we’re going to change it to be FastAPI compatible. To do that, follow the next steps.
### Step 1: Init the server
To start with the FastAPI project, create a new directory and a Python file that will be the entry point to the server. From a terminal, run the following command:
```shell
mkdir delphos &&\
cd delphos &&\
touch server.py &&\
pipenv install fastapi uvicorn &&\
pipenv shell
```
After opening the `delphos` directory with your favorite editor, enter the following content inside the `main.py` file:
```python
import uvicorn
from fastapi import FastAPI
app = FastAPI()
@app.get("/")
async def main():
return {"success": True, "message": "Hello Delphos"}
if __name__ == "__main__":
uvicorn.run("server:app", host="127.0.0.1", port=5000, reload=True)
```
The above script creates a basic FastAPI server with a GET endpoint that returns a JSON with the message "Hello Delphos". To test that everything works, run the `python server.py` command from a terminal and go to the url http://127.0.0.1:5000/ in a browser. Once there, you should see the following JSON: `{"success":true, "message": "Hello Delphos"}`.
To start with the migration, first copy the contents of [server.py](https://github.com/zulip/python-zulip-api/blob/main/zulip_botserver/zulip_botserver/server.py) into the `server.py` file in the main directory of the delphos project.
Then copy the contents of [input_parameters.py](https://github.com/zulip/python-zulip-api/blob/main/zulip_botserver/zulip_botserver/input_parameters.py) into `src/config/input_parameters.py`.
### Step 2: Create the request schemas
With the files moved to the right directories, let’s create the [Pydantic Schemas](https://pydantic-docs.helpmanual.io/usage/schema), that are based on the JSON’s content sent from the Zulip client through a POST method. See [here](https://zulip.com/api/outgoing-webhooks) for more info.
By using Pydantic to create the schemas, you can make use of the default typing validations that Pydantic provides. To define the schemas, create a new file `src/models/schemas.py` and then add the following content:
```python
from typing import List, Any, Union
from pydantic import BaseModel
class Message(BaseModel):
id: int
sender_id: int
content: str
recipient_id: int
timestamp: int
client: str
is_me_message: bool
sender_full_name: str
sender_email: str
sender_realm_str: str
subject: str = None
topic_links: List[Any] = None
last_edit_timestamp: int = None
edit_history: Any = None
reactions: List[Any] = None
submessages: List[Any] = None
flags: List[str] = None
display_recipient: Union[Any, str] = None
type: str = None
stream_id: int = None
avatar_url: str = None
content_type: str = None
rendered_content: str = None
class ZulipEvent(BaseModel):
data: str
message: Message
bot_email: str
trigger: str
token: str
bot_full_name: str
```
The bot endpoint will always receive an object of type `ZulipEvent` as the body of the request. `ZulipEvent` contains the event’s metadata and a field of type `Message` that describes the message information. For instance, the `Message` object indicates the content, the time, the message’s detailed information, and the list of `Recipients` which are representations of Zulip users.
### Step 3: Create the config module
Now create a new file `src/config/config.py` and add the following content:
```python
from types import ModuleType
from typing import Any, Dict, Optional
from pydantic import BaseModel
from zulip_bots.lib import ExternalBotHandler
class Settings(BaseModel):
bots_lib_modules: Optional[Dict[str, ModuleType]]
bot_handlers: Optional[Dict[str, ExternalBotHandler]]
message_handlers: Optional[Dict[str, Any]]
class Config:
arbitrary_types_allowed = True
```
This settings model will replace the Flask `app.config` for the FastAPI version, and define the attributes of the server bot configuration. This is a global model that contains a mapping system between the bots and their respective configurations. How it works:
* `bots_lib_module` is a dictionary that maps each of the available bots with the file as a module containing the bot source code.
* `bots_handler` is a dictionary that maps each of the bots with an object of type `ExternalBotHandler` containing the connection to the Zulip API client and other properties. The connection is established based on the bot credentials exposed in the `zuliprc` file.
* `message_handlers` is another dictionary that’s responsible for mapping each of the bots with the `BotHandler` functionality. The `BotHandler` functionality is then responsible for operating the bot logic and sending responses to the client, this by using the `handle_message` function that each bot must implement.
Once the server starts up, the system loads the bots configuration. To do this, the system iterates over each of the entries found in the `zuliprc` file and builds a Settings type object. Each of the attributes of the Settings object will have an entry for each bot found in the `zuliprc` file.
```shell
Settings = (
bots_lib_modules: {
"delphos": src/delphos/delphos.py
}
bot_handlers: {
"delphos": ExternalBotHandler = client: (
email="delphos@email.com",
api_key="delphos_api_key",
site="https://zulip.site.com",
)
...
}
message_handlers: {
"delphos": DelphosHandler.handle_message()
})
```
The above is a preview of what the Settings object will look like once theDelphos server is initialized.
### Step 4: Import third-party library
FastAPI is a framework that works asynchronously, which means that FastAPI needs to run on an asynchronous server engine. You’ll use `uvicorn`, an Asynchronous Server Gateway Interface (ASGI) for Python.
In the `server.py` file, let’s import the `uvicorn` library for serving the files, also import the main FastAPI object, which will be used to define the application instance in later steps.

Finally, update your project dependencies by installing the required libraries. From a terminal, let’s run the command `pipenv install importlib_metadata pydantic werkzeug zulip zulip_bots && pipenv update`.
### Step 5: Import the local modules
Now, import the classes previously created. These are the `Settings` model to map the bot with its controllers, and the `ZulipEvent` schema to represent the body when making a POST request from the Zulip client.
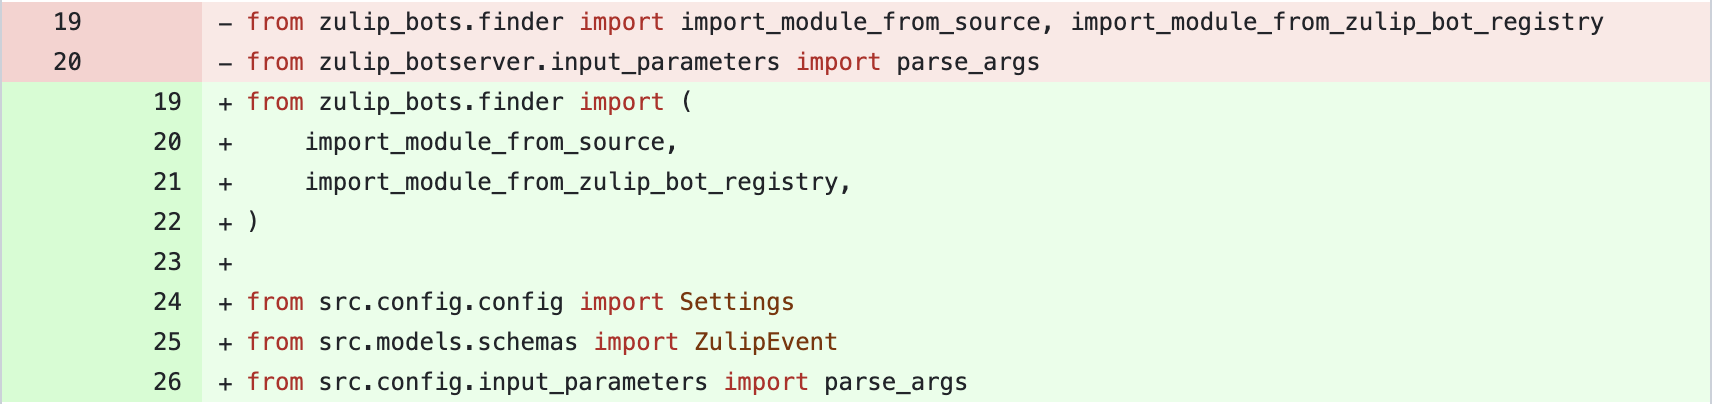
You also need to change the function `read_config_section` to update the module_name.
### Step 6: Initialize the FastAPI app
Change the app instance so that it 's an object of type FastAPI. Additionally, define an `initdata` variable of type `Settings` that will serve to store the initial configuration of the bot server as a global state of the app.

### Step 7: Adapt the path operation to FastAPI
Adapt the POST entrypoint so that it’s compatible with FastAPI. Here, the `ZulipEvent` model is used, which is the representation of the request body.

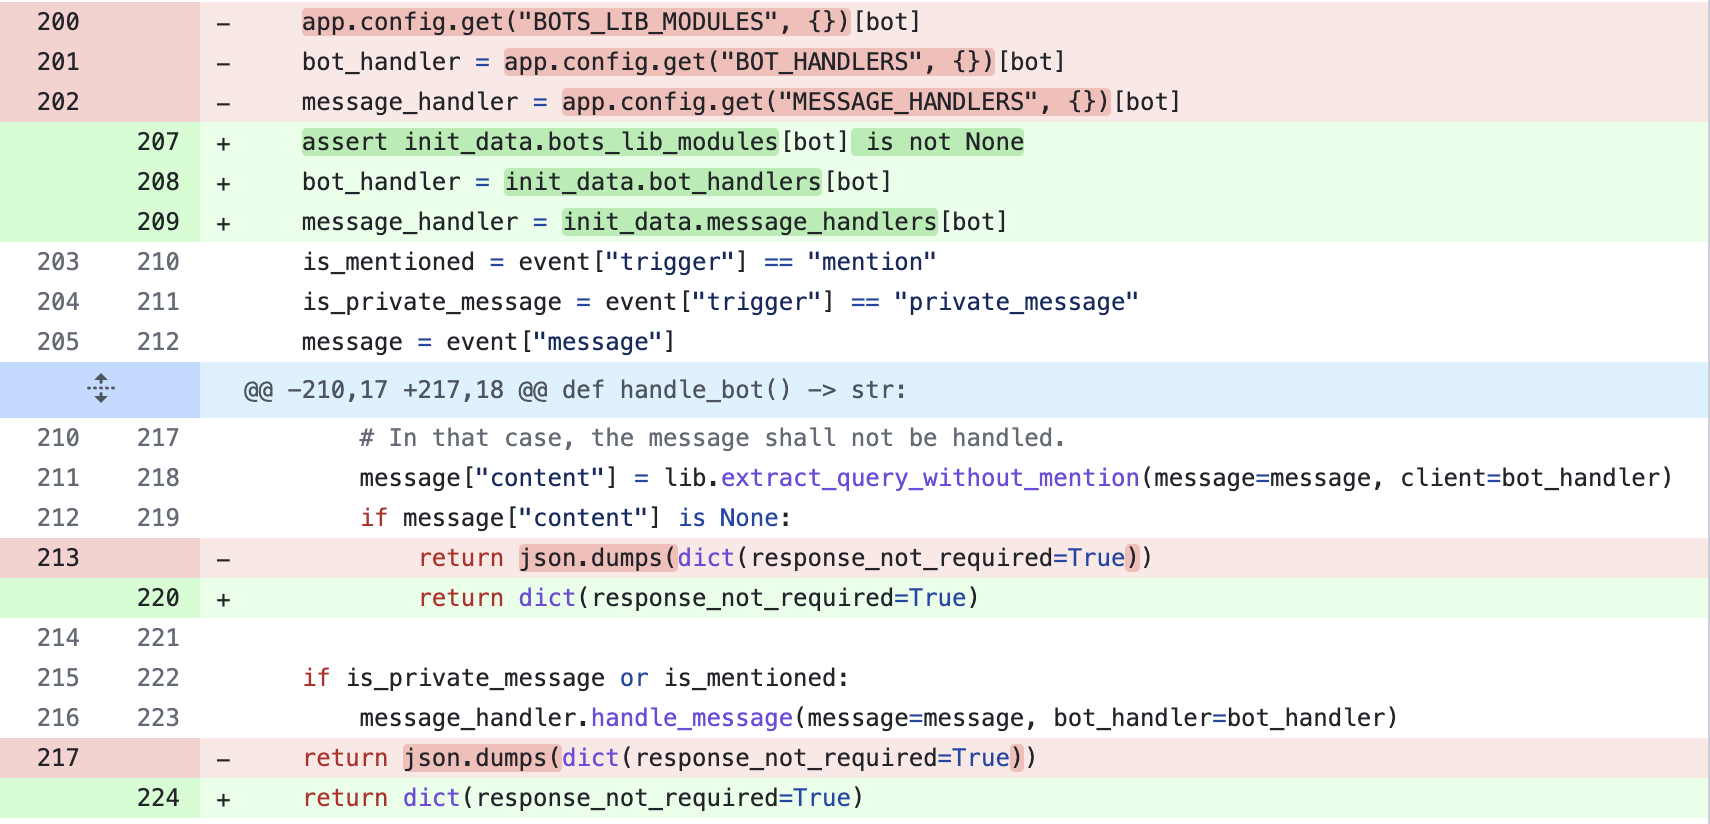
### Step 8: Update the `handle_bot` function
Change the way the configuration’s attributes are obtained. Instead of using the `app.config` of Flask, use the values of the `initdata` dictionary that represents `Settings`. In the return, the `json.dumps()` call is eliminated, because FastAPI takes care of the response encoding process internally.
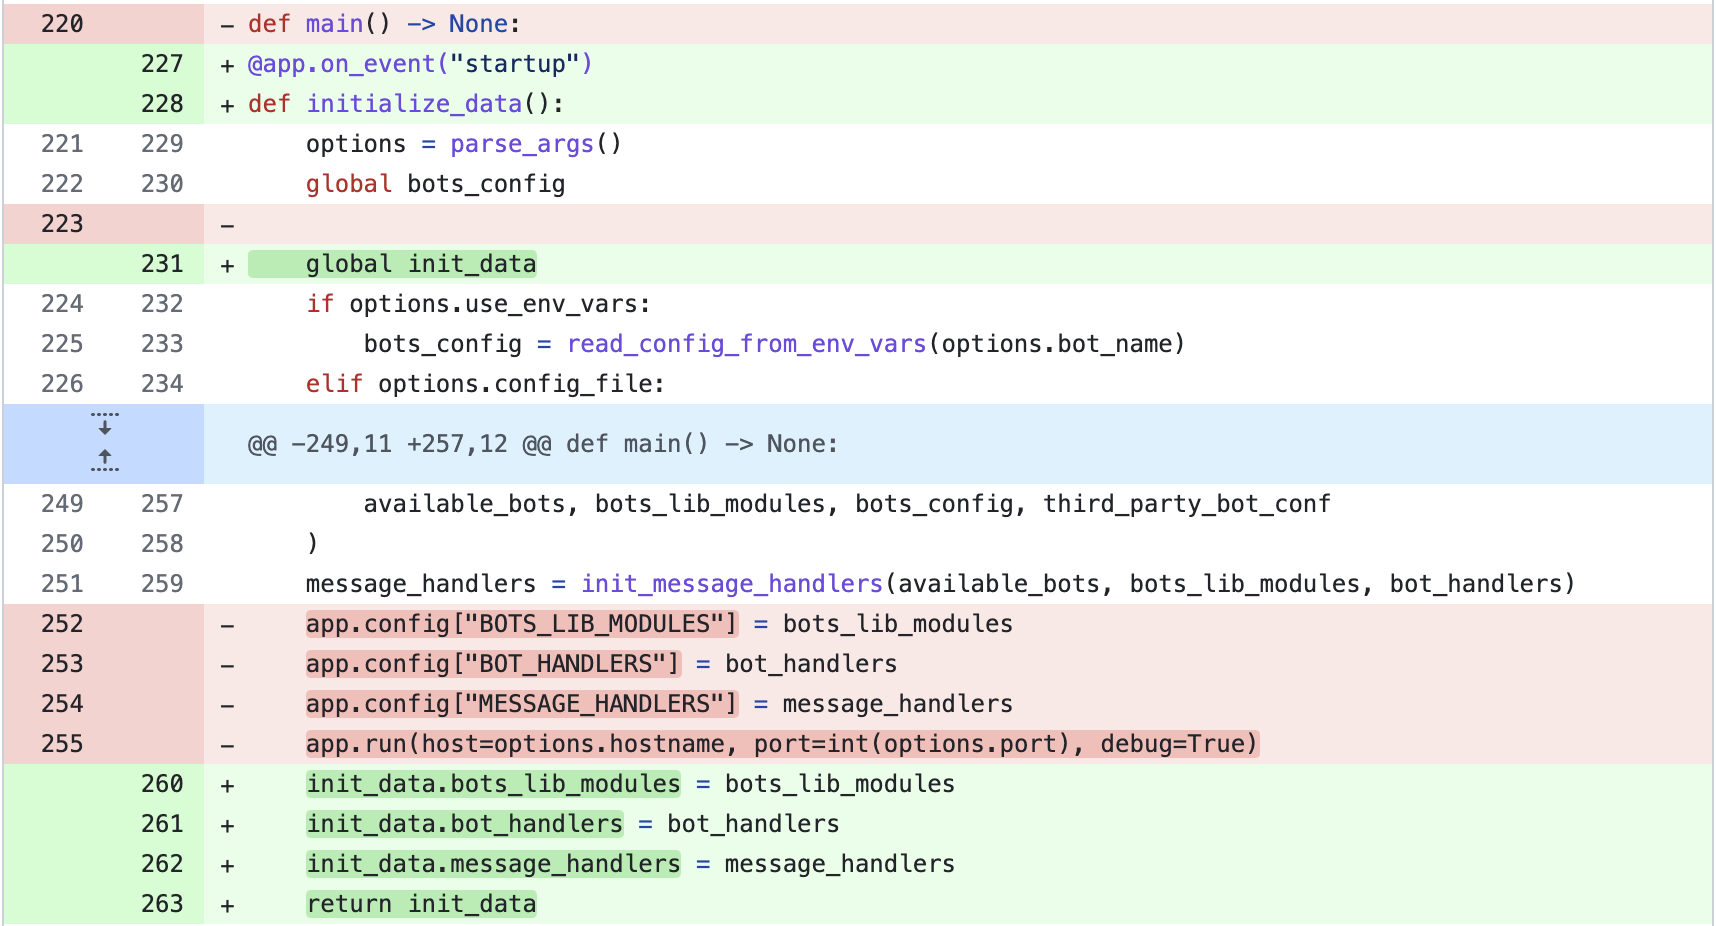
### Step 9: Change the main function on_startup event
FastAPI works by default in an asynchronous and multithreaded way, so it’s necessary that the parameters are initialized in the main function executed at the beginning of the application. For this,use the [on_startup event](https://fastapi.tiangolo.com/advanced/events/#startup-event) offered by FastAPI.
### Step 10: Run the server with uvicorn
Finally, make use of `uvicorn` to run the application:

Note that some of the parameters of the run command are passed as environment variables arguments when running the application from the console.
Up to this point, you’ve managed to migrate the `zulip-botserver` from Flask to FastAPI changing only what’s necessary. With the content of the `server.py` file, you can start the server that’ll be executing the bot and receiving requests from a Zulip client. But before that, let’s add a basic functionality to the bot.
### Step 11: Add your bot functionality
To run your own functionalities, you need to add commands to the bot. The following is an example of the process, with a command to get a city’s weather specified as a parameter. For example, `@delphos weather Medellin`.
To achieve this, we’ll make use of the public API **www.weatherapi.com**. First, register on its page to obtain an API KEY. Once you have the API KEY, you can make requests to its endpoint. Attach the API KEY and specify the name of the city as a parameter. Something like `http://api.weatherapi.com/v1/current.json?key=API_KEY&q=Medellin`. Let's see the complete example.
Create a new file file `src/bots/delphos/delphos.py` and add the following content:
```python
from typing import Any, Dict
import requests
from zulip_bots.lib import BotHandler
def get_weather(city_name: str):
API_KEY = "37bf4285515446549a4222213231001"
url = f"https://api.weatherapi.com/v1/current.json?key={API_KEY}&q={city_name}"
return requests.get(url).json()
class DelphosHandler:
ERROR_MESSAGE = """
Sorry, No command/city found. You need to write the command and city:
'@weather weather <city>' or 'weather <city>' in DM
"""
def usage(self) -> str:
return """
This is a weather report system,
Please specify the city name to obtain detailed info.
"""
def handle_message(self, message: Dict[str, Any], bot_handler: BotHandler) -> None:
content = message.get("content", None)
response = self.ERROR_MESSAGE
try:
content = content.strip().split()[-2:]
command = content[0]
city = content[1]
except IndexError as e:
command = None
city = None
if command == "weather" and city:
response = get_weather(city)
bot_handler.send_reply(message, response)
return
handler_class = DelphosHandler
```
### Step 12: Run the bot
Download the `zuliprc` file as `zuliprc-delphos` again, and put it inside the `delphos` project folder. Remember this file will be used as the credential when authenticating the bot against Zulip. Also, you need to update the file with the custom path:
```bash
[./src/bots/delphos/delphos.py]
email=delphos-bot@zulip.domain.com
key=xxxxxkeyxxxxx
site=https://zulip.domain.com
token=xxxxxtokenxxxxx
```
Now you can run the application with the following command from a terminal:
```shell
python3 server.py --config-file zuliprc-delphos --hostname="0.0.0.0" --port=8000
```
Here, the bot(s)’ credential’s file, hostname, port, and name that matches the key of the credentials file are specified.

Finally, to test the success of the bot’s operation and integration with Zulip, we’ll expose our local machine as a secure server with the help of [ngrok](https://ngrok.com/). Then, we’ll expose the local machine as a secure server. From a new terminal, run the command `ngrok http 8000`. If successful, you should have an image similar to:
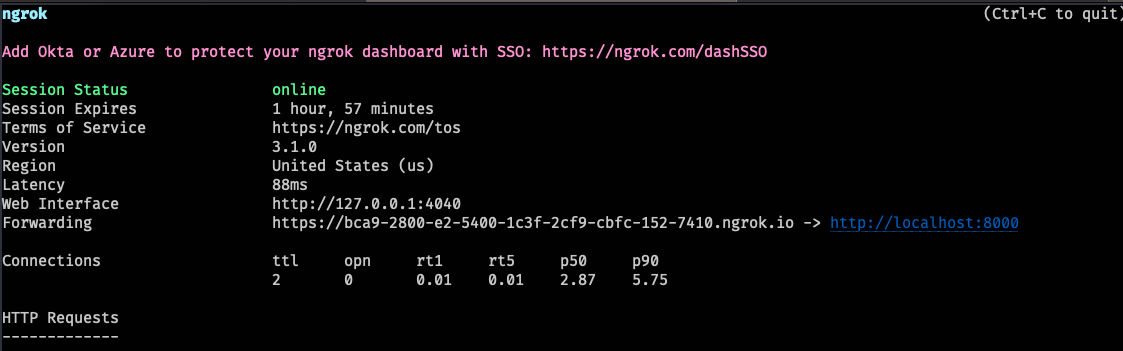
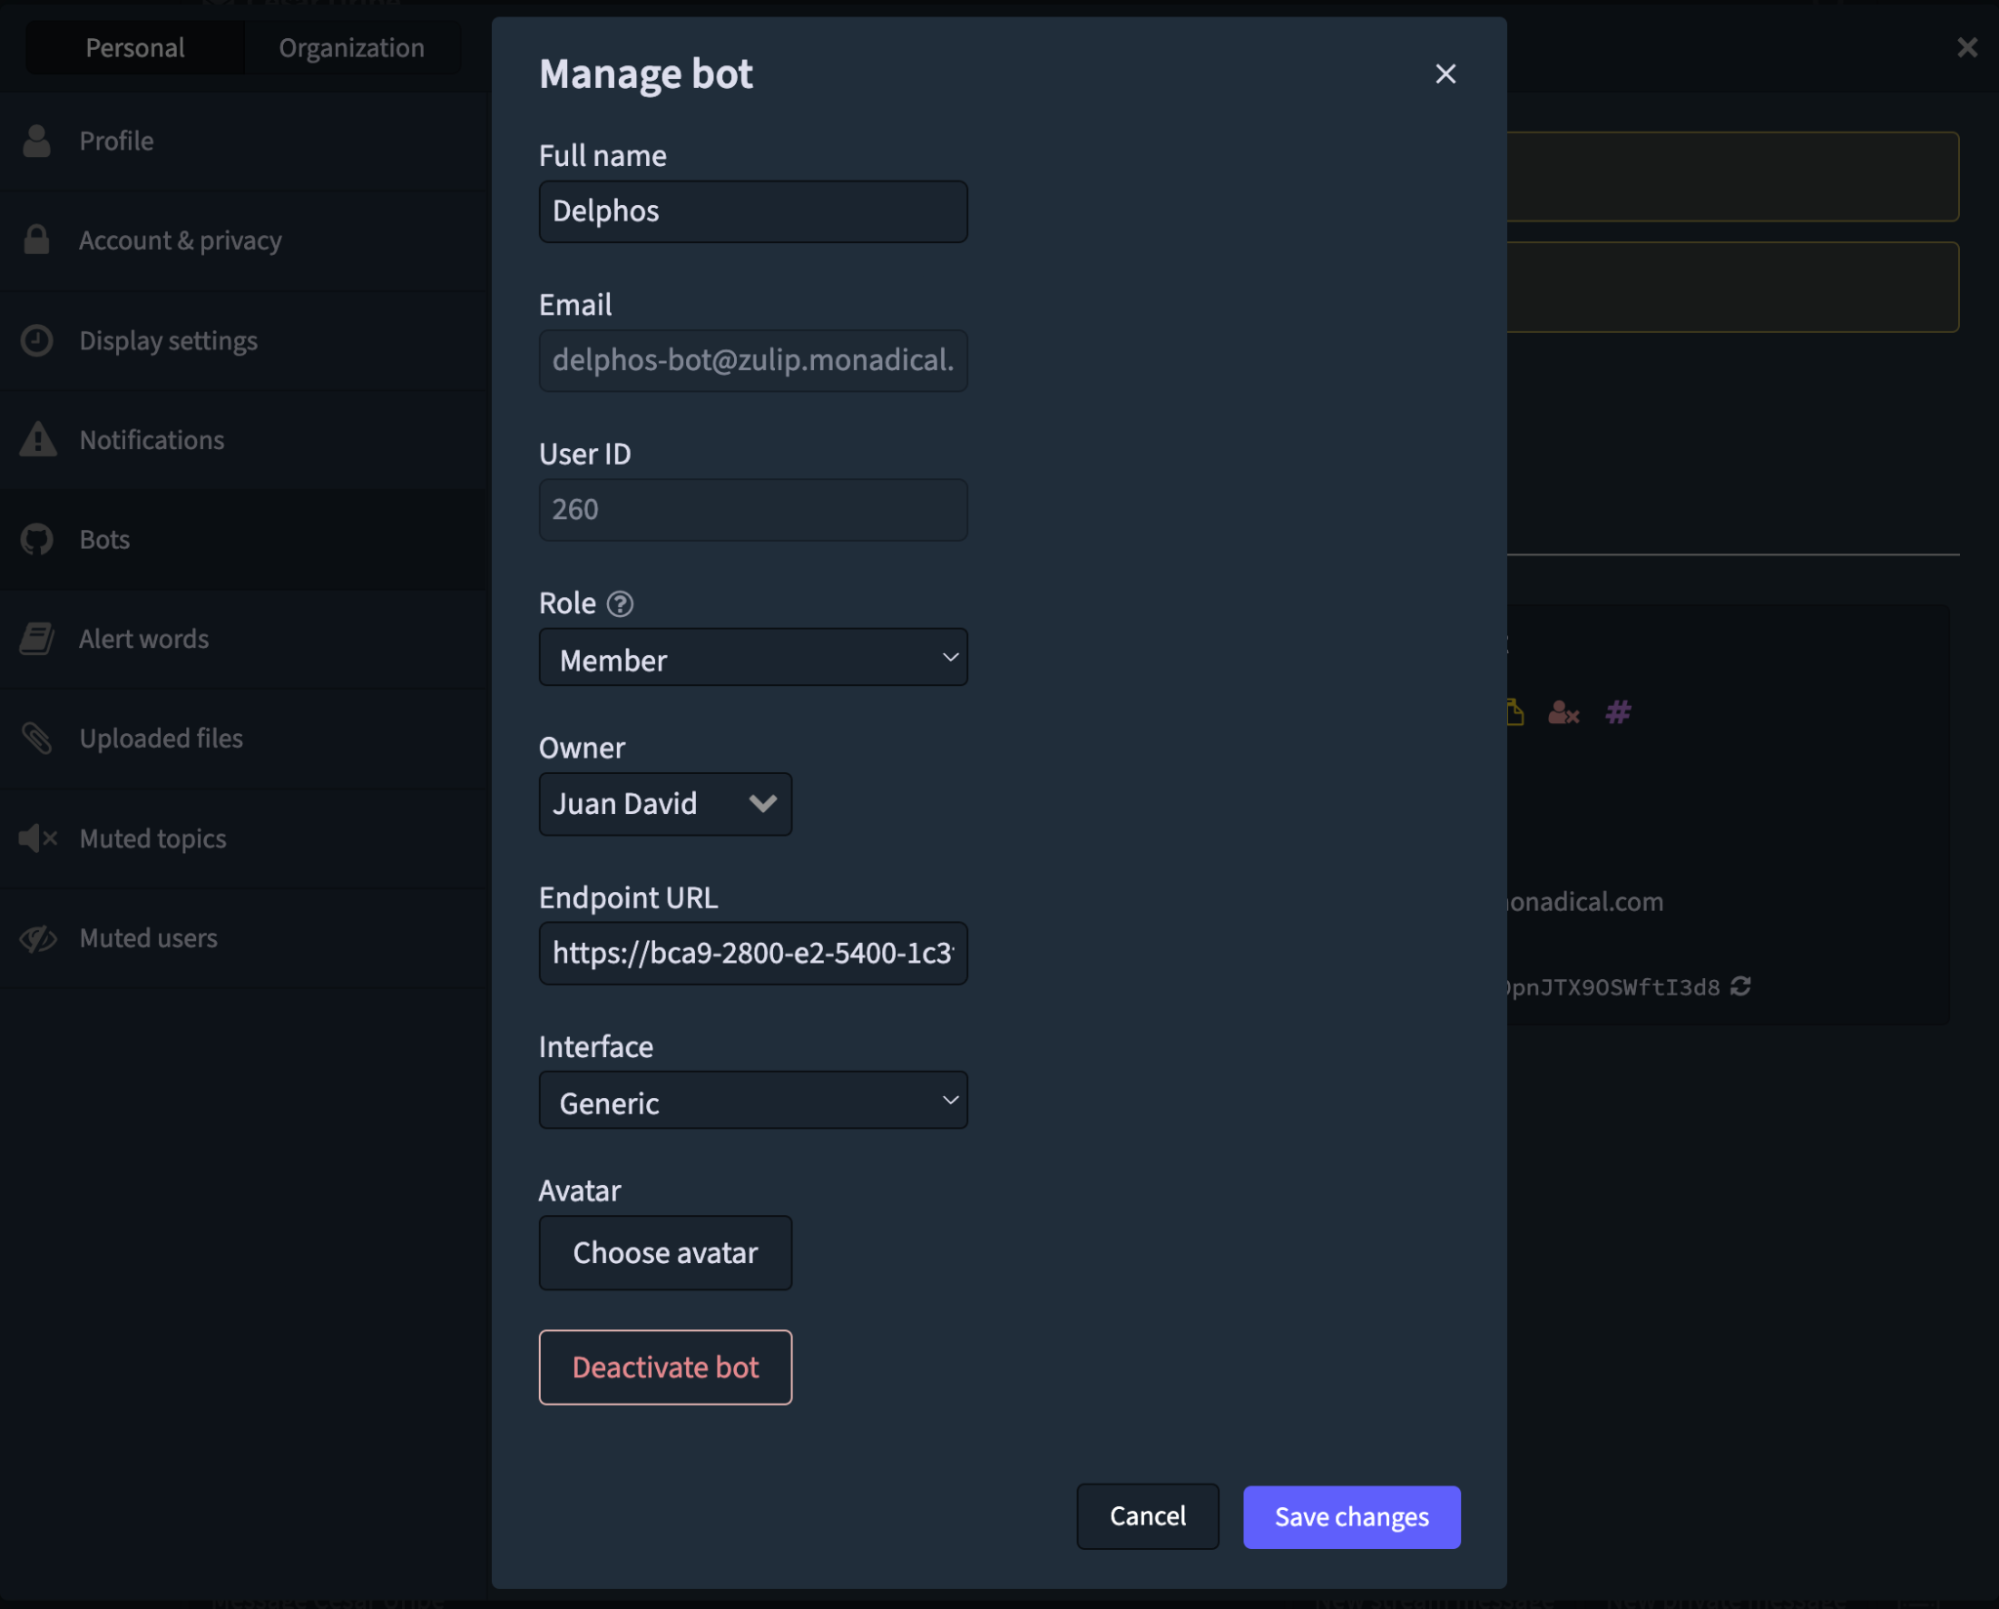
Once ngrok has completed the setup, replace the URL in the Endpoint URL field of the bot configuration form with the value returned:
To Deploy your bot in the cloud, deploy the project as a microservice in a cloud provider and run the same command as before. When the app is running, replace the URL in the Endpoint URL field with the domain of your microservice.
### Step 13: Playing with the bot
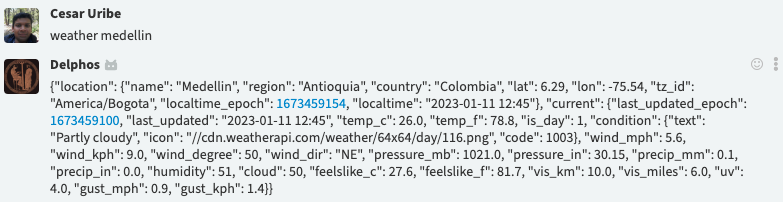
Once the bot is running and integrated with Zulip, test it by writing something like `weather medellin` to Delphos by DM.
If you write an incomplete command, you’ll receive a help message like this:
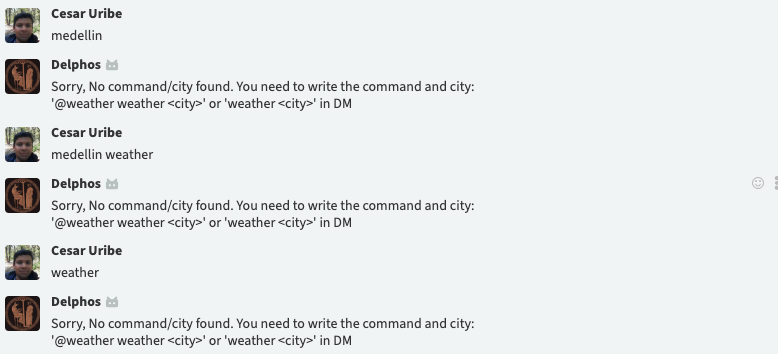
You’ve just run a Zulip bot with a FastAPI server 🎉!
You can also find all the source code at https://github.com/juanArias8/zulip-delphos-bot.
### Conclusions
Instead of creating a bot server from scratch, we’ve adapted Zulip’s base repository from Flask to FastAPI.
At first, you may have questioned the adaptation of the bot. After reading this blog post, we hope you’ve learned how FastAPI offers some cool tools that make the developer experience easier. This is because of its asynchronous process handling, automatic integration with OpenAPI, Swagger and Redoc for documentation, strong typing and automatic validations with pydantic. With this adaptation, you can use the FastAPI server to run your bots.
Finally, we’ve implemented a simple project structure without going into detail. In the next post, you’ll learn how to structure your project with a more elaborate architecture. Once you understand the architecture, you’ll be able to quickly integrate new features into your bot and easily scale it.
### References
* https://www.youtube.com/watch?v=ZEyKxsWjwNM
* https://github.com/zhanymkanov/fastapi-best-practices
* https://github.com/dev-courses/fastapi-backend
* https://zulip.com/api/running-bots
* https://fastapi.tiangolo.com
* https://www.cosmicpython.com/
* https://testdriven.io/blog/moving-from-flask-to-fastapi/

Juan David Arias
is a Full-stack dev/PM of Monadical