<center>
# The AI Evolution: Transforming Zulip Bots, Part 3
<big>
**Discover how AI reshapes chat automation in Zulip bots**
</big>
*Written by Juan David Arias. Originally published 2024-01-30 on the [Monadical blog](https://monadical.com/blog.html).*
</center>
## Introduction
We're back, at long last! If you've been journeying with us through the wonderful world of Zulip bots, now is not yet the time to rest, fellow traveller. Welcome to our third and final installment of the Zulip bot series!
<center>

</center>
After laying the groundwork with a basic Zulip bot using FastAPI in our [first article](https://monadical.com/posts/zulip-ia-bot-1.html), and scaling up with [N-tier architecture in the second](https://monadical.com/posts/zulip-ai-bot-2.html), we're now diving into the depths of chat automation with generative AI models. But not just any chat automation: we’re talking about a chatbot that generates images, writes poems, answers questions, spins up concise summaries, translates text, and more.
While our series is tailored for Zulip, the tricks that we’ve picked up along the way are pretty universal. So if you’re playing around with chatbots on Discord, Slack, or any other platform, you’ll surely find a few nuggets of insight.
In this final installment, we’re going to:
- Introduce you to powerful LLM and Stable Diffusion models with Python.
- Guide you through managing multiple, simultaneous requests using Celery.
- Show you how to integrate these advancements into Delphos, our flagship Zulip chatbot.
The tools that we will be using in this tutorial are:
- [Hugging Face](https://huggingface.co/ ): a platform for researchers and developers to share, train, and deploy NLP models
- [LLM models](https://aws.amazon.com/what-is/large-language-model/): Large Language Models are a kind of AI trained on massive amounts of text data. This allows them to generate human-quality text, translate languages, write different kinds of creative content, and answer your questions in an informative way.
- [Stable Diffusion](https://aws.amazon.com/what-is/stable-diffusion/#) models use a technique called diffusion to create images from text descriptions. Diffusion is the process of adding noise to an image and then gradually denoising it until it resembles the desired image.
- [Celery](https://docs.celeryq.dev/en/stable/getting-started/introduction.html): an asynchronous task queue based on distributed message passing. It is a Python-based system that allows you to defer the execution of tasks until a worker is available to execute them.
- [Redis](https://redis.io/): an open-source, in-memory data structure store used as a database, cache, and message broker.
- [Zulip](https://zulip.com/): an open-source team chat platform. It supports long-form conversations, threaded discussions, and powerful search, making it easy to stay on top of conversations and find information.
- [Delphos](https://github.com/juanArias8/zulip-delphos-bot): an implementation in FastAPI for a Zulip bot, it is the same chatbot that we’ve been working on in this series of articles.
We’ll follow the steps below:
1. Getting started with LLM and Diffusion models (which means creating interfaces for managing Stable Diffusion models and LLM models)
2. Adding Celery for handling asynchronous tasks (integrating Celery, creating a task queue for generation, and integrating AI models into Delphos, our chatbot for Zulip)
3. Integrating the model engine into the chatbot
## 1. Getting started with LLM and Stable Diffusion models
Diving into the world of LLM and Stable Diffusion models may sound complex and intimidating, but in reality, it follows a pretty standard flow. Let’s break it down into simple, easy-to-follow steps:
**1. Model Hunting on Hugging Face:** Choose your own adventure by exploring the [Hugging Face model repository](https://huggingface.co/models?search=stable%20diffusion) for the model you want to use. Simply searching for models based on Stable Diffusion will yield more than a thousand models listed, so there is indeed a treasure trove of options available.
**2. Select and Script:** Once you’ve spotted the model that fits your needs, the next step is to create a Python script to run it. Generally, the model's card includes steps for running the model, making it easy enough to get started.
**3. Setting the Stage:** Now, it’s time to roll up your sleeves. This involves creating a Python environment, installing dependencies, writing the pipeline, and executing the code. Think of it as laying the groundwork for your project.
**4. Initial Setup and Download:** The first execution of your code brings your chosen model from the Hugging Face repository to the local machine and stores it in a directory as a cache mechanism.
**5. Quicker Access on Subsequent Uses:** When you call the model again, it’ll be much quicker. Since the model is already stored locally, the load time is reduced and your workflow will be sped up.
### Creating an interface for running Stable Diffusion models
If you take a closer look at the model cards for [StableDiffusion XL](https://huggingface.co/stabilityai/stable-diffusion-xl-base-1.0) and [Segmind Stable Diffusion](https://huggingface.co/segmind/SSD-1B), you’ll notice something interesting: despite their distinct features, the examples of model implementation bear a striking resemblance:
**Stable Diffusion XL**
```python
import torch
from diffusers import DiffusionPipeline
pipe = DiffusionPipeline.from_pretrained(
"stabilityai/stable-diffusion-xl-base-1.0",
torch_dtype=torch.float16,
use_safetensors=True,
variant="fp16"
)
pipe.to("cuda")
prompt = "An astronaut riding a green horse"
images = pipe(prompt=prompt).images[0]
```
**Segmind Stable Diffusion**
```python
import torch
from diffusers import StableDiffusionXLPipeline
pipe = StableDiffusionXLPipeline.from_pretrained(
"segmind/SSD-1B",
torch_dtype=torch.float16,
use_safetensors=True,
variant="fp16"
)
pipe.to("cuda")
prompt = "An astronaut riding a green horse"
neg_prompt = "ugly, blurry, poor quality"
image = pipe(prompt=prompt, negative_prompt=neg_prompt).images[0]
```
Let’s explore the process of image generation with both models, abstracted as follows:
**1. Initiating the Process**
Start by importing the necessary libraries to run the model; in this case, import the `torch` library for machine learning, and from the `diffusers` library, import the class in charge of running the model.
**2. Setting Up the Pipeline**
Next, create a pipeline instance (`pipe`) that acts as the engine running the model. This step involves feeding it the `model_id` from Hugging Face and choosing a `dtype` (either `float16` or `float32`). These choices influence not just the size of the model you download but also several other key parameters.
**3. Configuring Generation Parameters**
Now, it's time to get creative. Define the parameters that will guide the model in creating your image. These parameters are the ingredients in your recipe and include the following:
- Prompt: The textual description to guide your image.
- Negative Prompt: Instructions on what the image should avoid.
- Width and Height: The dimensions of your canvas, in pixels.
- Num Inference Steps: The number of iterations the model takes to refine its image.
- Guidance Scale: How strongly the prompt influences the final image.
- Num Images per Prompt: The variety of images to generate from a single prompt.
- Generator: A random number generator to initialize the image generation process.
**4. Bringing the Image to Life**
With everything set, let the pipeline work its magic. Execute it with your chosen parameters, and voila – your generated image emerges!
Given the similar steps mentioned above, let’s build an interface that will load and execute various models for dynamic image generation, simply by changing the configuration parameters:
```python
# diffusion/diffusion_base.py
from abc import ABC
from pathlib import Path
import diffusers
import torch
from models import ImageGenerationRequest
class StableDiffusionAbstract(ABC):
def __init__(
self, *,
model_id: str = "stabilityai/stable-diffusion-xl-base-1.0",
pipeline: str = "StableDiffusionXLPipeline",
scheduler: str = "DDPMScheduler",
):
self.generator = -1
# Get the model source, path for local model, model_id for hugin face remote model
self.local_model_path = Path("./models").joinpath(model_id)
self.model_source = (
self.local_model_path if Path(self.local_model_path).exists() else model_id
)
# Check to see if we have CUDA available via an NVidia GPU.
if torch.cuda.is_available():
print("PyTorch CUDA backend is available, enabling")
self.device = "cuda"
elif torch.backends.mps.is_available():
print("PyTorch Apple MPS backend is available, enabling")
self.device = "mps"
else:
print("PyTorch is Defaulting to using CPU as a backend")
self.device = "cpu"
# Import modules and pipelines
self.pipeline_import = getattr(diffusers, pipeline)
self.scheduler_import = getattr(diffusers, scheduler)
# Load the model and scheduler
self.pipeline = self.pipeline_import.from_pretrained(
pretrained_model_name_or_path=self.model_source,
torch_dtype=torch.float16,
use_safetensors=True,
variant="fp16",
)
self.pipeline.scheduler = self.scheduler_import.from_config(
self.pipeline.scheduler.config,
)
self.pipeline.to(self.device)
# Save the model locally if it doesn't exist
self.save_model()
def set_generator(self, generator: int):
self.generator = torch.Generator().manual_seed(generator)
def save_model(self):
if not Path(self.local_model_path).exists():
self.pipeline.save_pretrained(save_directory=self.local_model_path)
def generate(self, request: ImageGenerationRequest):
print(f"Generating images with Stable Diffusion: request: {request}")
self.set_generator(request.generator)
result = self.pipeline(
prompt=request.prompt,
width=request.img_size,
height=request.img_size,
num_inference_steps=request.num_inference_steps,
guidance_scale=request.guidance_scale,
num_images_per_prompt=request.num_images_per_prompt,
negative_prompt=request.negative_prompt,
generator=self.generator,
).images
print(f"Generation results: {len(result)}")
return result[0]
```
In our script, we’ve defined a `StableDiffusionAbstract` class, which serves as an interface for other classes to create models dynamically. Let’s peel back the layers of this class.
The `StableDiffusionAbstract` class takes three parameters: `model_id`, `pipeline`, and `scheduler`. The `model_id` corresponds to the model’s ID on Hugging Face, the `pipeline` is the operational core (the class responsible for running the model from the diffusers) and the `scheduler` - essentially a timekeeper - dictates the flow and execution of the model’s operations ([more info on schedulers here](https://huggingface.co/docs/diffusers/using-diffusers/schedulers)). The default model is StableDiffusionXL, but it’s flexible enough to adapt to any model you specify.
The ‘StableDiffusionAbstract’ class also has a neat trick up its sleeve - it sets the `model_source` location of the model weights. This is either the model’s ID on Hugging Face (if the model is new) or the local path where the model is stored (if the model is already downloaded).
Let’s move on to the `self.device`. This variable is where you determine the type of device behind your model: - `cuda` for those equipped with NVIDIA GPUs with CUDA support, `mps` for devices with an Apple M1 or M2 chip, and `cpu` for the standard setup. If resources are tight, you can still participate using`accelerate` and `xformers`, but keep in mind that this might negatively affect the performance and quality of your outcomes. For those needing more muscle, platforms like [Colab](https://colab.google) offer complimentary GPU support for your exploratory endeavours.
The `pipeline_import` variable imports the specific class from `diffusers` that will run the model specified in `model_id`. The scheduler is also imported and saved in the `self.scheduler_import` variable. Once these imports are done and all the necessary components are in place, your pipeline is ready to execute the diffusion model, and the dynamic scheduler (specified to run on a `self.device` type service) is assigned.
The `save_model` method ensures that the model's weights are neatly archived in the cache directory specified by the `self.local_model_path` variable. If you’re orchestrating this process with Docker, remember to set `local_model_path` as a [volume](https://docs.docker.com/storage/volumes) so that it doesn't get deleted every time the container is brought down.
Finally (for now), the `generate` method: this is what sets the stage for image generation, utilizing the algorithm's generator and running the image generation based on the parameters specified in the request object. Once the pipeline finishes the process generation, the method returns your newly generated image, reflecting the parameters you set.
The `generate` method works in tandem with a specialized actor, the `ImageGenerationRequest` type. This Pydantic object ensures that the parameters for the `StableDiffusion` pipeline are accurately defined and validated, providing a structured approach to your creative machinations. The schema that represents the parameters is:
```python
# diffusion/models.py
import random
from pydantic import BaseModel
def generate_random_number():
# Generate a random number between 0 and 10^10
random_number = random.randint(0, 10 ** 10)
return random_number
class ImageGenerationRequest(BaseModel):
model_handler: str = "xl"
prompt: str = "A beautiful cat in a sunset"
img_size: int = 768
num_inference_steps: int = 50
guidance_scale: int = 10
num_images_per_prompt: int = 1
negative_prompt: str = "bad, ugly"
generator: int = generate_random_number()
```
To put the pipeline to the test, you might feel tempted to directly instantiate the class with something like `generator = StableDiffusionAbstract()`. However, the true power of this class lies in its role as an interface, not just a standalone entity. In keeping with this philosophy, in this tutorial, we’re going to explore two distinct implementations of this interface: one to run the Stable Diffusion XL model (which is the default) and another to run the Segmind Stable Diffusion model.
```python
# diffusion/image_generation.py
from diffusion_base import StableDiffusionAbstract
class StableDiffusionXLText2Img(StableDiffusionAbstract):
def __init__(self):
super().__init__()
class SegmindStableDiffusionText2Img(StableDiffusionAbstract):
def __init__(self):
super().__init__(model_id="segmind/SSD-1B")
```
Now that we have our classes ready, it’s time to put our generators to the test. But hold your horses - first, we must ensure that all the necessary dependencies to run the script are in place. For this tutorial, we will use poetry as our package manager, but feel free to choose your preferred tool, be it pip, pipenv, or something else.
```shell
poetry add torch accelerate xformers diffusers tokenizers transformers pydantic
Poetry shell
```
Our testing stage is quite straightforward. We’re going to append a `__main__` function at the end of the file, to indicate how to use these implementations for image generation using diffusion models. Here’s how it goes: we start by crafting a request object with the desired prompt, then we create instances of the generators, and finally, we set the wheels in motion by calling the `generate` method on each one.
```python
# diffusion/image_generation.py
if __name__ == "__main__":
# Create request object with prompt
prompt = "An astronaut riding a green horse"
request = ImageGenerationRequest(prompt=prompt)
# Generate image with Stable Diffusion XL
sdxl = StableDiffusionXLText2Img()
image = sdxl.generate(request=request)
image.show()
# Generate image with Segmind Stable Diffusion
ssd = SegmindStableDiffusionText2Img()
image = ssd.generate(request=request)
image.show()
```
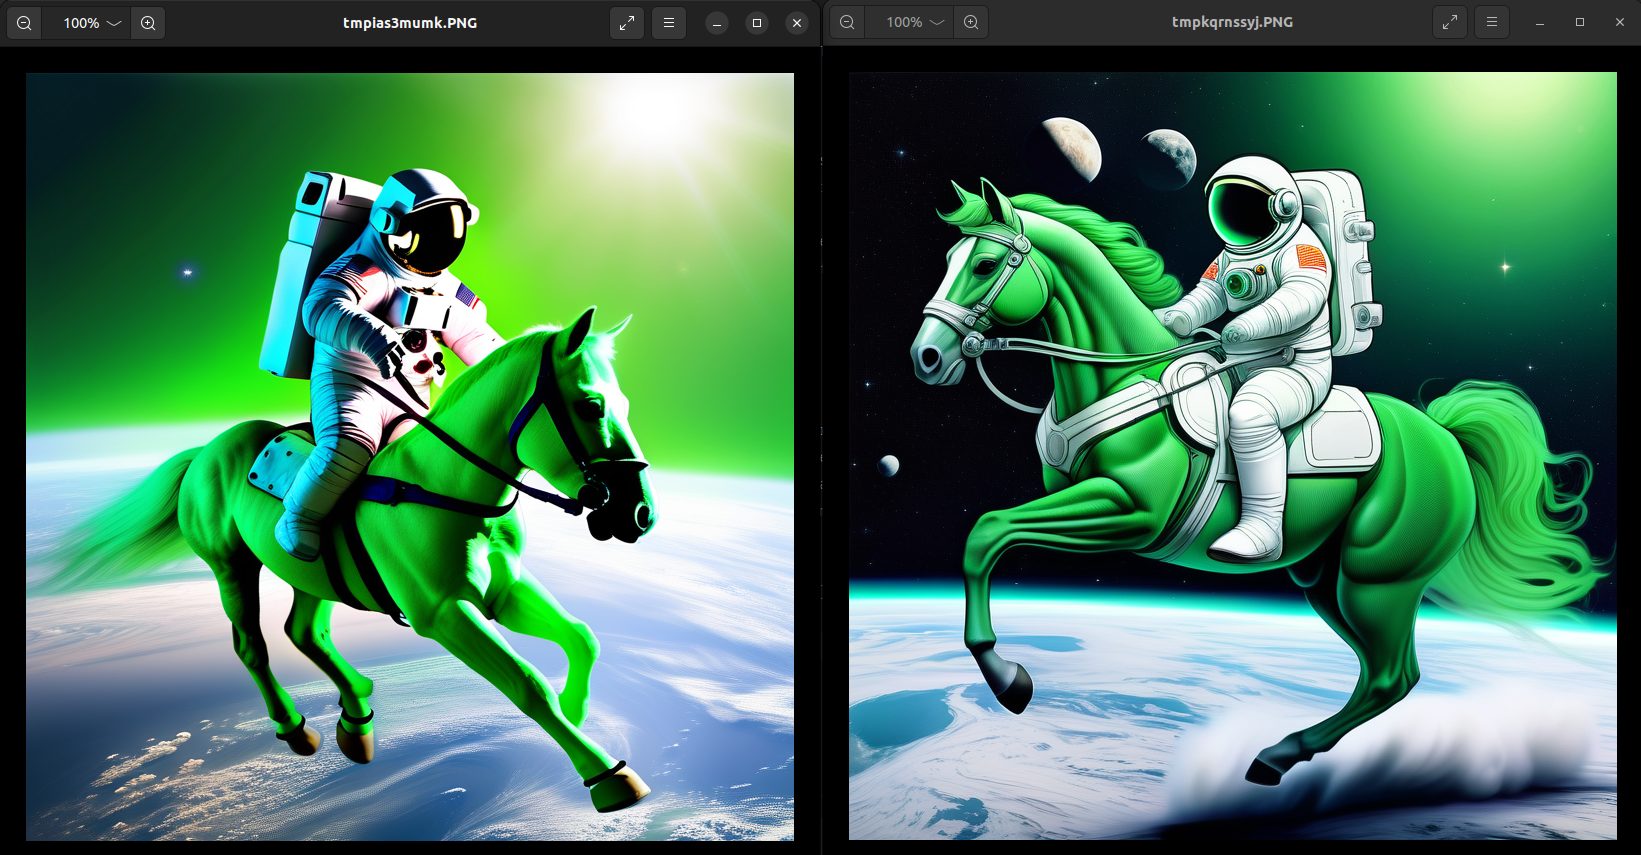
When you run the code in the command line with `python3 image_generation.py`, two images will appear, each generated by a different model. The image on the left corresponds to the SD XL model, and the image on the right corresponds to the SSD model.
<center>
</center>
A quick heads-up: if you bump into any dependency hiccups while generating images, these are the versions that were in use by poetry as of the date this article was written.
```shell
python = "^3.10"
torch = ">=2.0.0, !=2.0.1, !=2.1.0"
accelerate = "^0.24.1"
xformers = "0.0.19"
diffusers = "^0.22.3"
tokenizers = "^0.14.1"
transformers = "^4.35.0"
pydantic = "^2.4.2"
```
But our journey doesn’t end here. In the previous example, we only explored two models for image generation following the Text2Img strategy, but the script can easily be extended to add pipelines for Img2Img, Inpainting, Outpainting, Upscaling, ControlNet, LoRa, etc. For example, let’s take a peek at how we can adapt it for Inpainting.
```python
# diffusion/image_generation.py
class ImageGenerationRequest(BaseModel):
# other props
image: Image = None
mask: Image = None
class StableDiffusionXLInpainting(StableDiffusionAbstract):
def __init__(self):
super().__init__(
model_id="stabilityai/stable-diffusion-xl-inpainting",
pipeline="AutoPipelineForInpainting",
)
def generate(self, request: ImageGenerationRequest):
print(f"Inpainting with stable diffusion: request: {request}")
self.set_generator(request.generator)
result = self.pipeline(
prompt=request.prompt,
width=request.img_size,
height=request.img_size,
num_inference_steps=request.num_inference_steps,
guidance_scale=request.guidance_scale,
num_images_per_prompt=request.num_images_per_prompt,
negative_prompt=request.negative_prompt,
generator=self.generator,
image=request.image,
mask_image=request.mask,
).images
print(f"Generation results: {len(result)}")
return result[0]
```
All it took was integrating new fields into the `ImageGenerationRequest` schema, and overwriting the `generate` function to add the base image and mask needed for the inpainting process.
To give you a broader picture, here’s a table listing some of the models and pipelines that can be run with the previous script:
<center>
| **Model** | **Pipeline** |
| -------- | -------- |
| stabilityai/stable-diffusion-2 | StableDiffusionPipeline |
| prompthero/openjourney-v4 | StableDiffusionPipeline |
| stabilityai/stable-diffusion-xl-base-1.0 | StableDiffusionXLPipeline |
| stabilityai/stable-diffusion-xl-refiner-1.0 | StableDiffusionXLImg2ImgPipeline |
| stabilityai/stable-diffusion-xl-base-1.0 | StableDiffusionXLInpaintPipeline |
</center>
### Creating an interface for running LLMs
Just as we navigated the realm of diffusion models, we now set sail towards the vast ocean of LLMs. These models, focused on Natural Language Processing tasks, exhibit several common behaviours. So, naturally, our next quest is to create an interface that allows our system to abstract the behaviour of LLM models.
```python
# llm/llm_base.py
from abc import ABC
from pathlib import Path
import torch
import transformers
from models import TextGenerationRequest
class TextGenerationAbstract(ABC):
def __init__(
self, *,
model_id: str = "THUDM/chatglm3-6b",
model_pipeline: str = "AutoModel",
tokenizer: str = "AutoTokenizer",
):
# Models are saved in the models folder
self.cache_dir = Path("./models")
if torch.cuda.is_available():
print("PyTorch CUDA backend is available, enabling")
self.device = "cuda"
elif torch.backends.mps.is_available():
print("PyTorch Apple MPS backend is available, enabling")
self.device = "mps"
else:
print("PyTorch is Defaulting to using CPU as a backend")
self.device = "cpu"
# Load the pipeline
self.pipeline_import = getattr(transformers, model_pipeline)
self.pipeline = self.pipeline_import.from_pretrained(
pretrained_model_name_or_path=model_id,
trust_remote_code=True,
cache_dir=self.cache_dir,
)
self.pipeline.to(self.device)
# Load the tokenizer
if tokenizer:
self.tokenizer_import = getattr(transformers, tokenizer)
self.tokenizer = self.tokenizer_import.from_pretrained(
pretrained_model_name_or_path=model_id,
trust_remote_code=True,
cache_dir=self.cache_dir,
)
def generate(self, request: TextGenerationRequest):
inputs = self.tokenizer(request.prompt, return_tensors="pt")
outputs = self.pipeline(**inputs, max_length=200)
text = self.tokenizer.batch_decode(outputs)[0]
return text
```
Like the Stable Diffusion example, the `TextGenerationAbstract` class emerges as our guide for text generation using LLM models. It's quite the versatile toolkit – it requires the `model_id` from Hugging Face, the `pipeline` which refers to the class from the `transformers` library running the model, and sometimes, the `tokenizer` for managing the model's associated language processing. The class is configured by default to run the `gpt2` model, which can generate text, translate languages, write content, and answer questions.
Within the TextGenerationAbstract class, our first step is to specify a directory for caching the Hugging Face models. Then, we decide which type of device will take the helm - be it NVIDIA, MPS, or CPU (it's the same as StableDiffusionAbstract). Next, the pipeline is imported dynamically, and finally, we set the pipeline to run in `self.device`. And, in cases where a tokenizer is needed, it’s ready to be summoned from the `transformers` library.
The `generate` method is where things start to take shape. It takes as a parameter an object of type `TextGenerationRequest` that includes the prompt for generation. Then, it uses the tokenizer to convert the entered text into a format suitable for the model to understand, runs the generation with the model using the pipeline, decodes the model's results with the tokenizer, and finally returns the resulting text.
Since the behaviour of the models at the time of generation can vary slightly, the `generate` method can be overwritten in the implementation class if necessary.
Delving into specifics, the `generate` function collaborates with the `TextGenerationRequest` type, which has the following fields:
```python
# llm/models.py
from pydantic import BaseModel
class TextGenerationRequest(BaseModel):
model_handler: str = "chat_glm"
prompt: str
```
Let's see how it would look to implement some of the classes to run the language models `gpt2`, `microsoft/phi-1_5`, and `THUDM/chatglm3-6b`:
```python
# llm/text_generation.py
fromm llm_base import TextGenerationAbstract
class GPT2TextGeneration(TextGenerationAbstract):
pass
class Phi15TextGeneration(TextGenerationAbstract):
def __init__(self):
super().__init__(
model_id="microsoft/phi-1_5",
model_pipeline="AutoModelForCausalLM",
tokenizer="AutoTokenizer",
)
class ChatGLMTextGeneration(TextGenerationAbstract):
def __init__(self):
super().__init__(
model_id="THUDM/chatglm3-6b",
model_pipeline="AutoModel",
tokenizer="AutoTokenizer",
)
# Overwrites the generate function
def generate(self, request: TextGenerationRequest):
model = self.pipeline.eval()
response, _ = model.chat(self.tokenizer, request.prompt, history=[])
return response
```
Finally, the testing phase: to test the functionality of the previously created classes, we’ll define a `__main__` function at the end of the file. Here, we’ll create a request with a specific prompt, initiate each class instance, and then apply the `generate` method.
```python
# llm/text_generation.py
if __name__ == "__main__":
# Create request object with prompt
prompt = "What is an LLM?"
request = TextGenerationRequest(prompt=prompt)
# Generate text with ChatGLM
chat_glm = ChatGLMTextGeneration()
response = chat_glm.generate(request=request)
print(f"ChatGLM response: {response}")
# Generate text with Phi-1.5
phi_15 = Phi15TextGeneration()
response = phi_15.generate(request=request)
print(f"Phi-1.5 response: {response}")
```
Before initiating the testing, there's just one more task to address: integrating new dependencies vital for the LLM models. We’ll add them using poetry:
```shell
poetry add sentencepiece einops
```
With these dependencies in place, we’re set to run the script. By executing `python3 llm_base.py` in the command line, we can see each of the models responding to our prompts.
```python
----------------------------------------------------------------------------------
GPT2 response: What is python?
Python is a programming language that is used to create and manipulate data.
----------------------------------------------------------------------------------
Phi-1.5 response: What is python?
Python is a programming language that is used to create software applications.
----------------------------------------------------------------------------------
ChatGLM response: Python is a high-level, interpreted programming language
that is widely used for web development, scientific computing, data analysis,
artificial intelligence, and many other purposes.
It is known for its simplicity and readability, making it a great language
for beginners to learn. Python has a large and active community, and there
are many resources available to help you learn and use it effectively.
----------------------------------------------------------------------------------
```
Similarly, for those interested in exploring the scope of our script, we’ve prepared a small list of some of the models and pipelines that are compatible with our approach:
<center>
| Model | Pipeline | Tokenizer |
| -------- | -------- | -------- |
| google/flan-t5-large | T5ForConditionalGeneration | T5Tokenizer |
| facebook/bart-large | BartForConditionalGeneration | BartTokenizer |
| Helsinki-NLP/opus-mt-en-roa | MarianMTModel | MarianTokenizer |
| hf-internal-testing/tiny-random-gptj | GPTJForCausalLM | AutoTokenizer |
| openai-gpt | OpenAIGPTLMHeadModel | AutoTokenizer |
</center>
The above wraps up our section on the implementation of the scripts to run the models. Remember, however, that this was just to show the inner workings of these models and the preparations necessary for their effective use. The journey now continues as we move towards integrating this technology into the Zulip bot, enhancing our chatbot with some fancy-schmancy AI capabilities.
## 2. Adding asynchronous task management
As we delve deeper into enhancing our bot with AI capabilities, we encounter a critical aspect of real-world applications: managing asynchronous tasks effectively. Although our current model engine is quite the multitasker, handling multiple models for image and text generation, it's crucial to acknowledge the hurdles we need to clear when shifting to a production setting.
Let’s break this down:
- **Generation time:** A diffusion model can take anywhere from 10 seconds to over 30 seconds to generate an image; this could even extend to minutes the first time, while the model downloads.
- **Size matters:** generative models are big, typically ranging from 3GB to more than 12GB. You’ll need a hefty amount of RAM, whether on the CPU or GPU, to run just one generation.
- **The Power Play:** The generation time is directly proportional to the device’s power. A 32 GB vRAM NVIDIA V100 GPU will outperform a 12GB RTX 3060, capable of churning out more results in less time.
- **Request Configuration:** The configuration of your generation requests, like `num_inference_steps`, `guidance_scale`, and `num_images_per_prompt`, will affect how much computing power and time you’ll need. In the case of image generation, more computational power and time will be necessary to complete the task.
- **Handling the crowd:** In a real-world scenario, multiple users might be firing requests at your models all at once. To keep things orderly and efficient, we either need a queuing system to process these tasks or an auto-scaling system to adjust the number of GPUs based on demand.
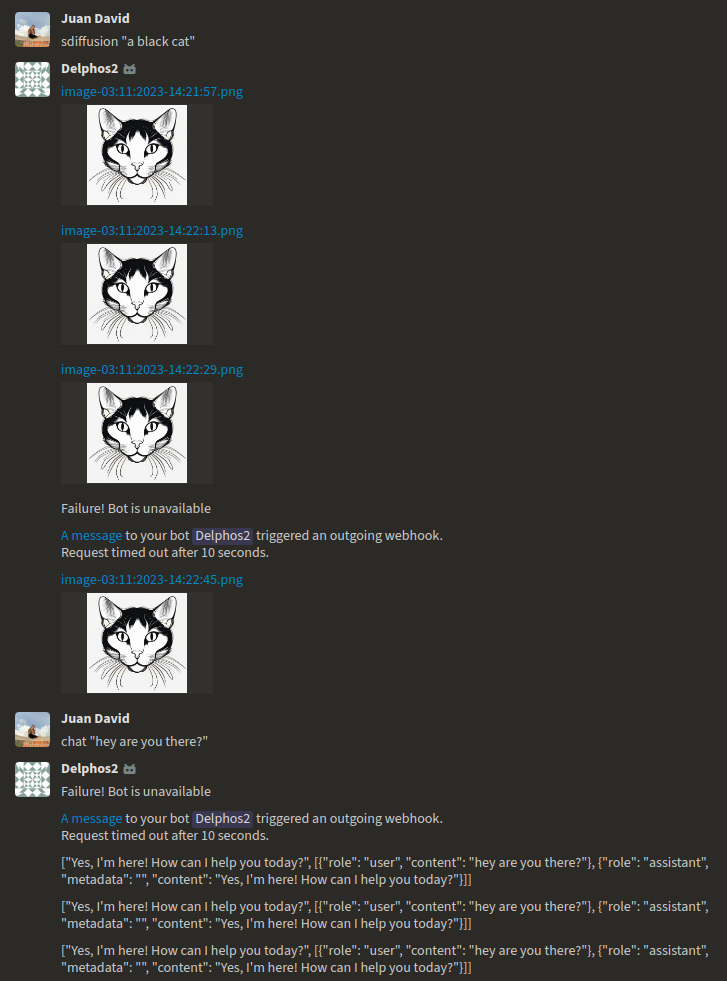
Now, let's talk about our Zulip bot. Zulip has its own way of handling messages between the client and server. One rule is the ten-second timeout for requests. If our bot doesn't reply within those ten seconds, the request gets dropped, and the communication between the client and server is lost. Additionally, if Zulip doesn’t hear back within a certain timeframe, it starts sending follow-up requests, which could lead to scenarios like:
<center>
</center>
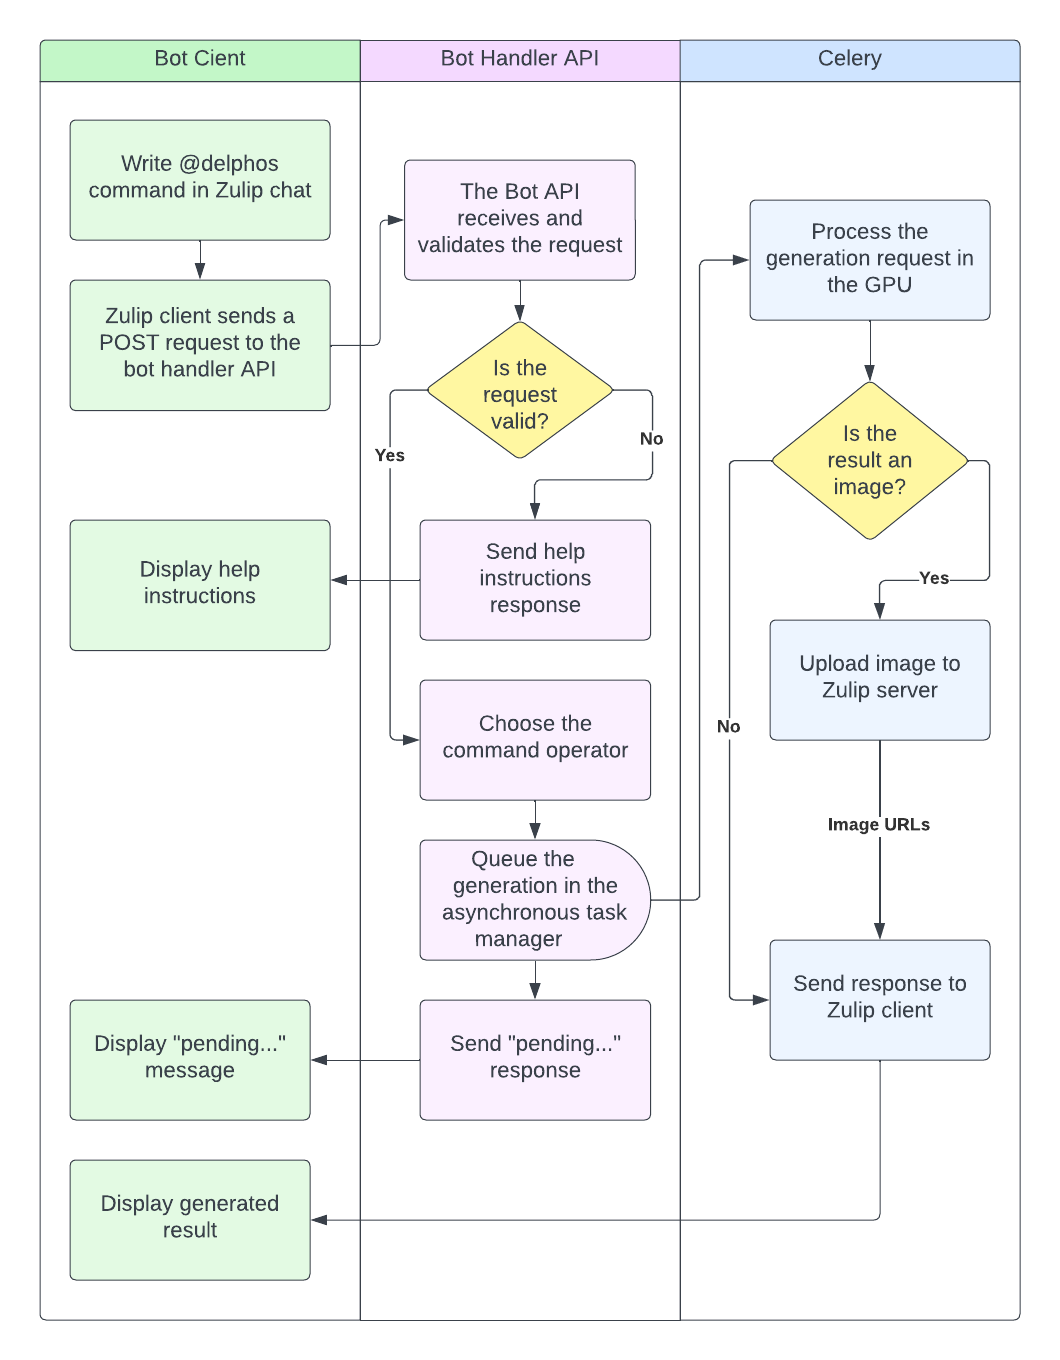
But how to prevent this unwanted behaviour? How to enhance our bot's functionality? By introducing an asynchronous task manager into our system. This ensures our bot can queue requests, process generations, and then, once it's ready, deliver the results back to the user without a hitch. We're essentially aiming to set up a flow that handles tasks efficiently and keeps everything running smoothly, as illustrated below:
<center>
</center>
When it comes to asynchronous task management in Python, there's a range of libraries we could choose from. On one end, we have simpler systems like Celery, and on the other, more complex ones like ray.io. For our current needs, we’ll start with Celery because it's straightforward and user-friendly. No worries, though - we plan to discuss Ray Serve for managing multiple SD and LLM models in an upcoming article.
Celery serves as an asynchronous task queue/job queue system used to run tasks (defined as functions) in the background. This allows for running heavy tasks that can take a long time in parallel and are separate from the application’s main thread. You can pair Celery with various messaging systems like RabbitMQ, Amazon SQS, etc., but for simplicity’s sake, we’ll use Redis.
First things first, let’s install the library into our project.
```shell
$ poetry add 'celery[redis]'
```
Then, we’re going to use Docker to launch a container with a Redis image, setting it up as a messaging system and backend in our app.
```shell
$ docker run --rm --name some-redis -p 6379:6379 redis:latest
```
Now, in a `celery` folder, we’ll create an `app.py` file. This is where we define the Celery app and add the necessary configurations.
```python
# celery/app.py
import os
from celery.app import Celery
redis_url = os.getenv("REDIS_URL", "redis://localhost:6379")
app = Celery(__name__, broker=redis_url, backend=redis_url)
app.conf.task_serializer = "pickle"
app.conf.result_serializer = "pickle"
app.conf.accept_content = ["application/json", "application/x-python-serialize"]
````
Initially, we’ll specify the Redis URL and create the Celery app instance, which will handle both the broker for message passing and the backend for results storage. We’ll also specify `pickle` as our serializer, making it easier to pass Pydantic objects like `TextGenerationRequest` and `ImageGenerationRequest`.
To wrap things up, we’ll set up our asynchronous task functions that Celery will handle in the background. With Celery, making an asynchronous task is pretty straightforward: it's enough to define a function and adorn it with the `@app.task` decorator.
```python
# celery/task.py
def map_text_handler_to_model(handler: str):
try:
models = {
"chat_glm": ChatGLMTextGeneration,
"phi_15": Phi15TextGeneration,
}
return models[handler]
except KeyError:
return ChatGLMTextGeneration
def map_handler_to_model(handler: str):
try:
models = {
"xl": StableDiffusionXLText2Img,
"ssd": SegmindStableDiffusionText2Img,
}
return models[handler]
except KeyError:
return SegmindStableDiffusionText2Img
@app.task
def text_generation_task(*, request: TextGenerationRequest, message: Message):
model = map_text_handler_to_model(request.model_handler)()
response = model.generate(request=request)
print(response)
# send response to the client
return response
@app.task
def image_generation_task(*, request: ImageGenerationRequest, message: Message):
model = map_image_handler_to_model(request.model_handler)()
response = model.generate(request=request)
response.show()
# upload image
# send response to the client
return image_url
````
As we dig deeper into the functionality of our bot, we come across the task.py file, which houses a couple of auxiliary functions: `map_text_handler_to_model` and `map_image_handler_to_model`. These are our friendly neighborhood guides, helping link the generator classes we previously created to a specific tag. This tag is what we pass externally through the `model_handler` request field. And just to keep things straightforward, we default to the Chat GLM model for text and Stable Diffusion XL for image generation.
Now, let’s take a moment to spotlight the `text_generation_task` function: decorated with `@app.task`, this function takes on the responsibility of running text generation with LLM models in the background. How? First, it picks the model based on the `model_handler` parameter received from the chatbot; then, it calls the `generate` method of the generator and prints the response. The cool part? The response gets stored in the Redis backend and can be fetched later using `AsyncResult(task_id)`. Just a heads-up, though: to integrate this with the chatbot, we’ll need to tweak this task a bit to send the result back to the Zulip client. But we’re going to save that for the next section.
Moving on to the `image_generation_task`, this function is the mastermind behind processing image generation with Stable Diffusion models. It follows a similar pattern: selecting a model, running the `generate` method to produce the images, and then processing the results. For the chatbot scenario, we’ll need to upload the image to the Zulip server-client first and then share the image URL to the chat.
With everything in place, it’s time to awaken our asynchronous task queue. Open up a new terminal with the following command:
```shell
celery --app=celery.app.app worker --concurrency=1 --loglevel=DEBUG
````
The process of queuing up tasks is painless. Just call either of the task functions with `.delay()`. For instance, for text generation, you'd do something like this:
```python
request = TextGenerationRequest(prompt="hey, are you there?")
text_generation_task.delay(request=request)
```
For image generation, similarly:
```python
request = ImageGenerationRequest(prompt=”a black cat”)
image_generation_task.delay(request=request)
```
## 3. Integrating the model engine into the chatbot
So far, so good! We've successfully created a generative model engine that runs locally and responds to commands. The next step? Transforming this engine into a dynamic service provider for external clients, such as web applications or chatbots, which means integrating this with the Zulip platform.
First, let’s get our environment set up for integrating our model engine into the Delphos chatbot. Start by cloning the Delphos repository on the [Delphos2 branch](https://github.com/juanArias8/zulip-delphos-bot/tree/delphos2) and preparing your development environment by installing the dependencies and activating the shell.
```shell
$ git clone –branch delphos2 git@github.com:juanArias8/zulip-delphos-bot.git
$ cd zulip-delphos-bot
$ poetry install
$ poetry add torch accelerate xformers diffusers tokenizers transformers ‘celery[redis]’
$ poetry shell
```
With the environment ready, it’s now time to enhance your bot with AI models.
### Register the commands
Our first step in the integration process involves adding two new commands to our chatbot’s repertoire. To do this, we need to update the `Instruction` class so that it contains the two new bot commands.
```python
# src.models.schemas.py
class Instruction(str, Enum):
...
CHAT = "chat"
DIFFUSION = "diffusion"
```
### Add the schemas
Remember the `TextGenerationRequest` and `ImageGenerationRequest` schemas that we looked at earlier? It's time to add them to the schemas file. Keeping these schemas in one place helps maintain order and standardization in our project.
```python
# src.models.schemas.py
class TextGenerationRequest(BaseModel):
model_handler: str = "chat_glm"
prompt: str
class ImageGenerationRequest(BaseModel):
model_handler: str = "xl"
prompt: str = "A beautiful cat in a sunset"
img_size: int = 768
num_inference_steps: int = 50
guidance_scale: int = 10
num_images_per_prompt: int = 1
negative_prompt: str = "bad, ugly"
generator: int = generate_random_number()
image: Image = None
mask: Image = None
```
### Add the help messages
To make the bot more intuitive and to get an idea of how the commands work, we’re going to define help messages for the new commands. Add a help message for the diffusion command and another for the chat command. Finally, register both these commands into the bot’s global help message.
```python
# src.utils.constants.py
DIFFUSION_HELP = """
## Diffusion
Generates an image with stable diffusion based on the <prompt> and uploads it to the topic.
Example: @delphos image "a flower made of stars"
PM Example: image "a flower made of stars"
You can choose between the following models:
- Stable Diffusion XL: @delphos image "a flower made of stars"
- Segmind Stable Diffusion: @delphos image "a flower made of stars" ssd
"""
CHAT_HELP = """
## Chat
Generate text based on the <prompt> and upload it to the topic.
Example: @delphos chat "write a poem about Colombia"
PM Example: chat "a flower made of stars"
You can choose between the following models:
- THUDM/chatglm3-6b: @delphos chat "a flower made of stars"
- microsoft/phi-1_5: @delphos chat "a flower made of stars" phi_15
"""
HELP_MESSAGE = f"""
...
{DIFFUSION_HELP}
{CHAT_HELP}
...
"""
```
### Add the operators
We’ll also add two new operators to our bot, one to handle the "diffusion" command and another to add the "chat" command. As you may recall, an operator is just a handler class for a command. This class performs validations, calls the data provider, and runs the necessary logic to generate a result.
Here’s a sneak peek at the operator for the "diffusion" command:
```python
# src/operators/diffusion.py
from typing import List
from src.integrations.celery.task import image_generation_task
from src.models.schemas import Command, ImageGenerationRequest
from src.utils.constants import DIFFUSION_HELP
class DiffusionOperator:
def get_response(self, command: Command) -> List[str]:
# Validate the command and build the params
if len(command.params) == 0:
return [DIFFUSION_HELP]
prompt = command.params[0]
model_handler = command.params[1] if len(command.params) > 1 else "xl"
# Build the request and send it to the task queue
request = ImageGenerationRequest(prompt=prompt, model_handler=model_handler)
image_generation_task.delay(request=request, message=command.message)
return ["Generating image..."]
```
And now, a look at the "chat" command operator:
```python
# src/operators/chat.py
from typing import List
from src.integrations.celery.task import text_generation_task
from src.models.schemas import Command, TextGenerationRequest
from src.utils.constants import ERROR_HELP
class ChatOperator:
def get_response(self, command: Command) -> List[str]:
# Validate the command and build the params
if (
not command.instruction
or command.instruction != "chat"
or not len(command.params) > 0
):
return [ERROR_HELP]
prompt = command.params[0]
model_handler = command.params[1] if len(command.params) > 1 else "chat_glm"
# Build the request and send it to the task queue
request = TextGenerationRequest(prompt=prompt, model_handler=model_handler)
text_generation_task.delay(request=request, message=command.message)
return ["Generating text..."]
```
Both operators follow a similar pattern. They first validate the command, ensure there’s a prompt in the request, then assemble the parameters for the `generate` method before sending off generation requests to the task queue. They also return a "generating..." message to the user to show that the task has been queued.
### Update Celery tasks to send results
We’ve already set up two asynchronous tasks for text and image generation, but there’s still a piece missing: sending the response back to the Zulip client. For this, we’ll use the `bot_handler` from Zulip that we set up in [Part 1](https://monadical.com/posts/zulip-ia-bot-1.html) of this series. With the `bot_handler`, we can use the `send_reply` function to deliver the response content directly to the user.
```python
from src.config.zulip_bot import load_bot_handler
...
zulip_client = ZulipIntegration()
bot_handler = load_bot_handler()
# other code
@app.task
def text_generation_task(*, request: TextGenerationRequest, message: Message):
model = map_text_handler_to_model(request.model_handler)()
response = model.generate(request=request)
if message is not None:
bot_handler.send_reply(message, response)
return response
@app.task
def image_generation_task(*, request: ImageGenerationRequest, message: Message):
model = map_handler_to_model(request.model_handler)()
response = model.generate(request=request)
image_url = zulip_client.upload_image_file_to_zulip(
filename=get_image_file_name(), image=response
)
if message is not None:
bot_handler.send_reply(message, image_url)
return image_url
```
The `image_generation_task` function uses the method `upload_image_file_to_zulip` from the `ZulipIntegration` class, which uploads a `PIL.Image` image to Zulip's file server and returns a URL in markdown format. This URL is then sent to the Zulip chat. It also uses `get_image_file_name` to create a filename for the image, which makes a string like `image-timestamp.png`.
Here’s how both functions are implemented:
```python
# src/integrations/zulip/zulip_client.py
import io
class ZulipIntegration:
def __init__(self):
self.client = Client(
email=settings.bot_email,
api_key=settings.bot_key,
site=settings.bot_site,
)
def upload_image_file_to_zulip(self, filename: str, image: Any) -> Union[str, None]:
buf = io.BytesIO()
image.save(buf, format="png")
byte_im = buf.getvalue()
with io.BytesIO(byte_im) as fstream:
fstream.name = filename
result = self.client.upload_file(fstream)
uri = result.get("uri")
return f"[{filename}]({uri})" if uri else None
# src.utils.py
def get_image_file_name():
now = datetime.now()
dt_string = now.strftime("%d:%m:%Y-%H:%M:%S")
return f"image-{dt_string}.png"
```
### Playing around with the new features
With all the pieces in place, it's now time to run the entire project and see our chatbot in action.
1. Run the Delphos bot server locally.
```shell
$ python3 server.py
```
2. Launch a Redis image for Celery’s message passing and result storage.
```shell
$ docker run --rm --name some-redis -p 6379:6379 redis:latest
```
3. Run our Celery app for queuing asynchronous tasks.
```shell
$ celery --app=src.integrations.celery.task.app worker --concurrency=1 --loglevel=DEBUG
```
4. Expose our server to the internet using ngrok.
```shell
$ ngrok http 8000
```
5. Update the endpoint URL field in **Manage bot** on your [Zulip domain](https://zulip.your-domain.com/#settings/your-bots) with the URL from [ngrok](https://ngrok.com).
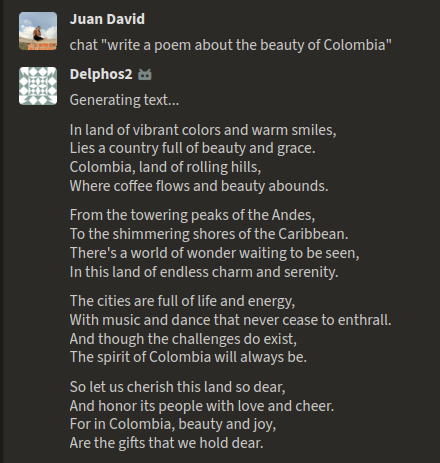
Now - the moment of truth! Test out the models in your chatbot! Send a private message to **@delphos** in Zulip, using the chat command for LLM models or diffusion for Stable Diffusion models. Just give it a prompt and see what your bot generates.
**Testing the bot**
<center>
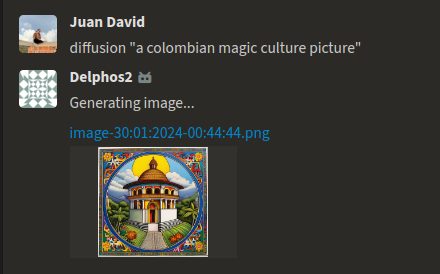
</center>
## Conclusion
And there we have it! What started off as a simple exploration of Zulip bots has turned into an odyssey through the world of generative AI models. We've navigated the integration of these advanced models with real-world applications, making AI applications not just smart, but also approachable and user-friendly.
Our bot stays efficient, even under the heavy computational load of the generative models. This is because we have Celery as our secret ingredient, keeping the bot agile, responsive, and capable of handling multiple requests easily, while coupled with task queues and the Redis backend.
Flexibility's been key, too. We've made our bot a bit of a jack-of-all-trades, easily switching between models for text, images, code, or even music, based on what's needed.
In essence, we've built more than just a task-oriented bot. It's a playground for future AI communication projects, opening doors for some really cool applications. It's a starting point for any developer wanting to blend AI into their toolkit.
We're excited about the potential of this project, like sharpening our models for even better results or adding new features and playing with new AI concepts. We're standing on a solid foundation that we can build on, and the future of AI and chatbots is promising. The fusion of AI and chatbots, as we’ve shown in this series, has the potential to transform how we interact with technology, making AI more accessible and functional for users across various domains.
Juan David Arias
is a Full-stack dev/PM of Monadical