<center>
# Ramping up on the Solana phone: Crypto for mobile
*Written by [Juan David Arias](https://github.com/juanArias8) and [Jose Benitez](https://twitter.com/yojosebenitez). Originally published 2022-09-06 on the [Monadical blog](https://monadical.com/blog.html).*
</center>
When we heard about the [upcoming launch](https://solanamobile.com/) of Solana Mobile, we were intrigued. Like the blockchain developers that we are, the opportunity to develop web3 based applications for mobile devices with hardware backed keys is revolutionary. For us, this opportunity means that we’ll be able to reach a larger number of users, we’ll have the possibility to enrich our applications with the multiple mobile sensors (camera, gyroscope, fingerprint scanner, accelerometer, etcetera), and we’ll extend the interactions of our customer’s communities using QR codes, bluetooth or NFC tags.
<h2>Solana Mobile Stack and Saga</h2>
Solana Mobile has two key parts to it. It has a new Android device called [Saga](https://solana.com/news/saga-reveal) and the [Solana Mobile Stack (SMS)](https://solanamobile.com/sms).
The most relevant feature about Saga is that it comes with an integrated [Secure Element](https://www.rambus.com/blogs/what-is-a-secure-element) microchip. This chip is designed to secure confidential information and cryptographic data at the hardware level. It only allows interaction with trusted applications and has its own operating system.
In Solana Mobile, this means that your wallets will never directly interact with your private keys, and specialized hardware protects them from malicious software while handling transactions. [AES encryption](https://www.geeksforgeeks.org/advanced-encryption-standard-aes/) also keeps seeds extra secure and protects against forensic attacks.
SE provides the same level of security as hardware wallets (HW wallets also use a secure element chip) but with the UI/UX of a mobile phone that people are already used to.
<h2>Solana Mobile Stack (SMS)</h2>
Now that we’ve learned about the hardware, let's take a look at the software components. The Solana Mobile Stack is a software development kit (SDK) which, when complete, will consist of:
- [Mobile wallet adapter](https://github.com/solana-mobile/mobile-wallet-adapter): A protocol specification for connecting apps to Wallets on mobile devices.
- [Seed Vault](https://github.com/solana-mobile/seed-vault-sdk): A service system that provides secure key custody to Wallet apps by integrating with the secure element microchip.
- [Solana Pay for Android](https://solanapay.com): A Solana protocol that allows easy incorporation of payment methods using SOL and SPL tokens within applications. This allows users to use URLs, QR codes, NFC tags, messages, and browsers to carry out transactions through the Solana blockchain.
- Solana dApp Store: An alternative app distribution system intended for publishing solana mobile apps. It will be available in the future.
The way this set of tools works is as follows: a developer creates a Decentralized App [dApp](https://www.coindesk.com/learn/what-is-a-dapp-decentralized-apps-explained) for Android using web3 and the Solana libraries. Once the dApp is finished, the developer can publish it in the Solana dApp store. Then, any interested users will be able to install the dApp into their Saga device and start using it.
Using a dApp means that the user is interacting in some way with a decentralized system such as the Solana blockchain. These dApps will use a wallet adapter that communicates with a wallet provider like Phantom, Sollet, or others. In turn, the wallet provider will communicate to the Seed Vault service that is responsible for ensuring that the user's keys are stored securely on the secured element microchip. This microchip receives a payload sent by the upper layers and signs it with the private key. It then sends the signed payload back to the wallet provider which will validate the signature against the Solana ledger. Finally, it will send the transaction to the blockchain and confirm it.
Here’s a somewhat detailed guide on how we set up our development environment, and the process of running the examples for a barely new Solana Mobile Stack. This guide is aimed at people who are interested in Android development, crypto for mobile, web3, and of course, the Solana Mobile Stack (SMS).
<h2>Setting up the environment for Solana Mobile Stack (SMS)</h2>
<h3>Step 1: Install Android Studio</h3>
At the moment, the SMS is only available on the Android platform. So, you’ll first need to install the Android Studio on your computer. To do this, go to https://developer.android.com/studio and follow the instructions specific to your operating system.
We recommend that you use Android Studio because it’s the official IDE for Google's Android OS. It includes direct support for Java and Kotlin. It gives options to build apps, generate APKs and [AABs](https://developer.android.com/guide/app-bundle), and distribute applications or modules. It also has automatic help tips, good documentation, and a powerful editor to build interfaces.
<h3>Step 2: Get the code and load it in Android Studio</h3>
Because the SMS is still under development, there’s no final or well-established SDK. But, even with the limited content that’s available, it’s still possible to get started in this new world and explore the main concepts. There are some implementation examples for Android devices using Kotlin, Java and React Native. Solana labs has disposed of an initial version of the Mobile Wallet Adapter component of the stack, which includes the tools and examples we’re about to test. So, to get into it, we’ll first clone the [Solana mobile-wallet-adapter](https://github.com/solana-mobile/mobile-wallet-adapter) repository on our computer.
```shell
mkdir solana-phone
cd solana-phone
git clone https://github.com/solana-mobile/mobile-wallet-adapter
```
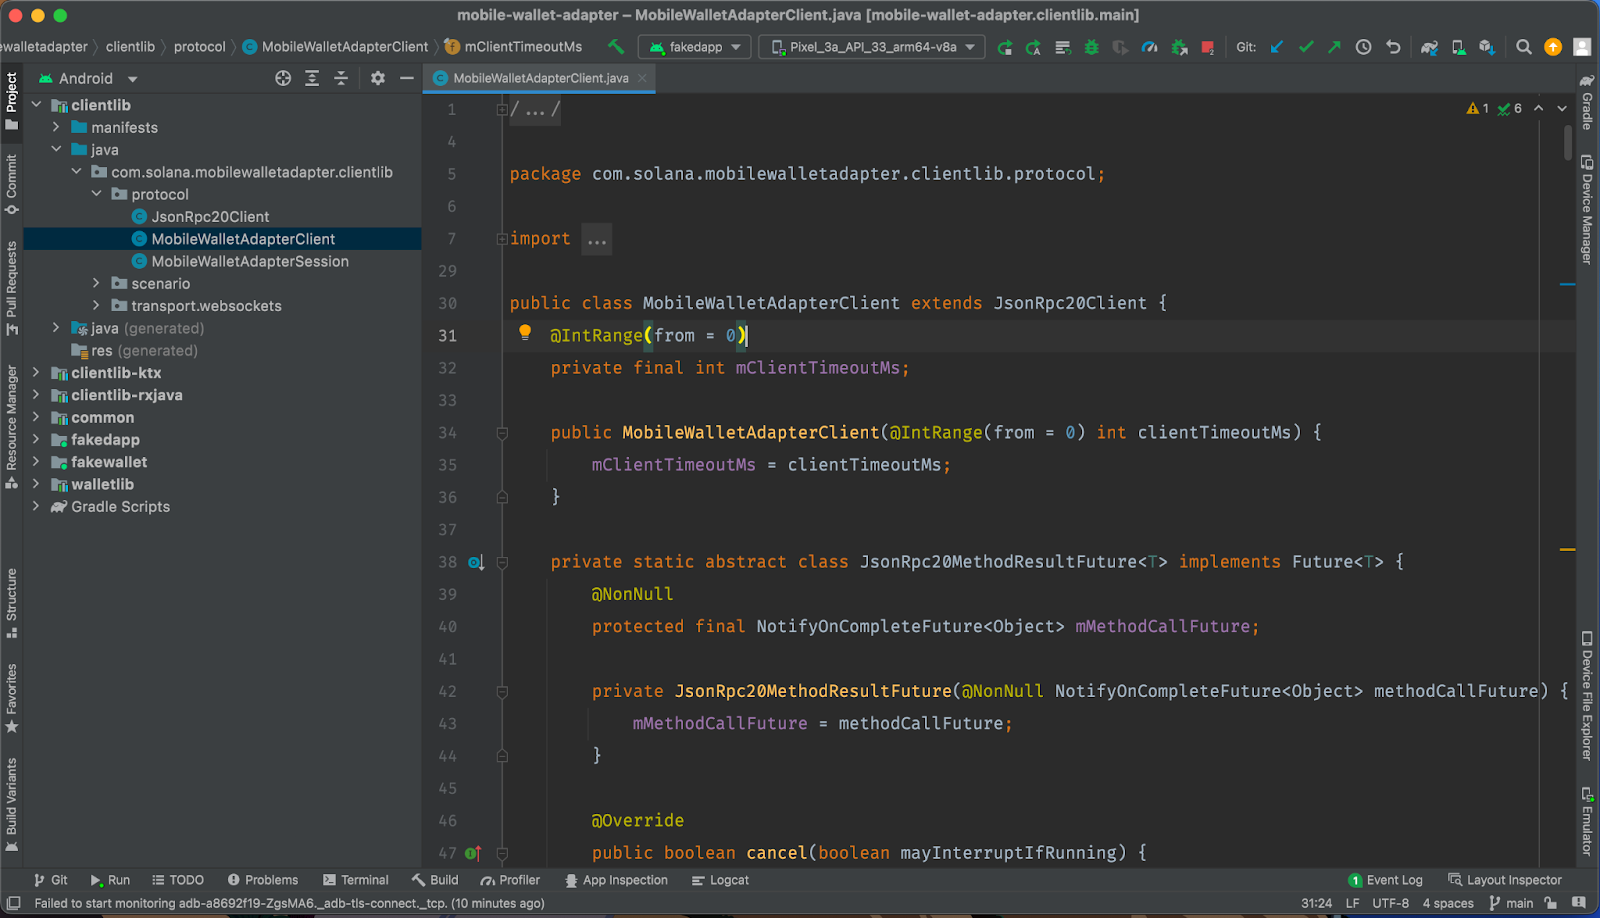
Now, let’s run Android Studio. From the welcome view, click the “Open” button, search the folder `./mobile-wallet-adapter/android`, and press the “Open” button. It’s important to make sure that we select the `android` folder which is inside the mobile-wallet-adapter.
The editor will take a while to load the project as it indexes the files and resolves the gradle settings. Once finished, we’ll see the contents of the `android` folder for `mobile-wallet-adapter`. This consists of the Java and Kotlin modules for the mobile wallet adapter. For example, the fakewallet and fakedapp modules, that we’ll explain below, are what we’re going to focus on in this part of the guide. These two modules are sample implementation drafts, and they’ll allow Solana users to get an idea of how SMS works. Once you open the directory with Android, you should see something like this:
<h3>Step 3: Create an android emulator (optional)</h3>
In case you don't want to use an android emulator, you can also run the app on your physical device. If you want to do it that way, we recommend following [this guide](https://developer.android.com/studio/run/device).
If we follow the installation recommended by Android Studio, the default editor will come with an emulator. This can be used to test local applications that are developed using different devices, configurations, and APIs.
To make sure you have an available emulator, just check in the taskbar that something like what is marked in the left box (see image below) appears like this:

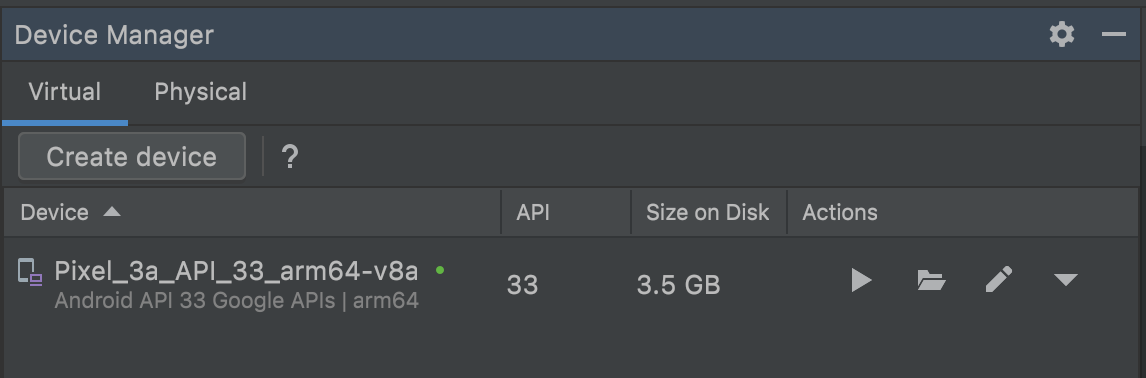
In case you don’t have an emulator yet, you can use the device manager to create a new android device emulator according to your needs. To open the device manager, we can click the button on the taskbar indicated by the right red box (see image above), or from `Tools > Device manager`.
Once there, we can click the “Create device” button, select the hardware and the operating system image, then confirm your configuration. To finalize this step, we’ll just click “finish” and our new emulator is configured! At the end of the process, the device manager should look something similar to this:
<h3>Step 4: Run fakewallet module</h3>
The `fakewallet` module is important because it will simulate the behavior of a wallet provider such as Phantom, Solflare, etcetera. The `fakewallet` will interact with other modules and dApps to provide them with services such as authorizing wallets, declining wallets, and signing transactions. In this case, we’re using the specification provided by Solana; but, each wallet provider on Solana Mobile must make their own implementations. For now,`fakewallet` is more than enough to run the tests.
To run the application within the emulator, we need to select the emulator and the `fakewallet` in the taskbar. Then, we click run:

We’ll have to be a little patient now as the process to run the application can take a couple of minutes. Once finished, we should be able to see the next welcome screen in the emulator:
<center>
<img src="https://docs.monadical.com/uploads/50f5a7e1-2186-47da-9b41-d6158bd3d9cb.png" width="350" />
</center>
<h3>Step 5: Run dApps</h3>
At this point, we should have the necessary configuration to start testing dApps and use the Solana Mobile wallet adapter. In our case, `fakewallet` will act as the wallet provider, but in the future we’ll be using the versions published by wallet providers. Having all this configured, it’s time to start testing with dApps.
<h2>Running the examples</h2>
<h3>Example 1: Run Android fakedapp module</h3>
The `fakedapp` module is an example of a dApp that the Solana team has made available for testing and analyzing code. It offers a lot of sample functionalities that interact with the `fakewallet` module to perform web3 operations, such as signing and sending transactions to the blockchain. The application runs in a very similar way to the `fakewallet` module, so we only have to select the `fakeapp` module in the taskbar.
As done before, we must ensure that we have an emulator selected, and then we can press the run button:

Again, we have to be patient as it loads. Once the application has finished loading the emulator, our screen should look something like this:
<center>
<img src="https://docs.monadical.com/uploads/9777af6d-698c-4a52-a709-b98be76ffd88.png" width="350" />
</center>
<br/>
In the previous view, we can see the possible operations that we can carry out within the application. We can also see that some buttons are disabled. These are the operations that require authorization to be carried out. Let’s click on the "AUTHORIZE" button, which will switch apps with the `fakewallet` application and allow the user to authorize or decline the action. Behind the scenes, the app is using an [Android intent](https://developer.android.com/reference/android/content/Intent) to request the user’s authorization through the `fakewallet` app[^1].
[^1]: https://github.com/solana-mobile/mobile-wallet-adapter/blob/main/android/docs/integration_guide.md#android-reference-implementation
<center>
<img src="https://docs.monadical.com/uploads/eeae859d-6c88-4066-bd44-abcac3ab0366.png" width="350" />
</center>
<br/>
Once in the fake wallet app, we are going to click the “AUTHORIZE” button to effectively let the `fakedapp` access the wallet and then switch back to the `fakedapp` screen. After the switch back, we’ll see that all buttons are active, which indicates that the authorization was successfully granted. Within the code, now we have access to a `wallet` object where we can access the public key and some methods like `signTransactions`, `signMessages` and `signAndSendTransactions`.
<center>
<img src="https://docs.monadical.com/uploads/9e6d854a-3bf4-4756-89f3-f156d9967db4.png" width="350" />
</center>
<br/>
To finish with this example, we’re going to test a couple of functionalities. First, we’ll test the “request airdrop” feature, which is a functionality to get free funds for testing[^2]. After, we’ll see a message with the text “Airdrop request sent, check block explorer for result”, which confirms that the transaction was a success.
[^2]: https://docs.solana.com/cli/transfer-tokens#airdrop-some-tokens-to-get-started
To see more details of the transaction, we are going to explore the device logs. First, click on the “logcat” tab found in the bottom bar of the editor or from `View > Tool Windows > Logcat`.
In the logs window, we’re going to first configure the filters. To do this, make sure you select the emulator you‘re using and the module `com.solana.mobilewalletapter.fakedapp`. Then, in the search bar, enter the keyword "airdrop". Now, we’ll be able to see the data associated with the transaction:

Finally, we’re going to test a functionality to sign and send transactions to the blockchain. To do this, click on the button "sign and send txn x1" which is at the end of the list of actions. Since the app is authorized to access the signing methods, the code will use the provided wallet client to call the `signAndSendTransactions`. As we saw before, the code will use Android intents to communicate to the `fakewallet` app. We’ll see that a switch has been made with the `fakewallet` app. This allows the user to authorize or decline the action from the wallet provider. The view we obtain is the following:
<center>
<img src="https://docs.monadical.com/uploads/cdad5836-bda1-4e0d-8652-464b7a6a2a03.png" width="350" />
</center>
<br/>
In this view, we once again have multiple options that allow us to simulate the different possible states of a transaction. In our case, we’re going to choose the option “authorize” which enables us to effectively sign the transaction. Once we press the button, we’ll obtain the following view:
<center>
<img src="https://docs.monadical.com/uploads/1f12a040-3950-4370-8793-00a91efc62a6.png" width="350" />
</center>
<br/>
Now, we’ll choose the option “send transaction to cluster”. If you want to learn more about clusters, please check out [this link](https://docs.solana.com/clusters). After a few seconds, the system will show us a toast with a message indicating that the transaction was completed successfully.
Like before, we can see the details of the transaction by searching the device logs. Let’s ensure we have the correct emulator selected and the module `com.solana.mobilewalletadatper.fakedapp`. Then, in the search bar, we’ll enter the keyword “transaction”:

<h3>Example 2: Run Solana Pay Android Example</h3>
Another example that Solana labs provides for developers and curious people to experiment on is an implementation about the Solana Pay Protocol. This implementation shows us how to use Solana Pay on Android using URIs generated from QR codes, NFC, etcetera.
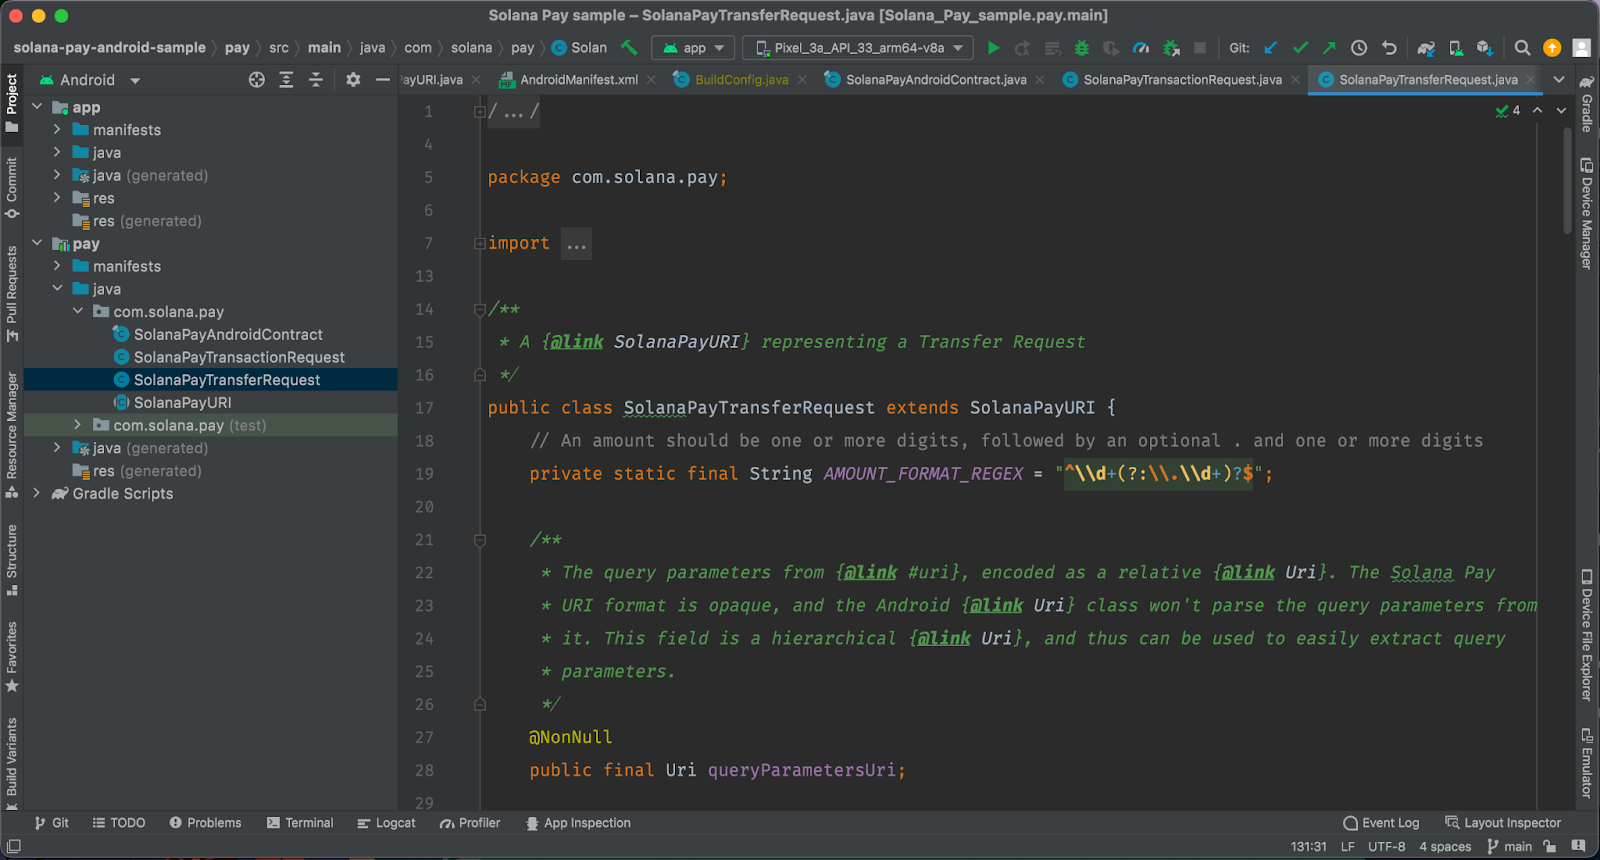
To get started, we’ll first clone the [solana-pay-android-sample](https://github.com/solana-mobile/solana-pay-android-sample) repository. Then, we’ll open it in Android Studio by going to `File > Open` and look for the directory `./solana-pay-android-example`. To finish, just press the “Open” button.
As the project configuration loads, we’ll see in the project section that the `app` and `pay` modules are loaded. The first module is a Solana Pay Protocol example which is the one we’re going to explore. The second module is the specification of Solana Pay for Android.
To run the Solana Pay Protocol example, we’ll simply click the “run” button on the taskbar. We must ensure that we have the `app` module selected and an active emulator. Once the app is loaded in the emulator we should see something like this:
<center>
<img src="https://docs.monadical.com/uploads/0b114586-ce68-49da-8479-8e62dc6824e7.png" width="350" />
</center>
<br/>
In this example, the “Launch Solana Pay Internally” button will internally generate a Solana Pay URI with the following format: `solana:84npKJKZy8ixjdq8UChZULDUea2Twt8ThxjiqKd7QZ54?amount=100&memo=Test%20xfer`. In a real application, we want to load the URI using mechanisms such as QR codes, NFC, etcetera. This URI will be read and interpreted by the Solana Pay implementation. Once we click the “Launch Solana Pay Internally” button, we’ll be redirected to a new view where the URI data has already been parsed, and it is now possible to simulate transactions in different states.
<center>
<img src="https://docs.monadical.com/uploads/64716acb-1ab5-40a6-a51b-67dccbec7786.png" width="350" />
</center>
<br/>
In our case, just press on the “Authorized, Submit Succeeds” button. Then, we’ll wait a few seconds until we see a toast with a message confirming that the operation was completed successfully.
<h3>Example 3: Run the Memo message example</h3>
The Memo message example consists of a mobile app written in Java, Kotlin and React Native. We're going to run the React Native version. The purpose of this example is to demonstrate the use of `transact()` as the main method to work with the wallet adapter. The Memo message example will sign and send transactions to the chain. It also contains other tools to handle sessions, connect, disconnect, get the latest blockhash, request airdrop, etcetera.
To run the Memo message example, we’ll clone the [mobile-wallet-adapter](https://github.com/solana-mobile/mobile-wallet-adapter) repository. Or, if you already cloned `mobile-wallet-adapter` from a previous step, feel free to use that copy instead. You just have to locate the directory `./examples/example-react-native-app/` within the cloned folder. To build and start the app, run `yarn && yarn start` in one terminal and leave the metro running in this terminal. Then, run `yarn android` in a second terminal. Since these steps build and start the app, we need to remember to have our Android phone connected and enabled for developing or an emulator properly configured.
<center>
<img src="https://docs.monadical.com/uploads/3e4cf3ea-b54c-4069-883a-efb9350760ee.png" width="350" />
</center>
<br/>
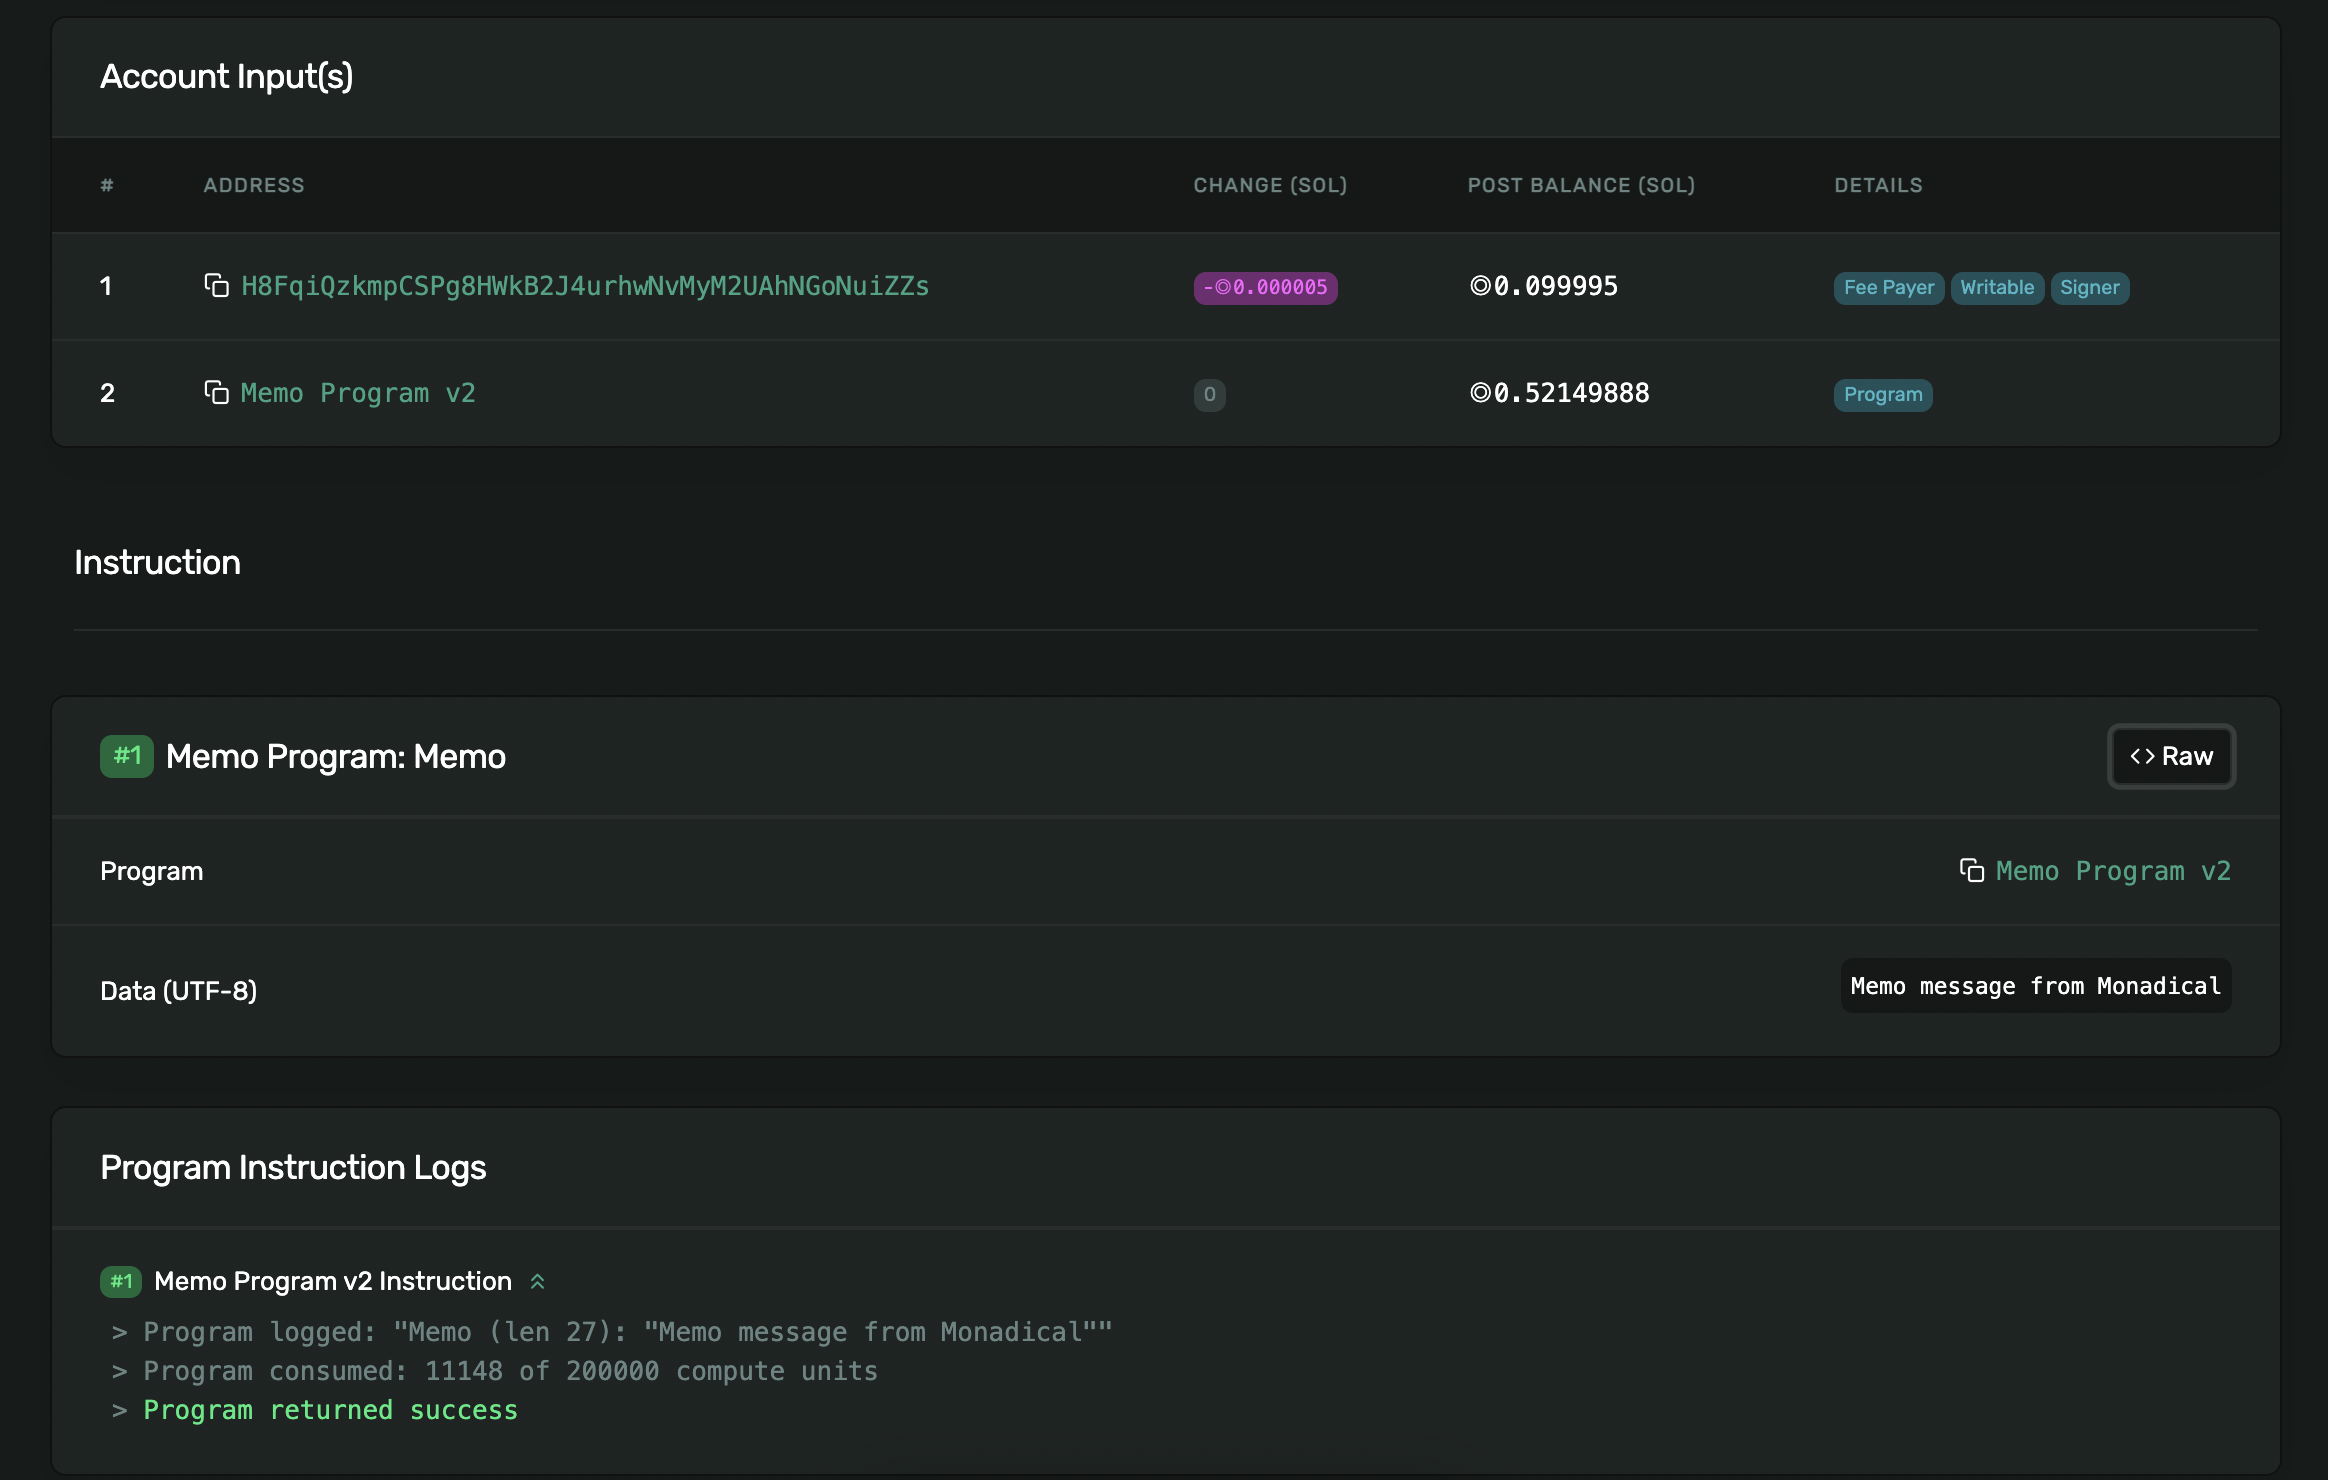
After we get the app running, feel free to add funds to your provisional devnet wallet, write a memo message, sign it, and of course, send it to the blockchain by clicking “Record Message”. If you do this, you’ll see a toast with a link to explore and inspect the transaction in the blockchain, and the memo instruction with the message. Here's [the link](https://explorer.solana.com/tx/2ofWbryFBYRUgv6bZDQV61kBPGSBgUFyMjjJLd4uv6cezQL8oYyzhGYH2g61TxS7EH67XBmh4f9eHztM3oJP9Pmw?cluster=devnet) to our transaction and this is how it looks in the explorer:
<h2>Conclusion</h2>
If you already know about Android development, then this guide should be pretty straightforward to you. Our goal was to explain and demonstrate the technical set up of SMS, and how to run and test the example applications with web3 technology. We did this with the recent Solana Mobile Stack. Theoretically, current wallet providers can sign transactions on your behalf, but it’s important to remember that each private key is not being handled by you or your device itself. Instead, it’s being handled by a 3rd party app. This seems unnecessary, but security and safety have to be prioritized when dealing with private keys.
In addition, more than half of internet traffic is done using smartphones. Until now, large corporations haven’t made a significant effort to enable new scenarios with web3 as part of the mobile world. Solana phone is an attempt to revolutionize this space through its mobile phone Saga and these new tools that will allow developers to start building content-rich web3 applications for mobile platforms. And that might just lead to some new and fantastic experiences for web3-decentralized communities!
<h2>Resources</h2>
We recommend you to visit the following links if you want to know more details about Solana Phone and SMS:
Reveal: https://solana.com/news/saga-reveal
Git: https://github.com/solana-mobile
Discord: https://discord.com/invite/solanamobile
Twitter: https://twitter.com/Solanamobile
Official Site: https://solanamobile.com/
SMS SDK: https://github.com/solana-mobile/solana-mobile-stack-sdk
Solana Developer Resources: https://solana.com/developers
Solana Mobile Grant Application: https://share.hsforms.com/17ieOT2CNT_SHx0RTjvLa_A5lohw

Juan David Arias
is a Full-Stack Dev of Monadical