<center>
# How to mint NFTs using Solana’s mobile wallet adapter
<big>
**With your development environment all set up, you’re ready to mint an NFT from Solana’s mobile app! We show you how in this step-by-step tutorial.**
</big>
*Written by [Juan David Arias](https://github.com/juanArias8) and [Jose Benitez](https://twitter.com/yojosebenitez). Originally published 2022-10-19 on the [Monadical blog](https://monadical.com/blog.html).*
</center>
In our [last article](https://monadical.com/posts/ramping-up-solana-phone.html), we introduced the upcoming Solana Mobile Stack (SMS) and showed how to set up your development environment.
With that completed, we're ready to demonstrate how to use the fake wallet app and the mobile wallet adapter library. To do so, we’re going to mint NFTs from a React Native mobile app. We’ll use a candy machine to mint NFTs because it handles assets, collections, custom tokens, and many other configurations. To start, we'll review how to create a candy machine, then we'll outline how to mint NFTs.
## Create a candy machine
We recommend using the [Sugar CLI](https://docs.metaplex.com/developer-tools/sugar) tool, because it allows you to properly configure your candy machine, and it’s easy to use.
Before getting started, you must have [Solana CLI](https://docs.solana.com/cli/install-solana-cli-tools) installed and [pointing to DevNet](https://docs.metaplex.com/guides/cli-wallet#setting-up-a-devnet-wallet-for-testing). Then, open a new terminal, and install the Sugar CLI:
```shell
bash <(curl -sSf https://sugar.metaplex.com/install.sh)
```
Create a new directory called `solana-phone`, and move into it:
```shell
mkdir solana-phone
cd solana-phone
```
Download the sample assets from [here](https://arweave.net/RhNCVZoqC6iO0xEL0DnsqZGPSG_CK_KeiU4vluOeIoI), and extract them inside the `solana-phone` folder that you just created.
Back in the terminal, run:
```shell
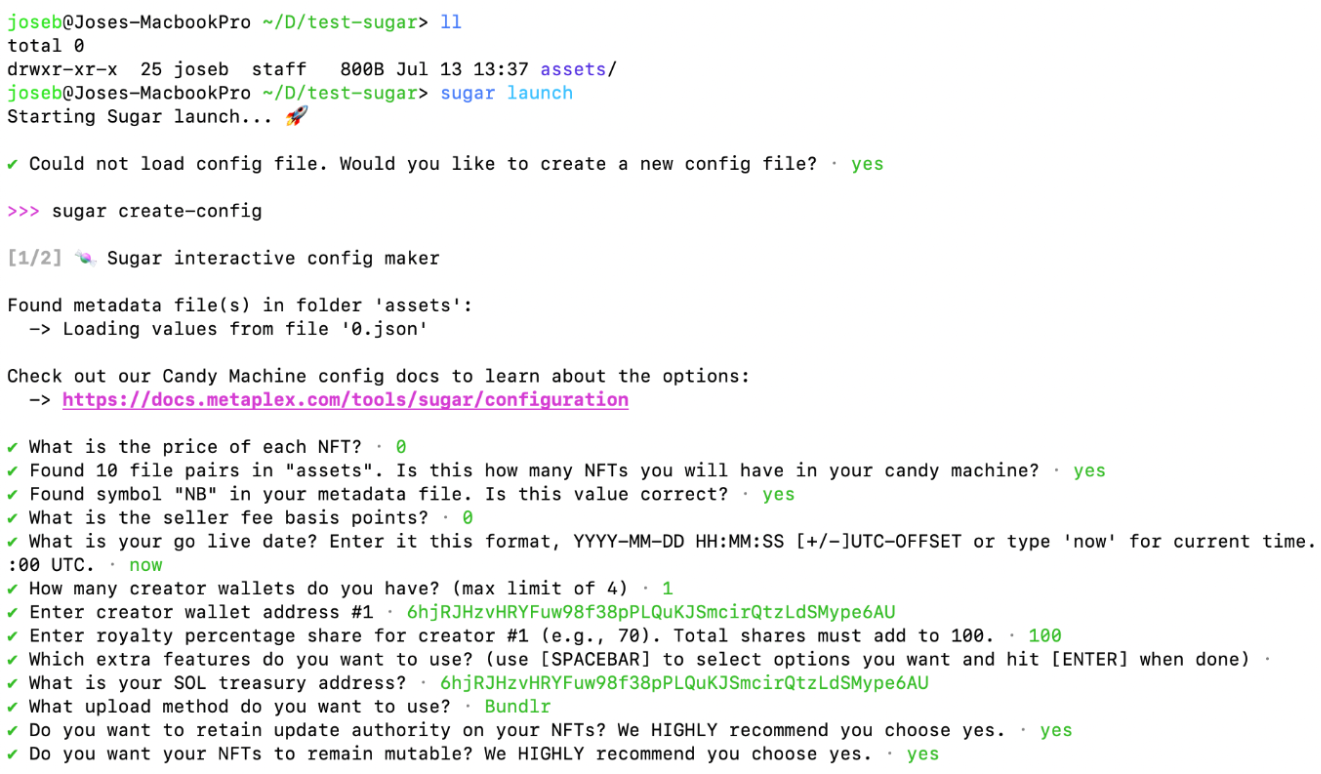
sugar launch
```
This script is in question-and-answer form, and here’s how you can configure it:
<center>
</center>
When it’s finished, look for the line that prints the candy machine ID, and keep it on hand as you’ll need it in the next step. The line should look like this:
<center>

</center>
If you need more detailed steps on how to create a candy machine, please take a look at [My First Candy Machine guide](https://docs.metaplex.com/developer-tools/sugar/tutorials/my-first-candy-machine).
Now that your candy machine has been created and configured to test the minting flow, we’ll go over how to mint NFTs.
## Minting NFTs from a mobile app
### Step 1: Clone the project repository
Before you start writing your code, remember that you don’t have to reinvent the wheel. In this case, you’ll see that we reuse a couple of modules that the Solana Labs team has arranged for us to carry out tests. So, let’s prepare our development environment.
The modules are as follows:
**Fake Wallet:** This is a native Android application that simulates the behaviour of a wallet provider. The implementation for the wallet adapter must be overridden by each wallet provider that wishes to be a part of the Solana phone ecosystem (Solet, Phantom, etc). Another thing to note is that the wallet adapter can only be run in a native Android environment.
**Example React Native App:** This is a test application made in React Native that contains some example functionalities, such as making an airdrop, signing a message, and others. This application makes use of Solana's mobile wallet adapter library to interact with the `fakewallet` app. This interaction conveys the transaction from our app to the [Secure Element Chip](https://solana.com/news/solana-mobile-stack-reveal) where it gets signed (if approved by the user) and then sent to the blockchain.
If you want to know more about the way `fakewallet` and dApps interact, you can review our previous post about [Ramping up on the Solana phone](https://monadical.com/posts/ramping-up-solana-phone.html).
Both modules mentioned above can be found inside the `mobile-wallet-adapter` repository in GitHub. To clone the project repository, open a terminal inside the `solana-phone` directory, and then run:
```shell
git clone https://github.com/solana-mobile/mobile-wallet-adapter
cd mobile-wallet-adapter
```
### Step 2: Run the fakewallet app
As stated in the introduction, it’s necessary to have an Android development environment setup. So you’ll need to have the Android SDK and an emulator installed on your computer. If you don’t know how to set up this environment, please check out our previous post on solana mobile [Setting up the environment for Solana Mobile Stack (SMS)](https://monadical.com/posts/ramping-up-solana-phone.html#Setting-up-the-environment-for-Solana-Mobile-Stack-SMS). In that post, we explain and show you how to run the fakewallet example. You can also install the `fakewallet` app on your Android smartphone if you prefer.
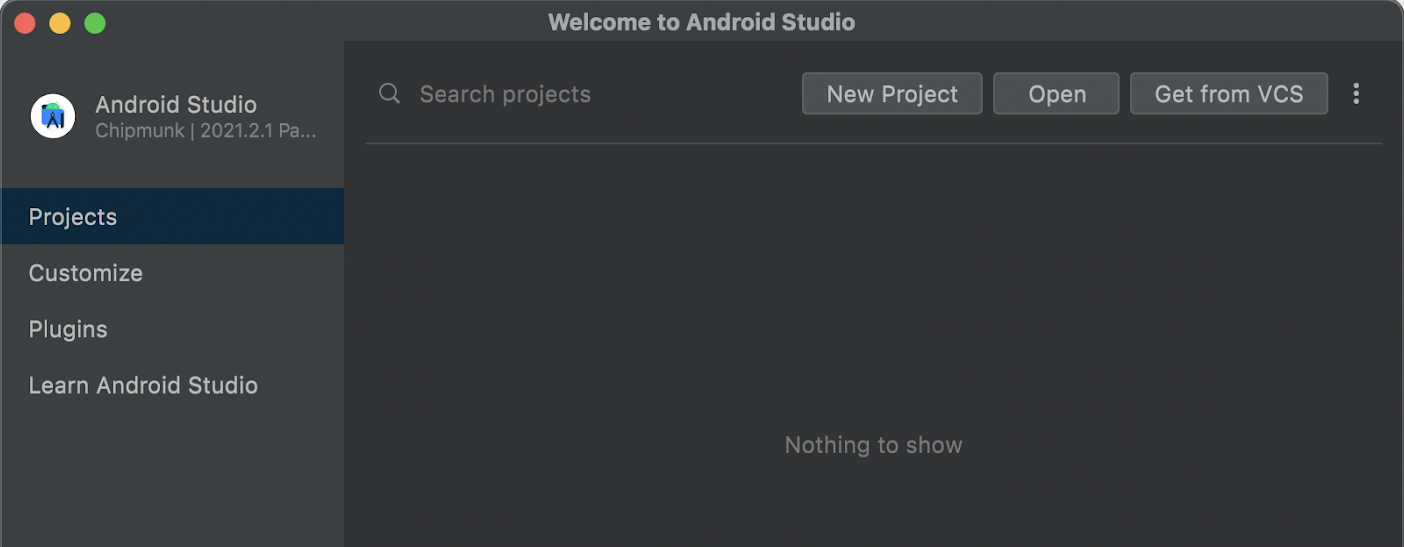
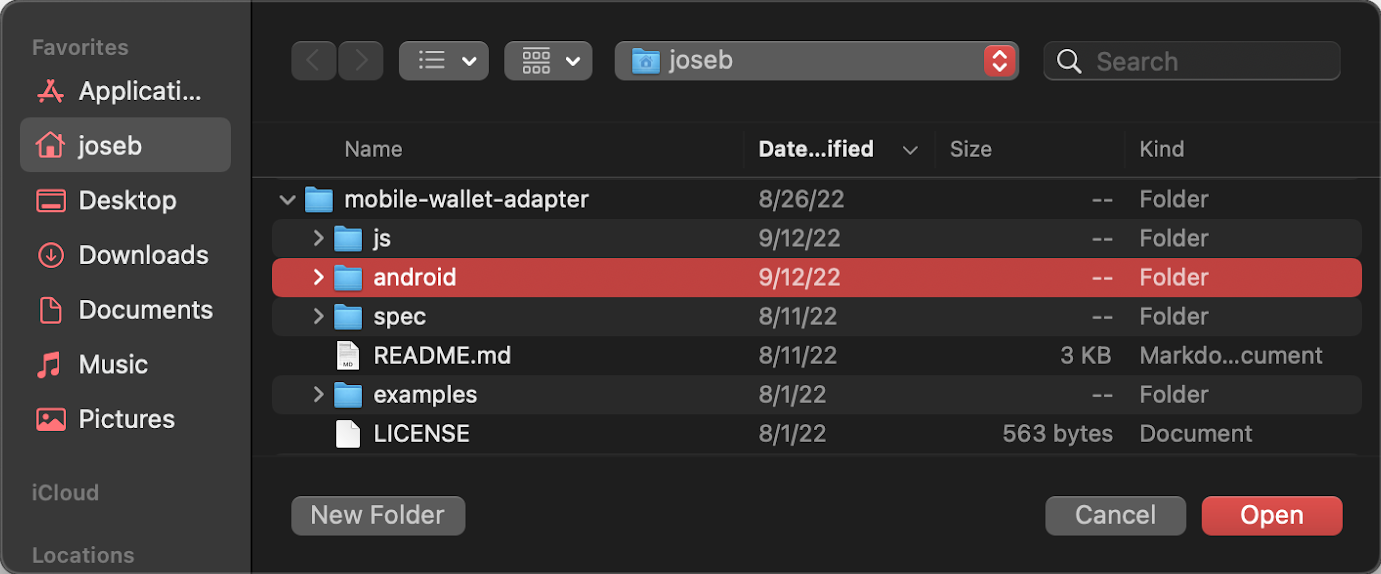
With that ready to go, launch Android Studio, and then click on the open button and select the folder `mobile-wallet-adapter/android`:
<center>
</center>
<center>
</center>
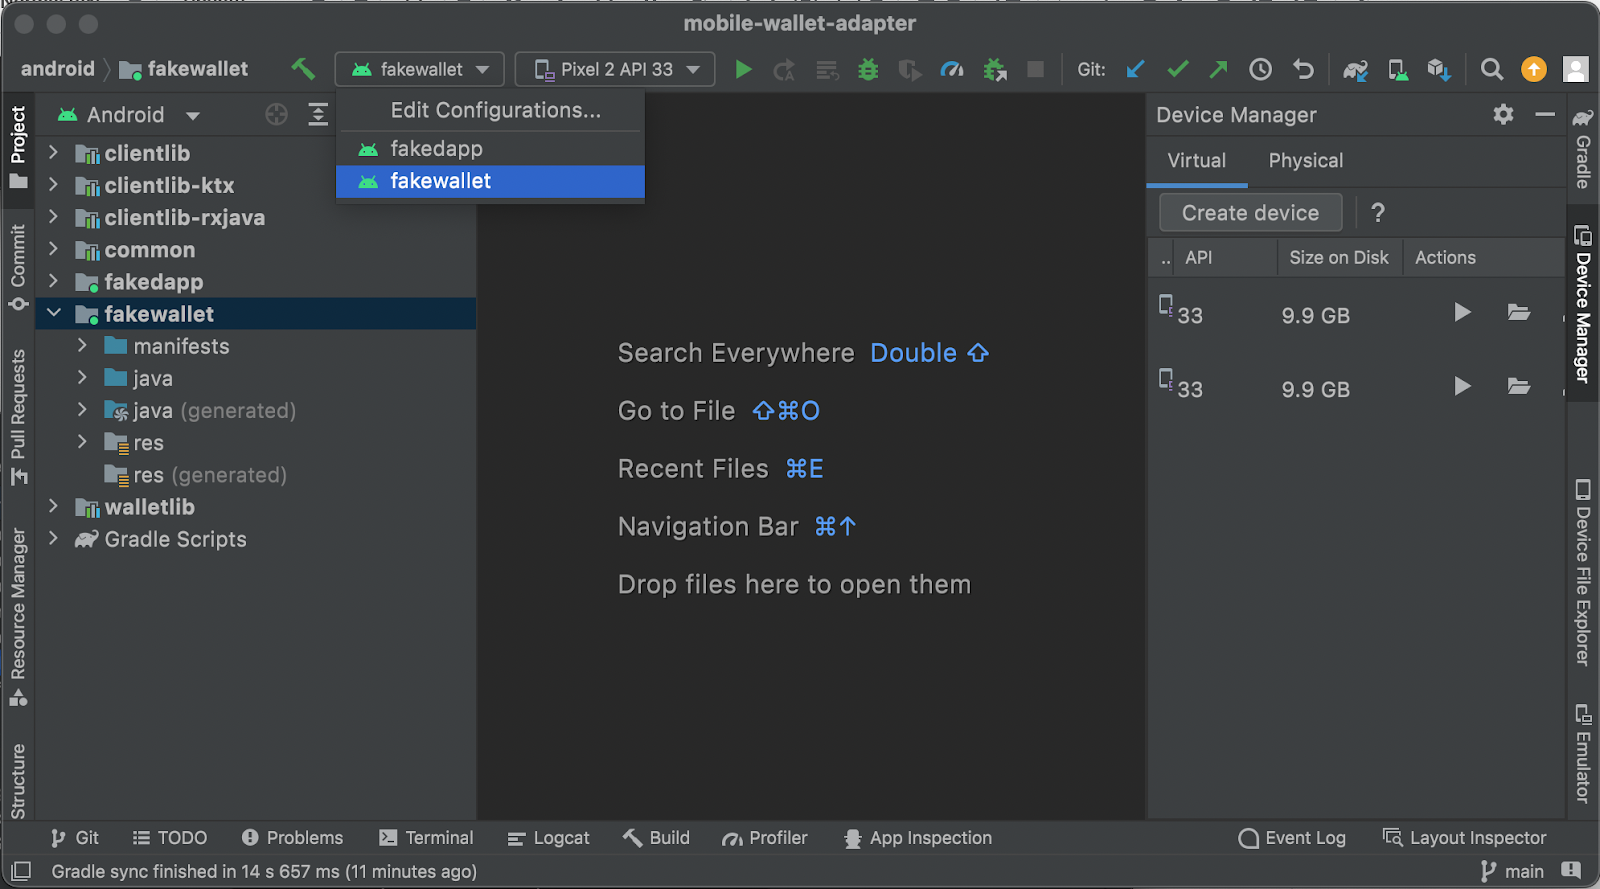
The above will load the modules from the Android directory into your Android studio. From there, you’ll need to wait a couple of minutes while the gradle loads the configuration, and the editor downloads the sources and makes the build. Once the editor has finished, you’ll have a view like the following:
<center>
</center>
:::warning
When loading the application, if you get a compatibility error with the `gradle` plugin like this: `The project is using an incompatible version (AGP 7.3.0) of the Android Gradle plugin. Latest supported version is AGP 7.2.1.`, you change the plugin version in the `build.gradle` file to an older version. To do this, open the `mobile-wallet-adapter/android/build.gradle` file and change the first two lines of the `plugins` section to the following:
```gradle
plugins {
id 'com.android.application' version '7.2.1' apply false
id 'com.android.library' version '7.2.1' apply false
…
}
```
:::
Select `fakewallet` in the dropdown menu of the upper taskbar. Make sure to also have an emulator or device selected. Finally, press the run button to install and run the `fakewallet` app on your device or emulator. If everything went well, you should have a view like the following:
<center>
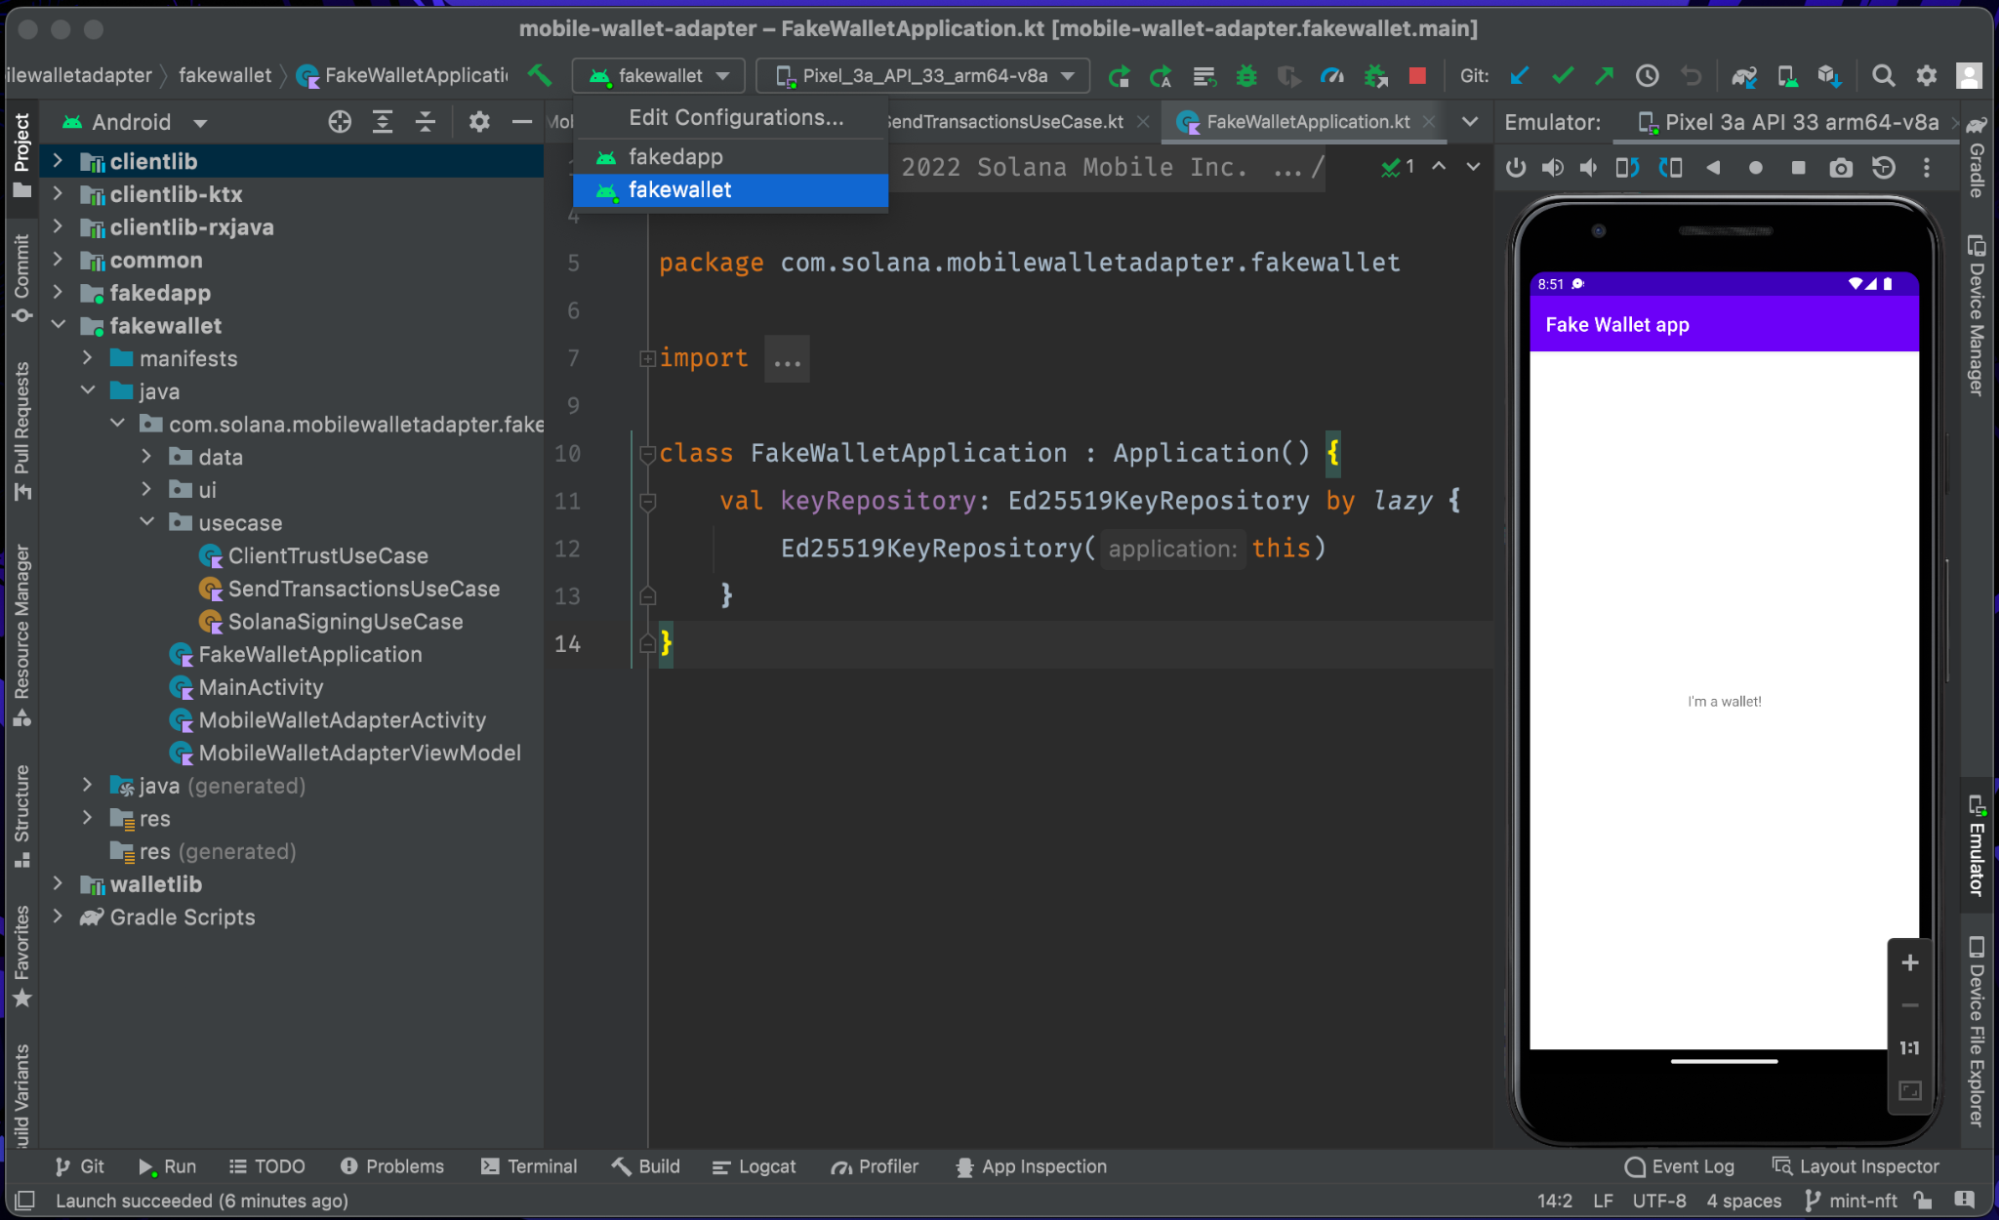
</center>
With that, you’ll have your wallet provider ready to interact with your dApps to start signing and sending transactions to the blockchain! 🎉 Now, we’re going to show you how to add the functionalities to mint NFTs.
### Step 3: Configure the mobile app
For this example we’ll be using the React Native framework, which Solana mobile is compatible with. React Native also offers a development experience very similar to what you might be used to with react and web3.js.
To start coding with React Native, you have to have the necessary setup in your development environment. Follow [the official guide](https://reactnative.dev/docs/environment-setup ), according to your operating system.
Essentially, if you want React Native to work in the end, you must have the following installed:
* Watchman
* Java SDK
* Android SDK
* Android Studio
To verify that React Native has been properly configured, you can use the [React Native Doctor](https://reactnative.dev/blog/2019/11/18/react-native-doctor) tool, a command that helps us to verify that the required tools are installed and that they integrate correctly. It also helps to identify a few errors and, if possible, corrects them.
From a terminal, navigate to the react native example at `~/solana-phone/mobile-wallet-adapter/examples/example-react-native-app`. Once there, run the `yarn install` command to install all dependencies, and then enter the command `npx react-native doctor` to run the verifications. Finally, verify that the items in the output – that is, the **Common** and **Android** sections – are marked with a check mark. If not, visit the different help links that the output gives you.
```shell
cd ~/solana-phone/mobile-wallet-adapter/examples/example-react-native-app
yarn install
npx react-native doctor
Common
✓ Node.js
✓ yarn
● Watchman - Used for watching changes in the filesystem when in development mode
Android
✓ JDK
✓ Android Studio - Required for building and installing your app on Android
✓ Android SDK - Required for building and installing your app on Android
- Versions found: 31.0.0
- Version supported: 31.0.0
✓ ANDROID_HOME
```
Once you have React Native and all its prerequisites installed, you can then open the `solana-phone/mobile-wallet-adapter/examples/example-react-native-app` in your favourite editor. This project contains a mobile application, developed in React Native, that comes pre-configured with the necessary libraries and tools to develop applications in Solana for Android.
Note that inside the `components` directory, you’ll find common features that are used within the ecosystem. The functionalities that appear by default are:
* **AccountBalance:** Shows the balance in SOL associated with a wallet
* **AccountInfo:** Shows the information associated with an account
* **ConnectButton:** Allows you to connect a wallet
* **DisconnectButton:** Allows you to disconnect an wallet
* **FundAccountButton:** Allows you to perform airdrops on DevNet
* **SignMessageButton:** Sign the message with your wallet and show the resulting signature
* **RecordMessageButton:** Record a message of your choosing on-chain, using the Memo program
To test the application as-is, enter the following commands from the terminal (make sure you have Android Studio open and one emulator running):
```shell
yarn install
yarn android
```
:::warning
When running the project, if you get the error `> SDK location not found. Define a valid SDK location with an ANDROID_HOME environment variable or by setting the sdk.dir path in your project's local properties file at '~/mobile-wallet-adapter/examples/example-react-native-app/android/local.properties'`. We should create a new `local.properties` file inside the `example-react-native-app/android/` directory, and then enter the following line:
```shell
sdk.dir=/Users/<username>/Library/Android/sdk
```
Then, try running `yarn android` again.
See [this stackoverflow answer](https://stackoverflow.com/a/43626724) for more context.
:::
Once the editor finishes compiling, you should see something like the following on your screen:
<center>
<img src="https://docs.monadical.com/uploads/694f3330-13e2-481d-9438-87362c44c32b.png" width="400" style="margin-bottom: 24px">
</center>
Try playing around with the different features and check out what each one does. Note that by clicking on either of the two options, the device will make an application switch with the `fakewallet` app to sign and send the transaction to the blockchain. Once this process is complete, the switch will be made again by the calling application.
### Step 4: Write some code
To carry out the minting process, we’ll be using some of the base functionalities, and adding some new ones. The minting process is as follows:
* A user enters the application
* The user authorizes the application to use the wallet using the `fakewallet` app
* The user clicks on the mint NFT button
* The system creates a Solana transaction with instructions to perform the mint
* The user authorizes and signs the transaction using the `fakewallet` app
* The `fakewallet` app sends the transaction to the blockchain
* The system confirms the transaction and displays the transaction details
Start by adding a new component to your application. First, you need to create a new `MintButton.tsx` file inside the `components` directory. The MintButton component will be in charge of minting a new token based on the ID of a candy machine specified as constant.
In the file, enter the following lines of code, which define the mint button and its respective styles:
``` jsx
import { StyleSheet, View } from "react-native";
import { Button } from "react-native-paper";
export default function MintButton() {
return (
<View style={styles.buttonGroup}>
<Button
disabled={!selectedAccount}
loading={loading}
onPress={handleClickMintButton}
mode="contained"
style={styles.actionButton}>
Mint NFT
</Button>
</View>
);
}
const styles = StyleSheet.create({
buttonGroup: {
display: 'flex',
flexDirection: 'column',
width: '100%',
},
actionButton: {
flex: 1,
marginBottom: 24,
},
});
```
At this point, the editor should give a couple of errors, since `selectedAccount`, `loading` and `handleMintButton` don't exist yet. But don’t worry, we're going to create them 😉. The next step will be to add the handler of the click event to perform the mint. For this, add a couple of states and a new function before the return statement:
```jsx
import { useState } from "react";
const EXPLORER_URL = 'https://explorer.solana.com';
const CLUSTER = '?cluster=devnet';
export default function MintButton() {
const [loading, setLoading] = useState(false);
const [explorerURL, setExplorerURL] = useState('');
const handleClickMintButton = async () => {
try {
setLoading(true);
const result = await mintNewToken();
setLoading(false);
if (!result && !(result.signature || result.mint)) {
showAlert('Error minting the token');
return;
}
if (result.mint) {
const url = `${EXPLORER_URL}/address/${result.mint}${CLUSTER}`;
setExplorerURL(url);
showAlert('NFT minted successfully');
return;
}
if (result.signature) {
const url = `${EXPLORER_URL}/tx/${result.signature}${CLUSTER}`;
setExplorerURL(url);
showAlert('Signature generated successfully');
return;
}
showAlert('Error minting the new NFT');
} catch (error) {
console.log(error);
}
};
...
}
```
The `handleClickMintButton` function is in charge of controlling the entire flow of the minting process. Initially, it makes a call to the `mintNewToken` function, which is in charge of managing the token’s mint and returning the transaction’s `signature` and the `mint` address.
If the mint address exists, the program creates a URL to see the details of the mint in [the Solana explorer](https://explorer.solana.com). The URL is then saved in the `explorerUrl` state and the user sees a success alert. If the mint doesn’t exist, but the transaction signature does, the program goes through a similar process, but this time to show the transaction status based on the signature. If neither the mint nor the signature exists, the program simply shows an error message to the user indicating that there was an error in the process.
Now, let's add the `mintNewToken` function. This function will be in charge of creating the transaction, signing it, sending it to the blockchain, and confirming if the transaction was successful. This function interacts directly with the mobile-wallet-adapter-protocol through the `fakewallet` dApp. It does this to obtain the wallet’s public key, stored in the adapter, and then to sign the transaction. Make sure to declare `CANDY_MACHINE_ID` at the beginning of the component as a constant.
```jsx
import { PublicKey, Transaction } from "@solana/web3.js";
import { transact } from "@solana-mobile/mobile-wallet-adapter-protocol-web3js";
import { useConnection } from "@solana/wallet-adapter-react";
import useAuthorization from "../utils/useAuthorization";
import useGuardedCallback from "../utils/useGuardedCallback";
import { getCandyMachineState, mintOneToken } from "../utils/candy-machine";
const CANDY_MACHINE_ID = new PublicKey(
'4muNoMvUbLFi8btqE8QV2YnsFYF2qUQ6tb9xVyHSUPFj',
);
export default function MintButton() {
const { authorizeSession, selectedAccount } = useAuthorization();
const { connection } = useConnection();
const mintNewToken = useGuardedCallback(async (): Promise<any> => {
const [signature, mint] = await transact(async wallet => {
const freshAccount = await authorizeSession(wallet);
const latestBlockhash = await connection.getLatestBlockhash();
const candyMachine = await getCandyMachineState(
{publicKey: freshAccount.publicKey} as anchor.Wallet,
CANDY_MACHINE_ID,
connection,
);
const [instructions, signers, mintPublicKey] = await mintOneToken(
candyMachine,
freshAccount.publicKey,
);
const transaction = new Transaction();
instructions.forEach(instruction => transaction.add(instruction));
transaction.recentBlockhash = latestBlockhash.blockhash;
transaction.feePayer = freshAccount.publicKey;
transaction.partialSign(...signers);
const signatureResponse = await wallet.signAndSendTransactions({
transactions: [transaction],
});
return [signatureResponse[0], mintPublicKey];
});
await connection.confirmTransaction(signature);
return {signature, mint};
}, [authorizeSession, connection]);
...
}
```
Note the `getCandyMachineState` and `mintOneToken` functions, these are reused from [the candy machine ui repository](https://github.com/metaplex-foundation/candy-machine-ui/blob/main/src/candy-machine.ts). Unfortunately, after copying the code snippets from candy-machine-ui to the React Native app and installing `@project-serum/anchor`, it turned out that they required many core NodeJS modules. Since [React Native can’t package these modules](https://hackernoon.com/using-core-node-js-modules-in-react-native-apps-64acd4d07140), our solution was to use [rn-nodeify](https://github.com/tradle/rn-nodeify) and to refactor an internal anchor function.
We won’t go into detail about the numerous changes we made, but the final result can be found in [this file](https://github.com/Monadical-SAS/react-native-mint-app/blob/main/examples/example-react-native-app/utils/candy-machine.ts), which you can copy and paste into your project’s `/utils` folder. You will also need to replace the package.json file with [the one we’ve arranged](https://github.com/Monadical-SAS/react-native-mint-app/blob/main/examples/example-react-native-app/package.json) and run the `yarn install` command again.
Up to this point, we have created a component based on the ID of a candy machine, which performs a mint transaction and returns the signature and mint address. Now it’s time to show the results.
Let’s add a new button at the bottom of the component. When the user taps this button, they’ll be sent to the Solana explorer via the URL stored in the explorerUrl state. Remember, explorerUrl stores either the URL that shows the user the details of their mint, if the mint address exists, or the URL that shows the details of the transaction, in case only the signature exists. The button makes use of the `openLink` function which simply redirects us to the page specified by the URL using the available browser.
```jsx
import { Linking } from "react-native";
export default function MintButton() {
...
const openLink = async (url: string) => {
await Linking.openURL(url);
};
return (
<View style={styles.buttonGroup}>
...
{explorerURL && (
<Button
onPress={() => openLink(explorerURL)}
mode="contained"
style={styles.actionButton}>
View Details
</Button>
)}
</View>
);
}
```
Finally, we’re going to create a function that displays response messages to the user. For this, we’ll make use of Snackbars, which are small, floating alerts shown on the screen.
```jsx
import { useContext } from "react";
import { SnackbarContext } from "./SnackbarProvider";
export default function MintButton() {
const setSnackbarProps = useContext(SnackbarContext);
...
const showAlert = (message: string) => {
setSnackbarProps({
children: message,
});
};
...
}
```
With this code, you’ll have the complete component to mint a new NFT based on the ID of a Candy Machine.
As a final step, we want to make the mint button available on the home screen, so we can actually make use of it! Inside the `screens/MainScreen.tsx` file, let’s import the `MintButton` component by replacing the content of the MainScreen with the following:
```jsx
import React, { Fragment, useEffect } from "react";
import { ScrollView, StyleSheet } from "react-native";
import { Appbar, Portal } from "react-native-paper";
import { transact } from "@solana-mobile/mobile-wallet-adapter-protocol-web3js";
import MintButton from "../components/MintButton";
import useAuthorization from "../utils/useAuthorization";
import AccountInfo from "../components/AccountInfo";
import "../shim"; // required by rn-nodeify
export default function MainScreen() {
const {
accounts,
onChangeAccount,
selectedAccount,
authorizeSession,
} = useAuthorization();
useEffect(() => {
if (!selectedAccount) {
transact(wallet => authorizeSession(wallet));
}
}, []);
return (
<Fragment>
<Appbar.Header elevated mode="center-aligned">
<Appbar.Content title="React Native dApp" />
</Appbar.Header>
<Portal.Host>
<ScrollView contentContainerStyle={styles.container}>
<MintButton />
</ScrollView>
{accounts && selectedAccount ? (
<AccountInfo
accounts={accounts}
onChange={onChangeAccount}
selectedAccount={selectedAccount}
/>
) : null}
</Portal.Host>
</Fragment>
);
}
```
Note that we also imported the `authorizeSession` function and added a `useEffect` at the beginning of the component. This requests authorization to connect the wallet as soon as the screen loads, rather than relying on the user tapping the connect and disconnect buttons.
And that’s it! With the above code in place we’ll have the minting button available on our main screen and are ready to test the results. So let's do that now.
### Step 5: Test the example
No codebase is complete without testing, so let’s run through that now. From a terminal, move to the `mobile-wallet-adapter/examples/example-react-native-app/` directory, then install the dependencies:
```
cd ~/solana-phone/mobile-wallet-adapter/examples/example-react-native-app
yarn install
yarn android
```
Do this to build the app, and to install it in the emulator or device. When the app opens, it switches to the `fakewallet` app to gain authorization and access to the wallet. Go ahead and authorize it:
<div style={"display:inline-flex"}>
<img src="https://docs.monadical.com/uploads/73e14f9f-2615-42d6-b26b-55a35b839e8d.png" width="350" style="margin-bottom: 24px">
<img src="https://docs.monadical.com/uploads/060db786-a07c-4918-9612-5e147db0053c.png" width="350" style="margin-bottom: 24px">
</div>
### Step 6: Mint that NFT
Before minting, tap on `Add Funds` to get some SOL. We’ll use these to pay transaction fees:
<center>
<img src="https://docs.monadical.com/uploads/b04e6b51-b3ff-42e7-8831-9acbc94c7d65.png" width="350" style="margin-bottom: 24px">
</center>
Now, it’s time to hit the “Mint NFT” button. Once again, the app switches to the `fakewallet` app and asks to authorize the transaction signature. After authorizing, you’re prompted to either simulate scenarios, or send the signed transaction to the DevNet cluster. We’ll tap “Send transaction to cluster”.
If there are no network errors or cluster issues, you’ll see a message on screen telling us that the NFT has been minted as well as a button to view the [NFT Details](https://explorer.solana.com/address/9NVoXQBc1Ke9BXWXAyBYYC478bX13U92ujqnNHh7xkVi?cluster=devnet).
<center>
<img src="https://docs.monadical.com/uploads/a767d1ee-5352-4561-a2f1-0df5cad71041.gif" width="400" style="margin-bottom: 24px; border: 1px solid grey; border-radius:16px;">
</center>
Tada! 🥳
## Take-away lessons
This exercise revealed that React Native apps still have difficulties running native NodeJS dependencies, due to the nature of the environment. Nevertheless, React Native is a powerful tool to develop mobile apps that can make use of Solana’s new mobile wallet adapter.
We also showed how to use the mobile wallet adapter to sign a transaction while the private keys remain safe inside the phone. As a result, you can now send a payload from any app that makes use of Solana's mobile wallet adapter to the phone’s secure element for signing. In this case, we showed how easy it is to achieve self-custody[^1] with the wallet adapter.
[^1]: Self-custody means only the owner of the private keys is responsible for its storage and manipulation; this doesn’t happen with current wallet apps where keys are in possession of the app and its creators, not the owner.

Juan David Arias
is a Full-stack dev of Monadical