# <p style="text-align: center;">Even More Skin in the Game: Digging Deeper Into Stable Diffusion-Generated Minecraft Skins</p>
## <p style="text-align: center;">Continuing the quest to train a Stable Diffusion model and create custom Minecraft skins with text prompts</p>
*<p style="text-align: center;">Written by Cory Spencer. Originally published 2023-07-25 on the [Monadical Blog](https://monadical.com/blog.html).</p>*
***Update:** Check out the hosted version of our [Minecraft Skin Generator](https://skingenerator.io/). This closed-source version significantly improves on the quality of generated skins from the open-source model.*
## Overview
Welcome back to the second part of our blog series on generating Minecraft character skins using Stable Diffusion models. In the [previous post](https://monadical.com/posts/mincraft-skin-generation.html), we explored the fine-tuning of a Stable Diffusion model to generate Minecraft-style character previews. Here’s a man in a purple suit wearing a top hat, an example of one of the images generated by our fine-tuned model:
However, astute Minecraft players will note that the output from our fine-tuned model doesn’t produce a usable Minecraft skin. The model we previously trained only generates previews of Minecraft characters, and there is no straightforward way for us to use these generated characters in the game itself. In this article, we will train a model that can generate fully functional Minecraft skins. So, grab your pickaxe and get ready to dig even deeper into the process!
For those wanting to skip straight to the code, the [Monadical\-SAS/minecraft_skin_generator](https://github.com/Monadical-SAS/minecraft_skin_generator) GitHub repository has example code to start generating usable Minecraft skins.
## A Brief History of the Minecraft Skin Specification
Let’s take a moment to first get a grasp of the [Minecraft skin specification](https://github.com/minotar/skin-spec). Minecraft skins have two versions: the first is the “classic” format used prior to Minecraft version 1.8, and then there is the newer format which lets you create more detailed skins with transparent overlays, allowing for richer visual effects.
Here’s an example skin for the classic default Steve character:
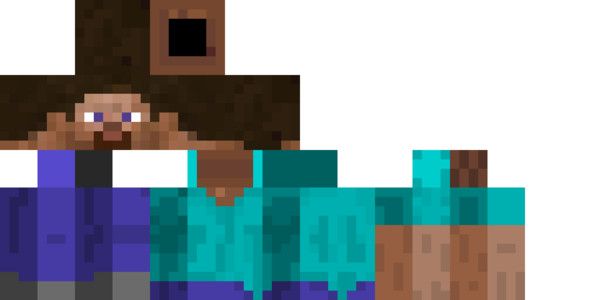
For now, we’ll keep the model training process simple and straightforward by focusing on the original pre-1.8 format. We’re still able to use these older style skins in-game, but the layout of our training images will be simplified.
Examining our example Steve skin above, we’ll find a 64x32 pixel image neatly divided into dedicated, rectangular sections for the head, arms, legs, torso, and hair. At first glance, it looks like the player has been squashed flat, which is quite accurate! Upon importing the skin into Minecraft, all these bits and blocks be folded back up to form our familiar, squarish Steve character.
## Creating the Dataset
Alright, let's dive into the details! When I first tackled the fine-tuning of the Stable Diffusion model, I decided to train the model using composite images that combined the skin itself with a 3D rendering of that very skin. My plan was to guide the model in mapping different parts of the 3D renderings to their specific spots in the skin file. For example, I hoped that the face generated by the forward-facing 3D rendering would align with that 8x8-pixel square in the skin file, with the top left corner at coordinate (8,8) and the bottom right corner at (16,16).
To simplify things, I chose to preprocess each skin by removing any elements that didn't belong to the head, arms, legs, or torso. Unfortunately for Steve, this means that I’m also masking out the portion of the skin that maps to a helmet, or extra hair features.
Here is the code I used to create a training image from a skin:
```python
from PIL import Image
import asyncio
import minepi
SCALING_RATIO = 12
IMAGE_WIDTH = 768
IMAGE_HEIGHT = 768
SKIN_MASK = "skin-mask.png"
def apply_mask(skin_image):
skin_mask = Image.open(SKIN_MASK)
# We need to convert both images to RGBA to apply the mask.
skin_mask.convert("RGBA")
skin_image.convert("RGBA")
# Mask out anything that isn't the base figure.
masked_skin_image = Image.composite(skin_mask, skin_image, skin_mask)
return masked_skin_image
async def create_training_image(skin_filename):
skin_image = Image.open(skin_filename)
# Mask out any areas not directly mapping to the head, arm, leg, or
# torso portion of the character.
skin_image = apply_mask(skin_image)
width, height = skin_image.size
if height > 32:
# We're only interested in the old-style skin file format, so
# skip over any version 1.8 or later skins.
return
skin = minepi.Skin(raw_skin=skin_image)
# Render the character from the front.
render1 = await skin.render_skin(hr=-45,
vr=-10,
vrla=-45,
vrra=45,
vrll=-45,
vrrl=45,
display_second_layer=False,
display_hair=False,
ratio=SCALING_RATIO)
# Render the character from behind.
render2 = await skin.render_skin(hr=135,
vr=-10,
vrla=-45,
vrra=45,
vrll=-45,
vrrl=45,
display_second_layer=False,
display_hair=False,
ratio=SCALING_RATIO)
# Scale the skin up to fill the top half of our training images.
scaled_skin_image = skin_image.resize((64 * SCALING_RATIO, 32 * SCALING_RATIO),
resample=Image.BOX)
# Create the composite image of our skin plus the rendered character images.
training_image = Image.new('RGBA', (IMAGE_WIDTH, IMAGE_HEIGHT), (0, 0, 0, 0))
training_image.paste(scaled_skin_image, (0,0))
training_image.paste(render1, (0, int(IMAGE_HEIGHT/2)))
training_image.paste(render2, (int(IMAGE_WIDTH/2), int(IMAGE_HEIGHT/2)))
return training_image
training_image = create_training_image("indiana.png")
```
And here’s an example of one of the resulting training images:
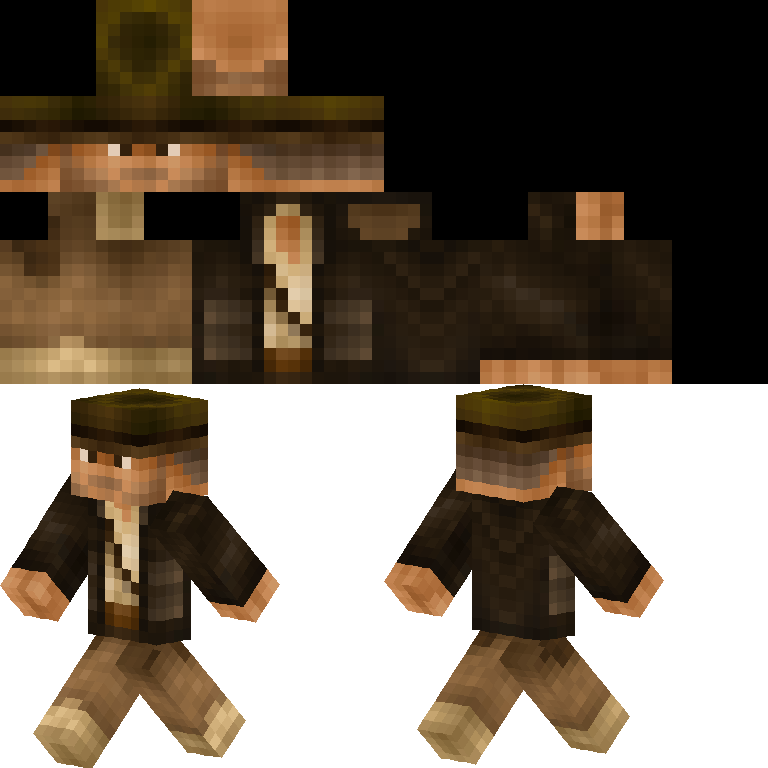
Take a peek at the picture, and you'll spot the top half with a scaled-up version of the 64x32 pixel skin. Right beneath it, you'll find those spiffy character renderings strutting their stuff. I’ve tried to maintain a close 1-to-1 pixel ratio between the renderings and the skin as it made a world of difference in the output we'll get from the model we're training.
Now, getting our training dataset all set up is a breeze. All we need to do is go through our collection of skins, do a little coaxing to mold the data into the desired [dataset format](https://huggingface.co/docs/datasets/create_dataset), and voilà! We're ready to roll!
## Fine-tuning the Skin Generation Stable Diffusion Model
Now, let's dive into the nitty-gritty of fine-tuning our model, which follows a similar process as discussed in the [previous half](https://monadical.com/posts/mincraft-skin-generation.html) of this series. The exciting part is that now we'll be working with our freshly created dataset, paving the way for exciting new possibilities.
To kick things off, let's revisit [steps one through six](https://docs.monadical.com/zzthlWvuSj-PXyN4ZZiCyg#Setting-Up-the-training-environment) from our previous posts, found in the section titled "Setting Up the Training Environment." By doing so, we'll ensure our environment is properly set up for the task at hand. However, we'll deviate from Step 7, which involves checking out a dataset from Hugging Face. Instead, all you need to do is move or duplicate the training dataset directory into the "examples/text_to_image" directory.
First, we’ll get the environment variables in order:
```bash
$ export SD_MODEL_NAME="stabilityai/stable-diffusion-2"
$ export SD_MODEL_RES=768
$ export DATASET="./minecraft-skin-dataset"
$ export SAVE_STEPS=1000
$ export MAX_STEPS=18000
$ export MODEL_DIR="minecraft-skin-model"
```
Once that’s done, it’s time to launch the train_text_to_image.py script using the ‘accelerate’ command. Here’s how you do it:
```bash
$ accelerate launch --mixed_precision="fp16" train_text_to_image.py \
--pretrained_model_name_or_path=$SD_MODEL_NAME \
--dataset_name=$DATASET \
--use_ema \
--resolution=$SD_MODEL_RES \
--train_batch_size=1 \
--gradient_accumulation_steps=4 \
--gradient_checkpointing \
--checkpointing_steps=$SAVE_STEPS \
--max_train_steps=$MAX_STEPS \
--learning_rate=1e-05 \
--max_grad_norm=1 \
--lr_scheduler="constant" --lr_warmup_steps=0 \
--output_dir=$MODEL_DIR
```
Be aware that this process requires patience as it takes a significant amount of time. On the NVidia RTX A6000 I used, for example, the fine-tuning alone exceeded a whopping 18 hours. So grab a snack and a comfortable chair, and enjoy the process!
## Evaluating the results of the fine-tuned model
Let’s check out how our model is doing by taking a look at the images it’s generated from fixed text prompts at each saved checkpoint, just like we did before. Here are the results for five of the text prompts we used last time, along with a couple of new ones:
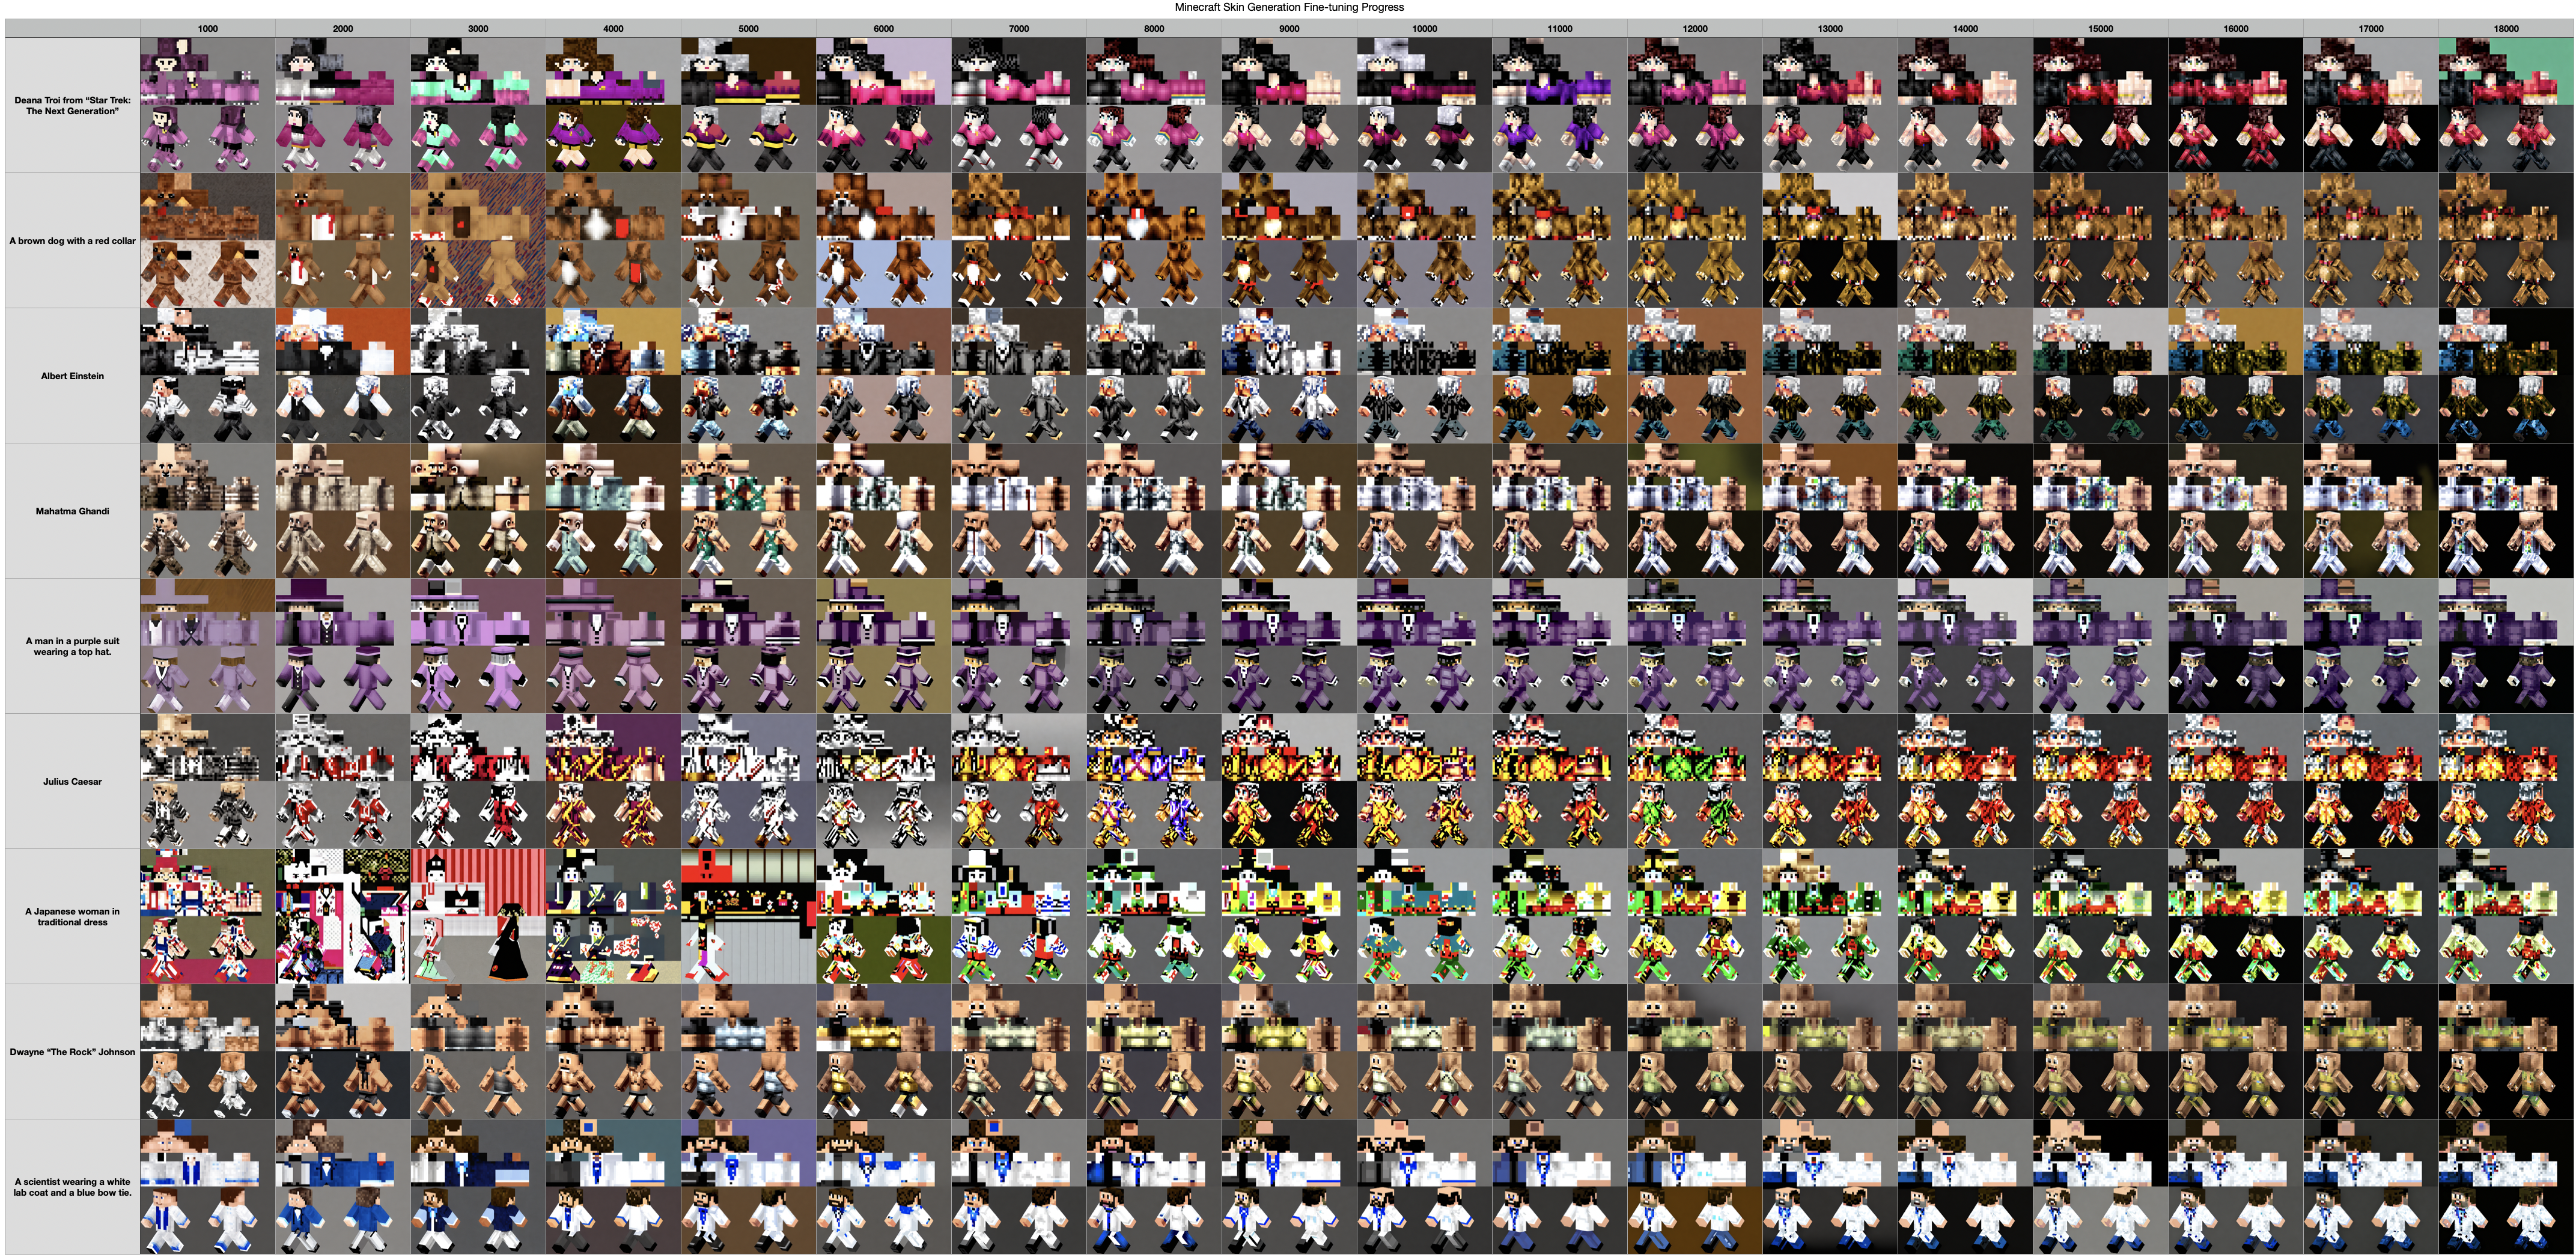
Somewhere around the 12,000th to 13,000th training step, things really start to improve with the image generation. We’re starting to see some good results in the format we trained the model on.
## Postprocessing our Generated Images
But hold your horses, we're not quite ready to use those brand-new skins just yet! We need to crop out the skin part from the top half of each image and then scale it down to the expected 64x32 pixel size. And there’s one more trick up our sleeves - we'll whip out that trusty mask we used in the "Creating the Dataset" section to clean up any residual noise from the image generation. With these final touches, our freshly generated skins will be all set to rock the Minecraft fashion world!
Here’s the code I used:
```python
from PIL import Image
import numpy as np
def extract_minecraft_skin(generated_image):
# Extract the skin portion from the top half of the image.
width, height = generated_image.size
generated_skin = generated_image.crop((0, 0, width, height/2))
# Scale the skin down to the expected size of 64x32 pixels.
width, height = generated_skin.size
scaled_skin = generated_skin.resize((int(width / SCALE), int(height / SCALE)),
resample=Image.NEAREST)
return scaled_skin
def restore_skin_alphachannels(image):
# Convert the image to RGBA.
converted_image = image.convert('RGBA')
# Convert the image into a numpy array.
image_data = np.array(converted_image)
red, green, blue, alpha = image_data.T
# Convert all of the black pixels in the skin to slightly-less-black.
# We're going to later use (0,0,0) as our transparency color, so this
# will prevent transparent pixels in our skin.
black_areas = (red == 0) & (blue == 0) & (green == 0)
image_data[..., :-1][black_areas.T] = (1, 1, 1)
# Convert the data back into Image format.
converted_image = Image.fromarray(image_data)
converted_image = converted_image.convert("P")
# Enable transparency in the skin image.
converted_image = converted_image.convert("P")
converted_image.info["transparency"] = 0
converted_image = converted_image.convert("RGBA")
# Load an imagemask of unused skin areas that shoudl be fully transparent.
mask_image = Image.open(MASK_IMAGE)
mask_image = mask_image.convert("RGBA")
# Perform the alpha composite, and return the result.
mask_image.alpha_composite(converted_image)
return converted_image
# Extract and scale down the Minecraft skin portion of the image.
minecraft_skin = extract_minecraft_skin(generated_image)
# Clean up any background noise in the skin and restore the alphachannel
# transparency.
minecraft_skin = restore_skin_alphachannels(minecraft_skin)
```
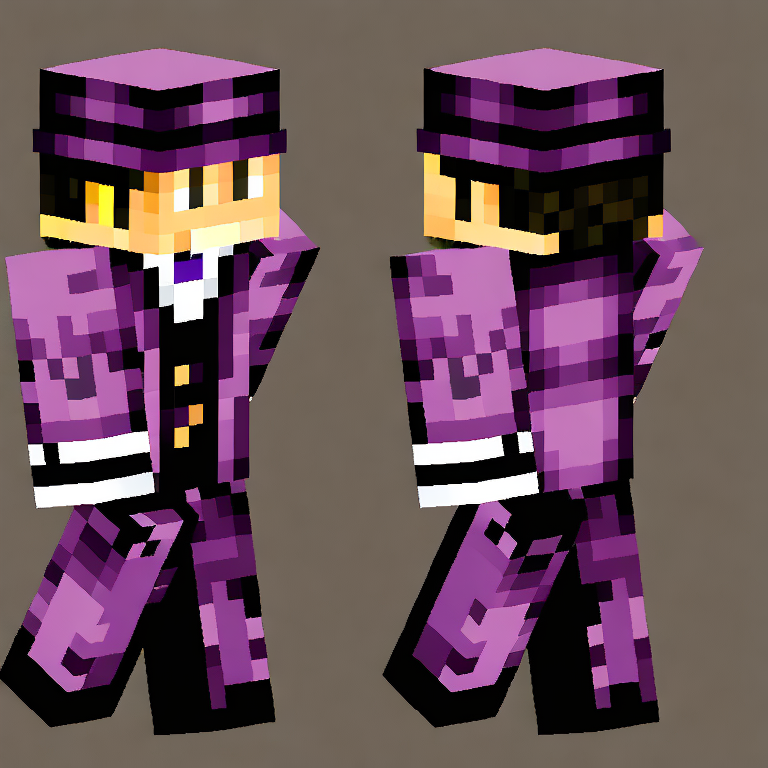
Let’s take a look at the “Man in a purple suit wearing a top hat” result generated at the 13,000th step. Here's the image returned from our fine-tuned model:
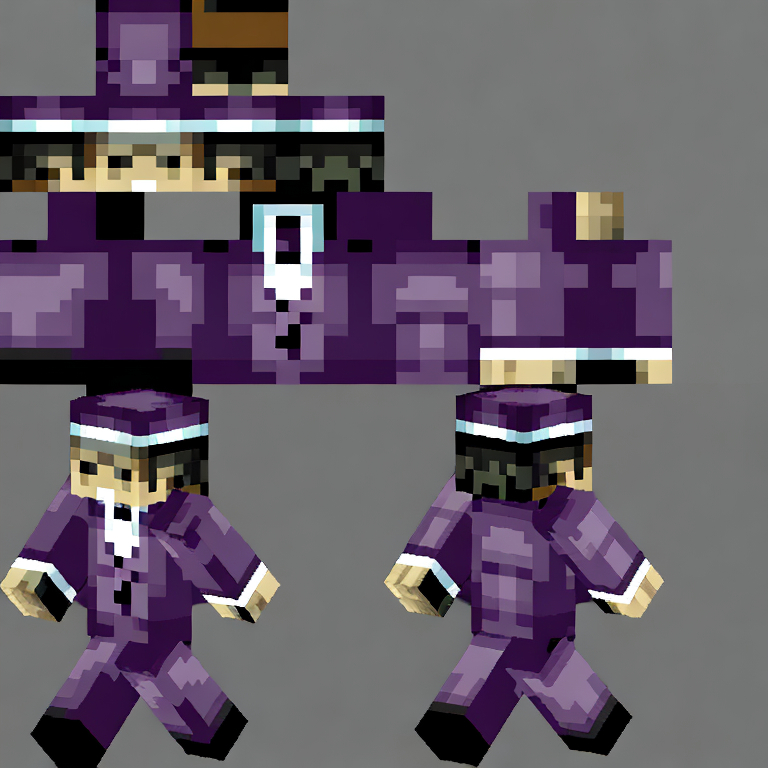
After we save the skin returned from the restore_skin_alphachannels function, we get to the fun part! We can import our dapper, purple-suited friend right into Minecraft! If we need to touch up the skin a bit first, there's a multitude of online skin editors out there. Let's bring our brand-new character to life in the Minecraft universe!
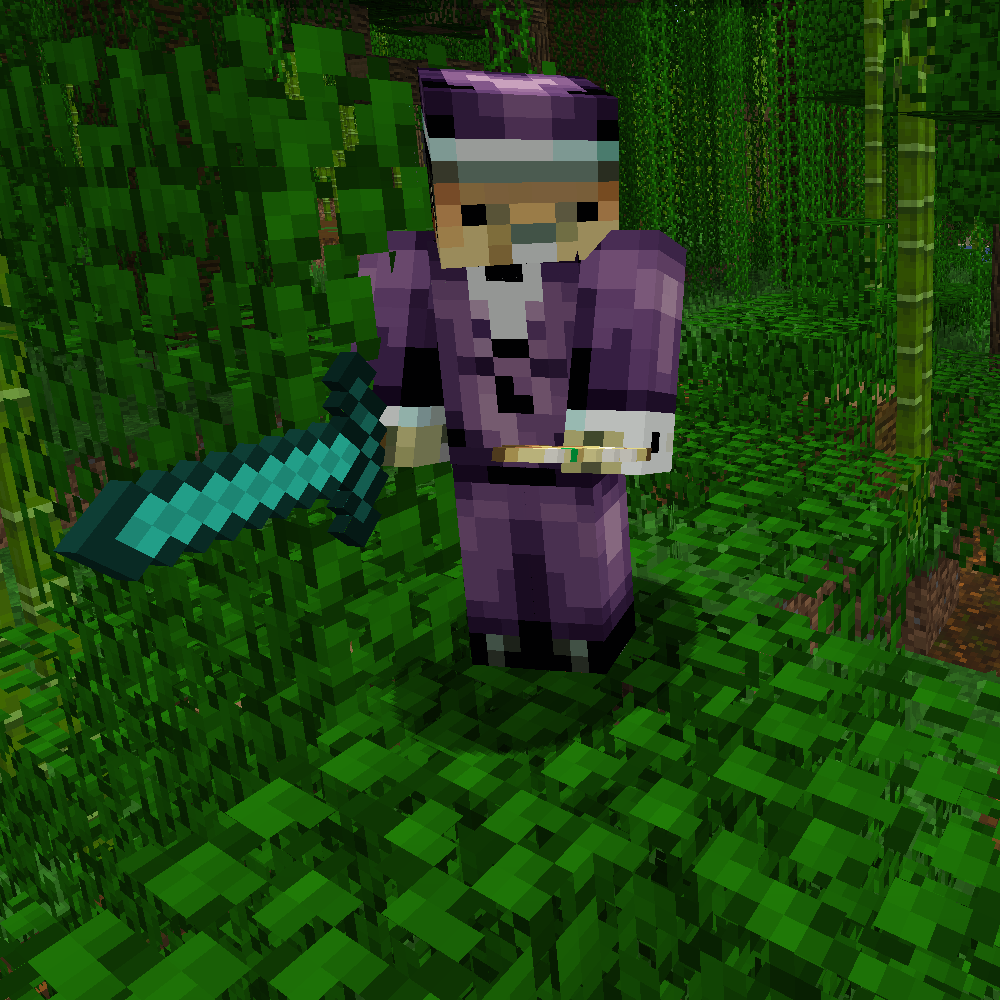
*<p style="text-align: center;">Crafting has never looked so good!*</p>
## Concluding Remarks
In a nutshell, we've truly had some…skin in the game (ba dum tss) on this quest to train a Stable Diffusion model and create some custom Minecraft skins with only text prompts. From fine-tuning our model to delivering the Minecraft-style character previews, we took it to the next level by training a model that spits out actual usable Minecraft skins.
It's your turn to unleash your imagination and bring your character designs to life! Check out the newly fine-tuned model in the [Monadical Hugging Face repository](https://huggingface.co/monadical-labs/minecraft-skin-generator). Code for this project is available in the [Monadical GitHub repository](https://github.com/Monadical-SAS/minecraft_skin_generator).
Drop a line in the comments and let us know how it goes!
Cory Spencer
is a of Monadical