<center>
# Digging into Stable Diffusion-Generated Minecraft Skins
*Written by Cory Spencer. Originally published 2023-06-27 on the [Monadical blog](https://monadical.com/blog.html).*
*This is Part 1 of a two-part series. In Part 2, "[Even More Skin in the Game: Digging Deeper Into Stable Diffusion-Generated Minecraft Skins](https://monadical.com/posts/minecraft-skins-part2.html)", we'll cover the generation of usable Minecraft skins. For more, check out the [Minecraft Skin Generator](https://skingenerator.io/).*
</center>
***Update:** Check out the hosted version of our [Minecraft Skin Generator](https://www.skingenerator.io). This closed-source version significantly improves on the quality of generated skins from the publicly available model.*
</center>
## Overview
Who doesn’t love Minecraft, the ridiculously popular [sandbox video game](https://en.wikipedia.org/wiki/Sandbox_game) that has enthralled both kids and adults alike for nearly twelve years?
The hallmark of the game is that it allows players to embark on endless adventures in infinite, blocky worlds, building, mining, battling mobs, and exploring a dynamically-generated world made of blocks. However, an often-overlooked side effect is that Minecraft has also been instrumental in spawning and strengthening familial relationships; for example, I can spend quality time bonding with my son over Minecraft, without the threat of pollen allergies and/or risking a potential sunburn. In fact, his interest in the game inspired me to build a Stable Diffusion-powered model to create customized character skins.
In the spirit of Minecraft’s emphasis on freedom and creation, Part One of this two-part series will explore how to fine-tune a Stable Diffusion model to create Minecraft-style characters, based solely on a text prompt provided to our model. Part Two will look at integrating the Minecraft skin generation plugin as a part of an open-source project we have in the pipeline, with very few changes.
Let’s get started!
## Reviewing the training dataset
Source: [Monadical’s Dataset Preview](https://huggingface.co/datasets/monadical-labs/minecraft-preview/viewer/monadical-labs--minecraft-preview) on Hugging Face.
The dataset we’ll be using consists of 1022 Minecraft skins, consisting of characters like Ang from Avatar, Vito Corleone from Godfather, and Colonel Sanders. Each training image consists of two renders of each skin: one rendered from the front, and the second from the rear.
Below are a few of my favourites, along with their associated text descriptions:
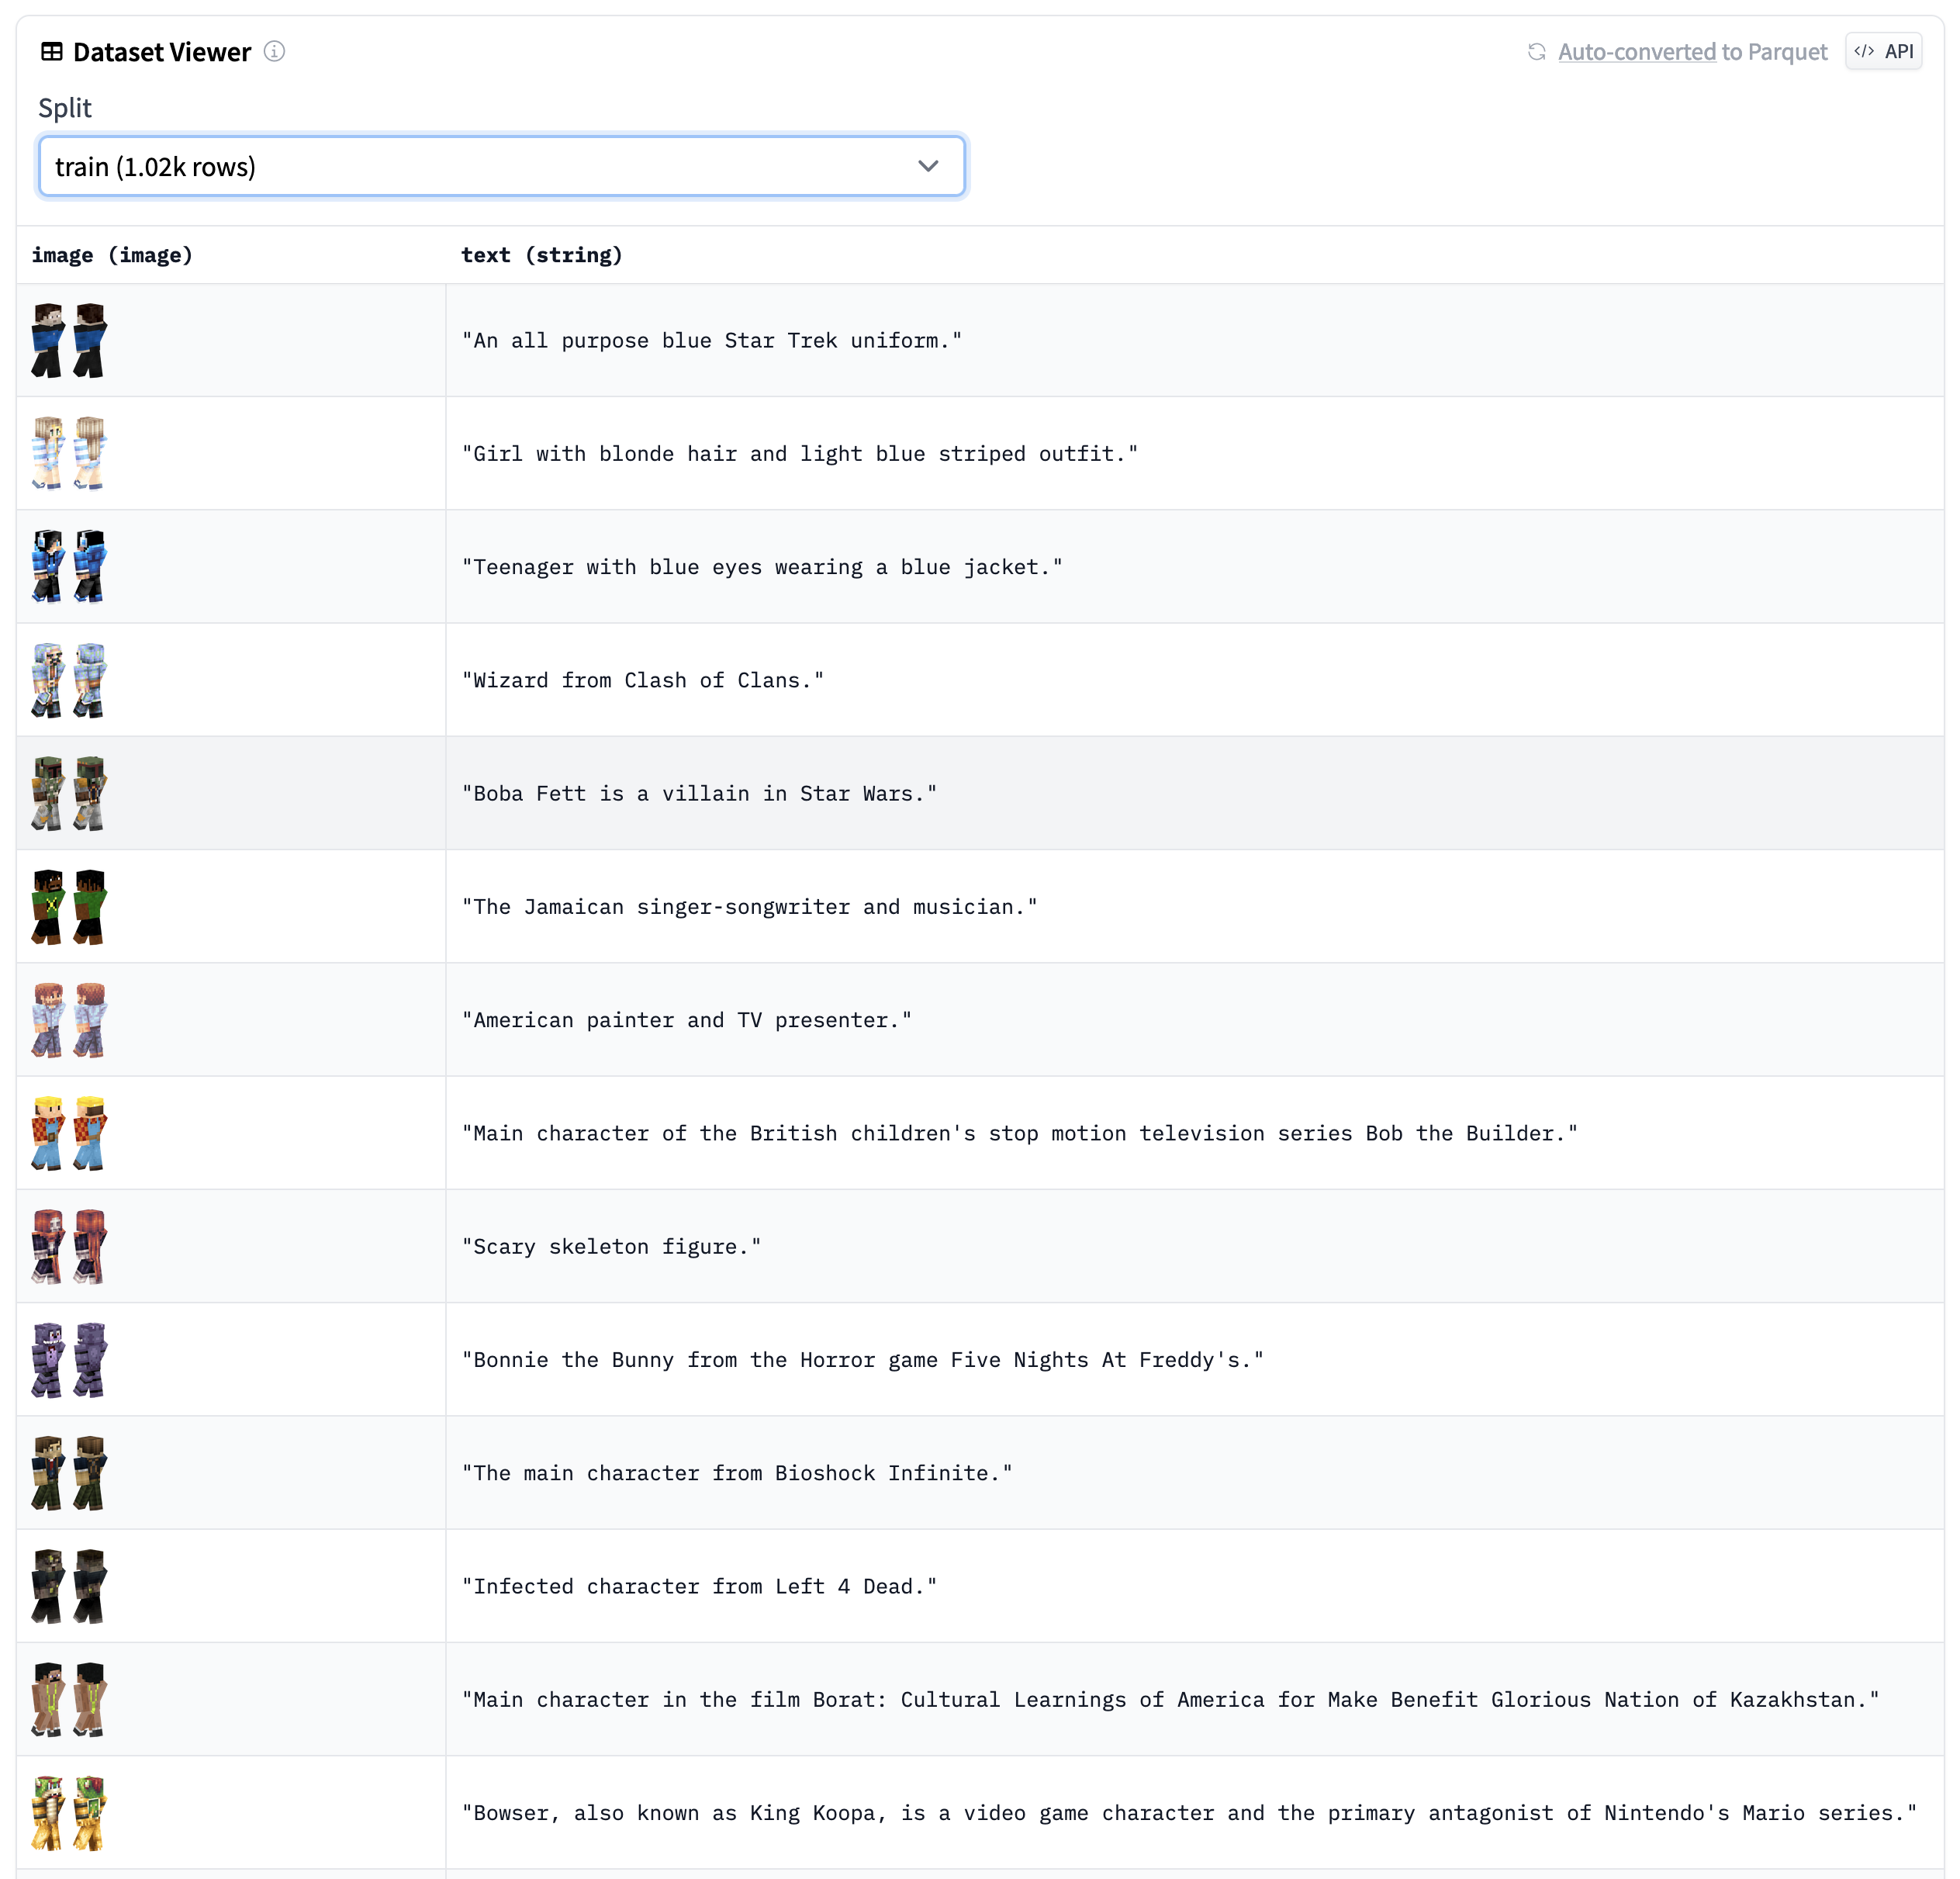
Indiana Jones, the fictional American adventurer, professor of archaeology, and the central protagonist of the Indiana Jones franchise.
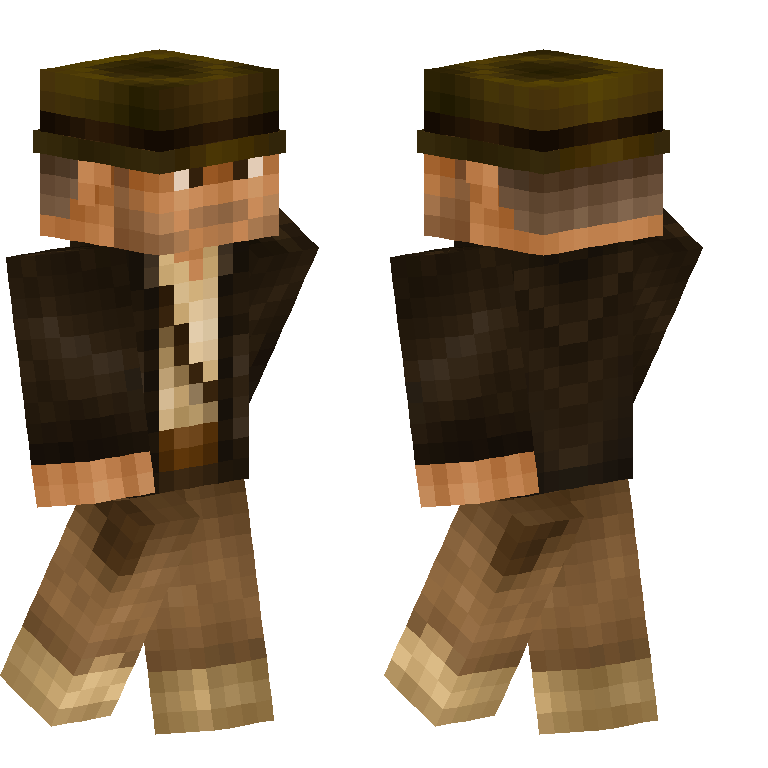
Yoda, the incredibly powerful Jedi Master in the Star Wars universe.
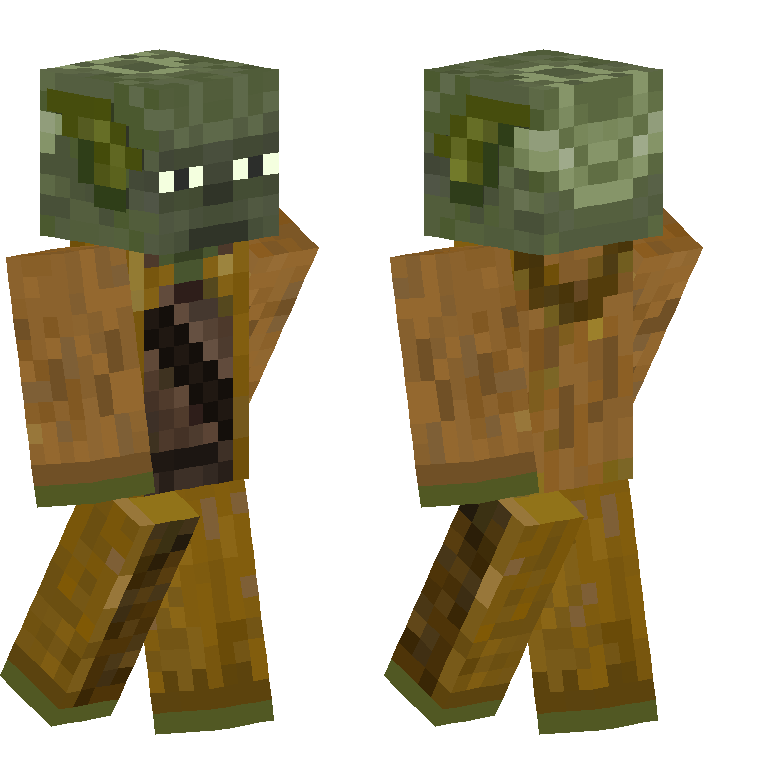
Agent Smith, Neo’s enemy in The Matrix movie series.
Now let’s see how we can turn all these images into a fine-tuned model.
## Setting up the training environment
Before we start the fine-tuning process, we first need to set up the training environment. To do this, we’ll use a script included with the [Hugging Face Diffusers library](https://huggingface.co/docs/diffusers/index) to fine-tune our model.
1. First, let’s check out the most recent copy of the Diffusers library, and switch into that directory:
```bash
$ git clone https://github.com/huggingface/diffusers
$ cd diffusers
```
If you’re training on a remote server, such as an instance in Google Cloud or AWS, you may wish to start the training process within a ‘screen’ session. Using ‘screen’ will ensure the process doesn’t get interrupted if, for example, the SSH connection is interrupted.
```bash
$ screen
```
1. Next, create a new Python environment with pipenv:
```bash
$ pipenv shell
```
1. We can install the Hugging Face Diffusers library we’ve checked out of git as follows:
```bash
$ pip install .
```
1. Switch into the examples/text_to_image directory, and install the Python modules required by the training scripts:
```bash
$ cd examples/text_to_image
$ pip install -r ./requirements.txt
```
1. Next, initialize an ‘accelerate’ environment. Using ‘accelerate’ allows us to train on all GPUs available on the system, without having to write additional code:
```bash
$ accelerate config
```
1. Finally, the training dataset can be cloned with ‘git’ into the current directory as follows:
```bash
$ git clone git@hf.co:datasets/monadical-labs/minecraft-preview
```
Now with everything installed, we can start the training process.
## Fine-tuning the Stable Diffusion model
Before we start fine-tuning the model, we first need to set up some environment variables as follows:
```bash
$ export SD_MODEL_NAME="stabilityai/stable-diffusion-2"
$ export SD_MODEL_RES=768
$ export DATASET="monadical-labs/minecraft-preview"
$ export SAVE_STEPS=1000
$ export MAX_STEPS=18000
$ export MODEL_DIR="minecraft-model"
```
$SD_MODEL_NAME tells our training script that we want to use the Stable Diffusion 2 model, which has a higher output resolution than the original Stable Diffusion. Should, for some reason, you wish to use the original Stable Diffusion model, change $SD_MODEL_RES from 768 to 512. You will also need to scale the dataset images from 768x768 down to 512x512.
$DATASET indicates that we’ll be using the Hugging Face Minecraft-preview dataset that we looked at earlier.
$SAVE_STEPS tells the training script that we want to save a checkpoint of the model every 1000 training steps. Depending on the number and type of GPU you will use for training, saving checkpoints regularly will allow you to resume training without losing too much work, should the training script be interrupted by Creepers, Zombie Pigmen, or Endermen (or for any other equally plausible reason).
$MAX_STEPS indicates that we will be training the model for a maximum of 18,000 steps, after which a usable model will be written out to $MODEL_DIR.
With these environment variables set, we’re ready to start training at last! Launch the train_text_to_image.py script as follows:
```bash
$ accelerate launch --mixed_precision="fp16" train_text_to_image.py \
--pretrained_model_name_or_path=$SD_MODEL_NAME \
--dataset_name=$DATASET \
--use_ema \
--resolution=$SD_MODEL_RES \
--train_batch_size=1 \
--gradient_accumulation_steps=4 \
--gradient_checkpointing \
--checkpointing_steps=$SAVE_STEPS \
--max_train_steps=$MAX_STEPS \
--learning_rate=1e-05 \
--max_grad_norm=1 \
--lr_scheduler="constant" --lr_warmup_steps=0 \
--output_dir=$MODEL_DIR
```
This process will probably take a long time, so if you have young children waiting for their custom skins, make sure you have a contingency plan to keep them occupied. On an NVidia RTX A6000, for example, the training process took in excess of 18 hours (which means that your child could feasibly ask, “Is it ready yet?” over 60,000 times, assuming they are awake, which of course they will be because children don’t sleep).
As a sleep-deprived father of a young child, I digress.
It should be noted that each of the checkpoint directories takes up 10-15GB of disk space, so in addition to the potentially life-saving backup plan mentioned above, you’ll also need to have several hundred gigabytes available to save all 18 checkpoints, in addition to the final model. If this isn’t an option, you can increase the $SAVE_STEPS environment variable so that fewer checkpoints are written out.
## What to do if the training script crashes
If your training session is interrupted, and you want to resume it, add the “–resume_from_checkpoint latest” flag to the train_text_to_image.py command. This will load the latest checkpoint saved in the $MODEL_DIR directory.
If the training script crashes while saving a checkpoint folder, that checkpoint may be incomplete or corrupted. If this is the case, just delete the last checkpoint folder and use the one saved previously.
## Evaluating the results of the fine-tuned model
We can evaluate the model fine-tuning progress by looking at the resulting images generated by fixed text prompts at each of the saved checkpoints. For example, here are the results for five text prompts on each of the 18 checkpoints saved during our training process:
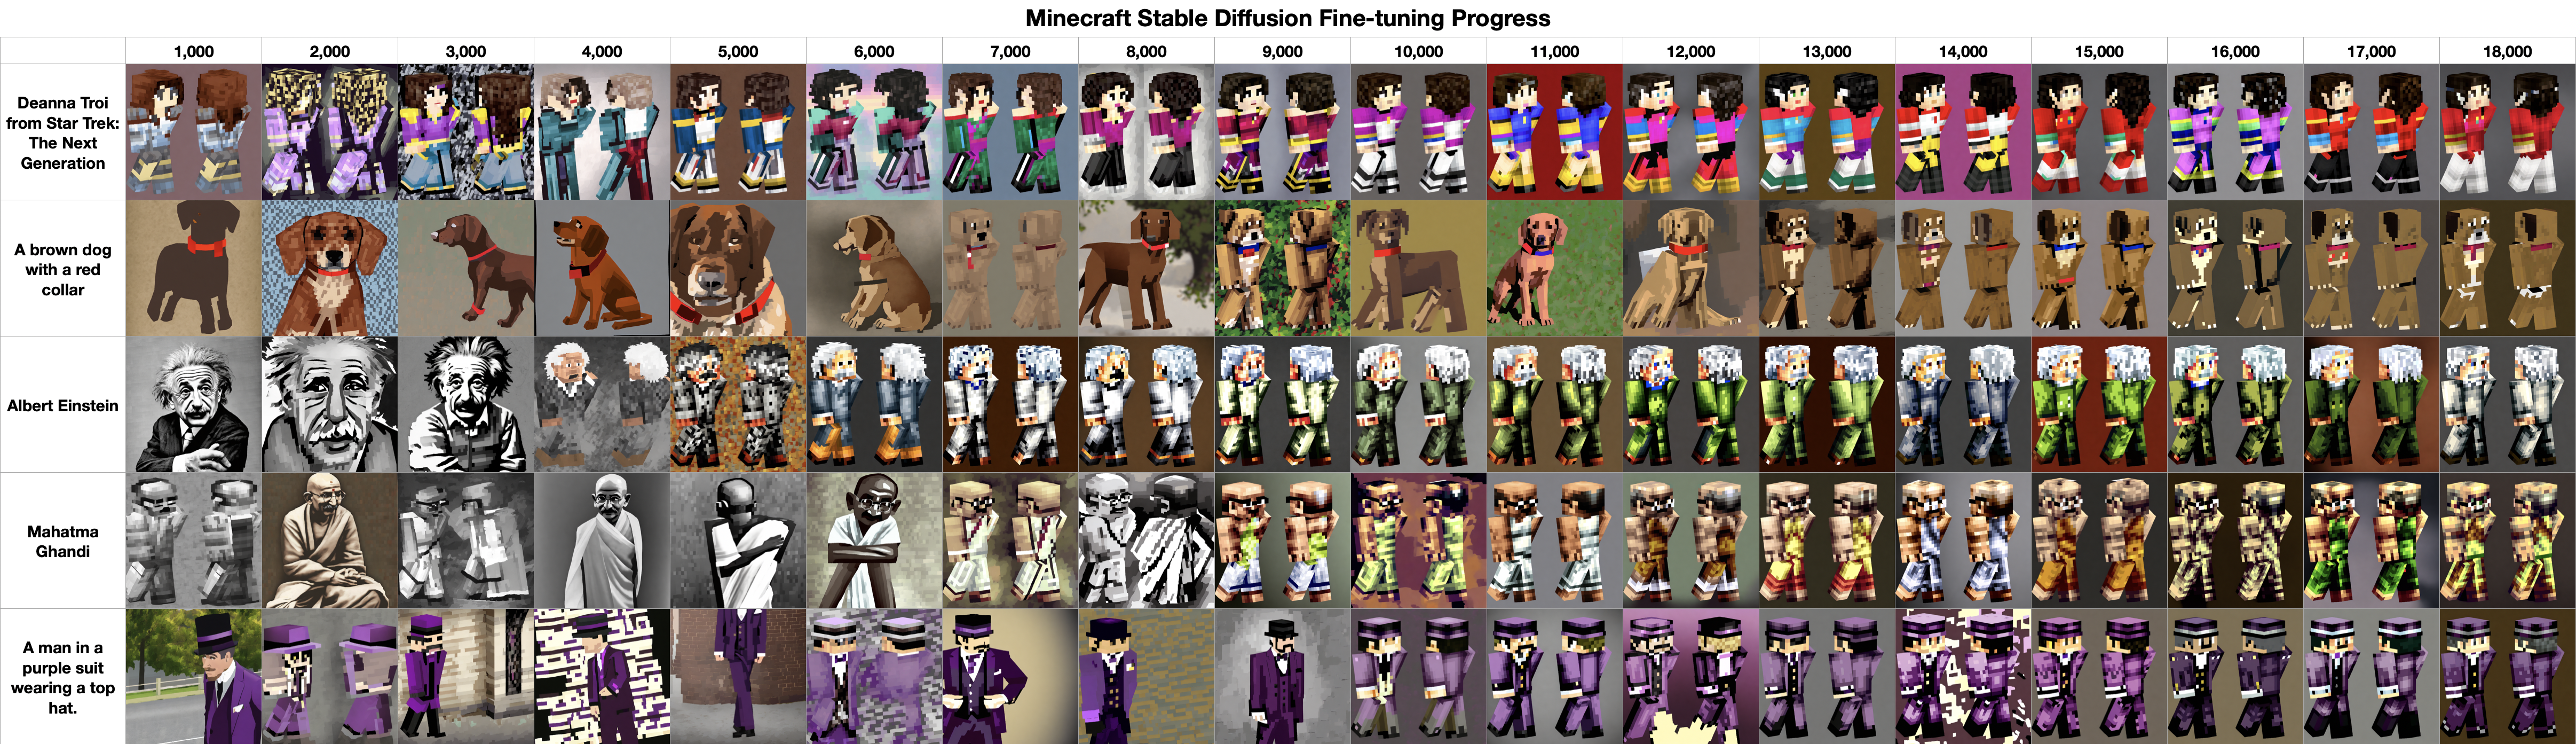
At around the 15,000th training step, we start to see a reliable generation of images in a format very similar to our input Minecraft character images.
## Using the generated model
```python
import argparse
import torch
from diffusers import StableDiffusionPipeline
MODEL_PATH = "./minecraft-model" # Path to the fine-tuned model.
parser = argparse.ArgumentParser(description='Process some inputs.')
parser.add_argument('filename', type=str, help='Name of the genereated Minecraft skin file')
parser.add_argument('prompt', type=str, help='Stable Diffusion prompt to be used to generate skin')
args = parser.parse_args()
filename = args.filename
prompt = args.prompt
pipe = StableDiffusionPipeline.from_pretrained(MODEL_PATH, torch_dtype=torch.float16)
pipe.to("cuda") # Set this to "cpu" if not using an NVidia graphics card.
image = pipe(prompt=prompt).images[0]
image.save(filename)
```
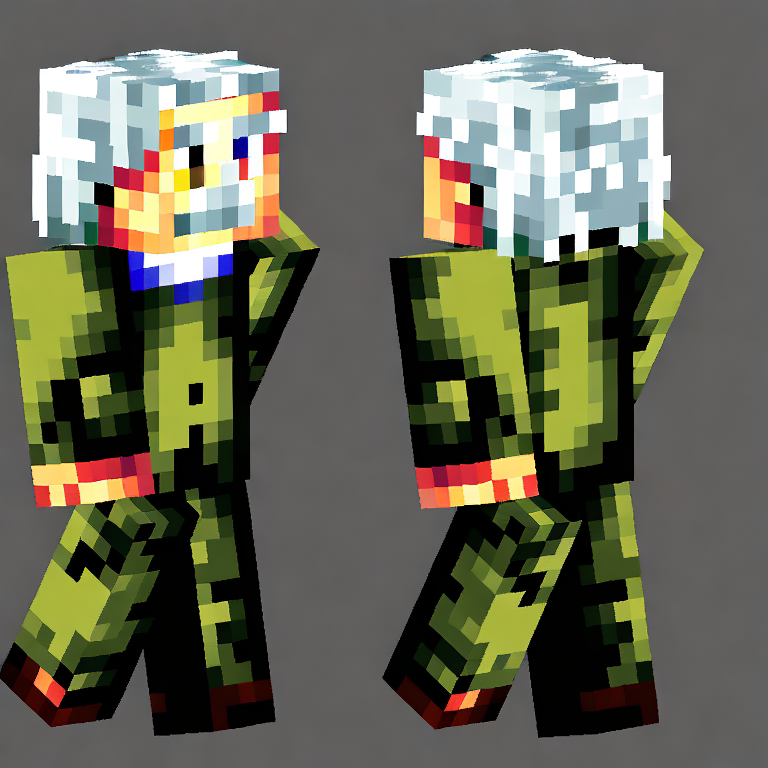
Save the script to "minecraft-skins.py", ensure the MODEL_PATH references the save path of the model we’ve just trained, and then run it as follows:
```bash
$ minecraft-skins.py einsten.png “Albert Einstein”
```
After a short wait while the image is being generated, you should find yourself with a Minecraft-style character much like those in our training datasets:
We've made our [fine-tuned model available on HuggingFace](https://huggingface.co/monadical-labs/minecraft-preview), so you won't need to train one yourself.
## “Are we there yet?”
That’s it - we’ve successfully fine-tuned a model to generate Minecraft characters! Unfortunately, these generated images are just character previews, and cannot be used in-game to customize your character...yet! If you join us for Part Two of this series, we’ll retrain another model to turn them into usable skins. Stay tuned!
Cory Spencer
is a Monadical of Monadical