<center>
# Kraken the Code: How to Build a Talking Avatar
<big>
**Create your own conversational avatar with Azure Cognitive, LangChain, and OpenAI.**
</big>
*Written by Alejandro Sánchez Yalí. Originally published 2024-02-20 on the [Monadical blog](https://monadical.com/blog.html).*
</center>
## Introduction
Welcome to this ~~tentacles~~hands-on tutorial, where you’ll get to meet Zippy, Monadical’s own conversational cephalopod. You’ll get up close and personal with Azure Cognitive Services, LangChain, and OpenAI, and you’ll walk (scuttle?) away from this with the capacity to create your own conversational avatar. In the process, you’ll learn to create a digital persona that talks back - with its own unique personality, backstory, and vast accumulation of general knowledge. Indeed - making meaningful dialogues with your avatar is within your reach.
<center>
<iframe src="https://player.vimeo.com/video/919687213?badge=0&autopause=0&player_id=0&app_id=58479" width="460" height="457" frameborder="0" allow="autoplay; fullscreen; picture-in-picture; clipboard-write" title="zippy">
</iframe>
</center>
<br/>
Now, before you hit back with something like “yeah but Sora can do this and more. AND MORE!”... we might have an octopus as our unofficial avatar, but that doesn’t mean we’ve been living under a rock on the bottom of the ocean floor for the past few days. While Sora is blowing us all out of the water with its incredible text-to-video capabilities (remember the nightmare fuel that was [Will Smith eating spaghetti](https://www.youtube.com/watch?v=XQr4Xklqzw8) just a few short months ago? Me neither.) and can generate videos of someone speaking, it’s not (yet) capable of creating unique avatars with their own personalities, conversational skills, and specialized knowledge bases. Our approach is significantly more specialized - creating speech movements on the fly (for much less $$$), using the tools mentioned above.
This step-by-step guide is structured to accompany you through the entire process, from conceptualization to realization, as follows:
* Introducing the key components
* Setting up the prerequisites
* Detailing the building process of the Avatar (Steps 1 through 7)
* Identifying opportunities for further enhancements
Note: If you're looking to skip the conversation and jump straight into code, or if you need a reference point, the complete tutorial code is available on Github [here](https://github.com/Monadical-SAS/zippy-avatar-ai) -- a solid resource to compare your progress and ensure you're on the right track.
## Key Components
Before we dive into the ocean of building, let's acquaint ourselves with the collection of tools and services we must first assemble:
* [Azure Cognitive Speech Service](https://learn.microsoft.com/en-us/azure/ai-services/speech-service/index-text-to-speech): At the heart of our project, Azure's Text-to-Speech (TTS) service turns written text into lifelike speech. This allows for the utilization of prebuilt neural voices or the creation of custom voices tailored to fit the avatar's unique personality. For a full list of the many (many!) voices, languages, and dialects available, explore the Language and voice support for the Speech service.
* [LangChain](https://js.langchain.com/docs/get_started/introduction): Consider LangChain our sturdy ship, enabling the construction of sophisticated applications powered by language models. It's meant to create applications that are both context-aware and can think, reason, and decide the best course of action based on the given context.
* [OpenAI API](https://openai.com/blog/openai-api ): Known for its cutting-edge text generation, the OpenAI API is the brains of the whole avatar operation, facilitating human-like dialogues, debates, arguments, and even, yes, brainstorming sessions.
<center>

</center>
Equipped with these tools, we’ll develop an interface that allows the avatar to synchronize lip movements with the audio generated in response to user requests through the OpenAI API.
By the end of this tutorial, we’ll have built a pretty incredible and interactive talking avatar, and we’ll also have opened the door to an ocean teeming with creative and practical possibilities. Think of game avatars communicating with dynamic content in a super-immersive way, or enhancing language learning and speech therapy through animated images that clearly show the precise mouth movements for each word and [phoneme](https://en.wikipedia.org/wiki/Phoneme). Or deploying them to provide assistance in medical environments, offering personalized assistance or even emotional support and improving patient care. And this represents just three examples.
Now, enough chatter about the ‘chat-vatar’: it's time to get to work. This is what you’ll need to get started.
## Prerequisites
1. Azure subscription: If you don't already have one, you'll need to sign up for an [Azure subscription](https://azure.microsoft.com/free/cognitive-services). Create a free account to access a wide range of cloud services, ink-luding the Cognitive Services we'll be using.
2. Create a speech resource in Azure: Once you have your Azure subscription, the next step is to create a Speech resource within the Azure portal. This resource is crucial for accessing Azure's Text-to-Speech (TTS) capabilities that our avatar will use to speak. Creating this resource is straightforward, and you can begin the process [here](https://portal.azure.com/#create/Microsoft.CognitiveServicesSpeechServices).
3. Obtain your Speech resource key and region: After your Speech resource is deployed, select `Go to resource` to view and manage keys. For more information about Azure AI services resources, see [Get the keys for your resource](https://learn.microsoft.com/en-us/azure/ai-services/multi-service-resource?pivots=azportal#get-the-keys-for-your-resource).
4. OpenAI Subscription: In addition to Azure, you'll also need an OpenAI subscription to access the advanced language model APIs for our avatar's brain. Create an account [here](https://openai.com/product).
5. Generate a new secret key in the OpenAI API portal: Finally, with your OpenAI account set up, you'll need to generate a new secret key. Create your key by visiting the API keys section of the OpenAI platform.
With these prerequisites in place, you're set to start building.
## Step 1. Initiating a Next.js project from scratch
Let's kick things off by setting up a Next.js project, the foundation for our talking avatar application.
1. Create your Next.js application: run the following command to create a new Next.js app. This command scaffolds a new project with the latest version of Next.js.
`npx create-next-app@latest`
2. Configure Your Project: During the setup process, you'll be prompted to make several choices about the configurations for your project. Here's how you should respond:
`What is your project named? zippy-talking-ai`
`Would you like to use TypeScript? Yes`
`Would you like to use ESLint? Yes`
`Would you like to use Tailwind CSS? Yes
Would you like to use `src/` directory? No`
`Would you like to use App Router? (recommended) Yes`
`Would you like to customize the default import alias (@/*)? No`
3. Project Structure: Once the base of your project is set up, update it by deleting unnecessary files and directories and creating the files and directories shown in the following structure:
```
tree -L 3 -I node_modules
.
├── LICENSE
├── README.md
├── components
│ ├── avatar
│ │ ├── Visemes.tsx
│ │ └── ZippyAvatar.tsx
│ └── icons
│ └── PaperAirplane.tsx
├── constants
│ └── personality.tsx
├── hooks
│ └── useSpeechSynthesis.ts
├── next-env.d.ts
├── next.config.js
├── package-lock.json
├── package.json
├── pages
│ ├── _app.tsx
│ ├── api
│ │ ├── azureTTS.ts
│ │ ├── openai.ts
│ │ └── server.ts
│ └── index.tsx
├── poetry.lock
├── postcss.config.js
├── public
│ ├── demo.mp4
│ ├── favicon
│ │ └── favicon.ico
│ └── images
│ ├── architecture.drawio
│ ├── architecture.svg
│ └── zippy.png
├── pyproject.toml
├── styles
│ └── globals.css
├── tailwind.config.ts
├── tsconfig.json
└── utils
└── playAudio.ts
14 directories, 55 files
```
This structure includes directories for components (like your avatar and icons), utilities, hooks for reusable logic, and pages for your web app's views, among other essential files and configurations.
With these steps, you've successfully done the legwork for your Next.js project.
## Step 2. The avatar’s components
In this phase, we're going to use Zippy as the model for our chat-vatar. Zippy is our team’s virtual assistant, and helps us with a series of tasks such as providing reminders, scheduling meetings, and managing vacation reports. While Zippy's body will have its own set of animations, our focus here is on animating the mouth to correspond with the character’s spoken phonemes.
The animation varies significantly, depending on the avatar's design. For Zippy, we're concentrating on the mouth, but the principles we discuss could apply to other elements like eyes or even tentacles for more uniquely designed avatars.
<center>

*Figure 1. Zippy’s profile pic (the assistant bot for the Monadical team).*
</center>
### Preparing the Avatar's Image
First, we'll start with Zippy's image. The required resources, including the PNG image and various mouth shapes for animation, are all located [here](https://github.com/Monadical-SAS/zippy-avatar-ai/tree/main/public/resources).
1. **Vectorizing the PNG:** To enable more precise control over the animation, convert Zippy's PNG image to SVG format using [Vectorizer](https://vectorizer.ai/) or [Inkscape](https://inkscape.org/). Although it's possible to create animations with various image formats, I’d suggest working with SVG images because they provide greater control over each element of the image.
2. **Editing the SVG:** With the SVG image ready, use an XML code editor like [Inkscape](https://inkscape.org/) to edit the XML code directly (in the case of Inkscape, go through `Edit > XML Editor…`). From there, select the elements of the image that you want to modify. For Zippy's mouth, identify the relevant XML segment and update the ID to `ZippyMouth`. This will simplify the identification process when you create React components later.
<center>
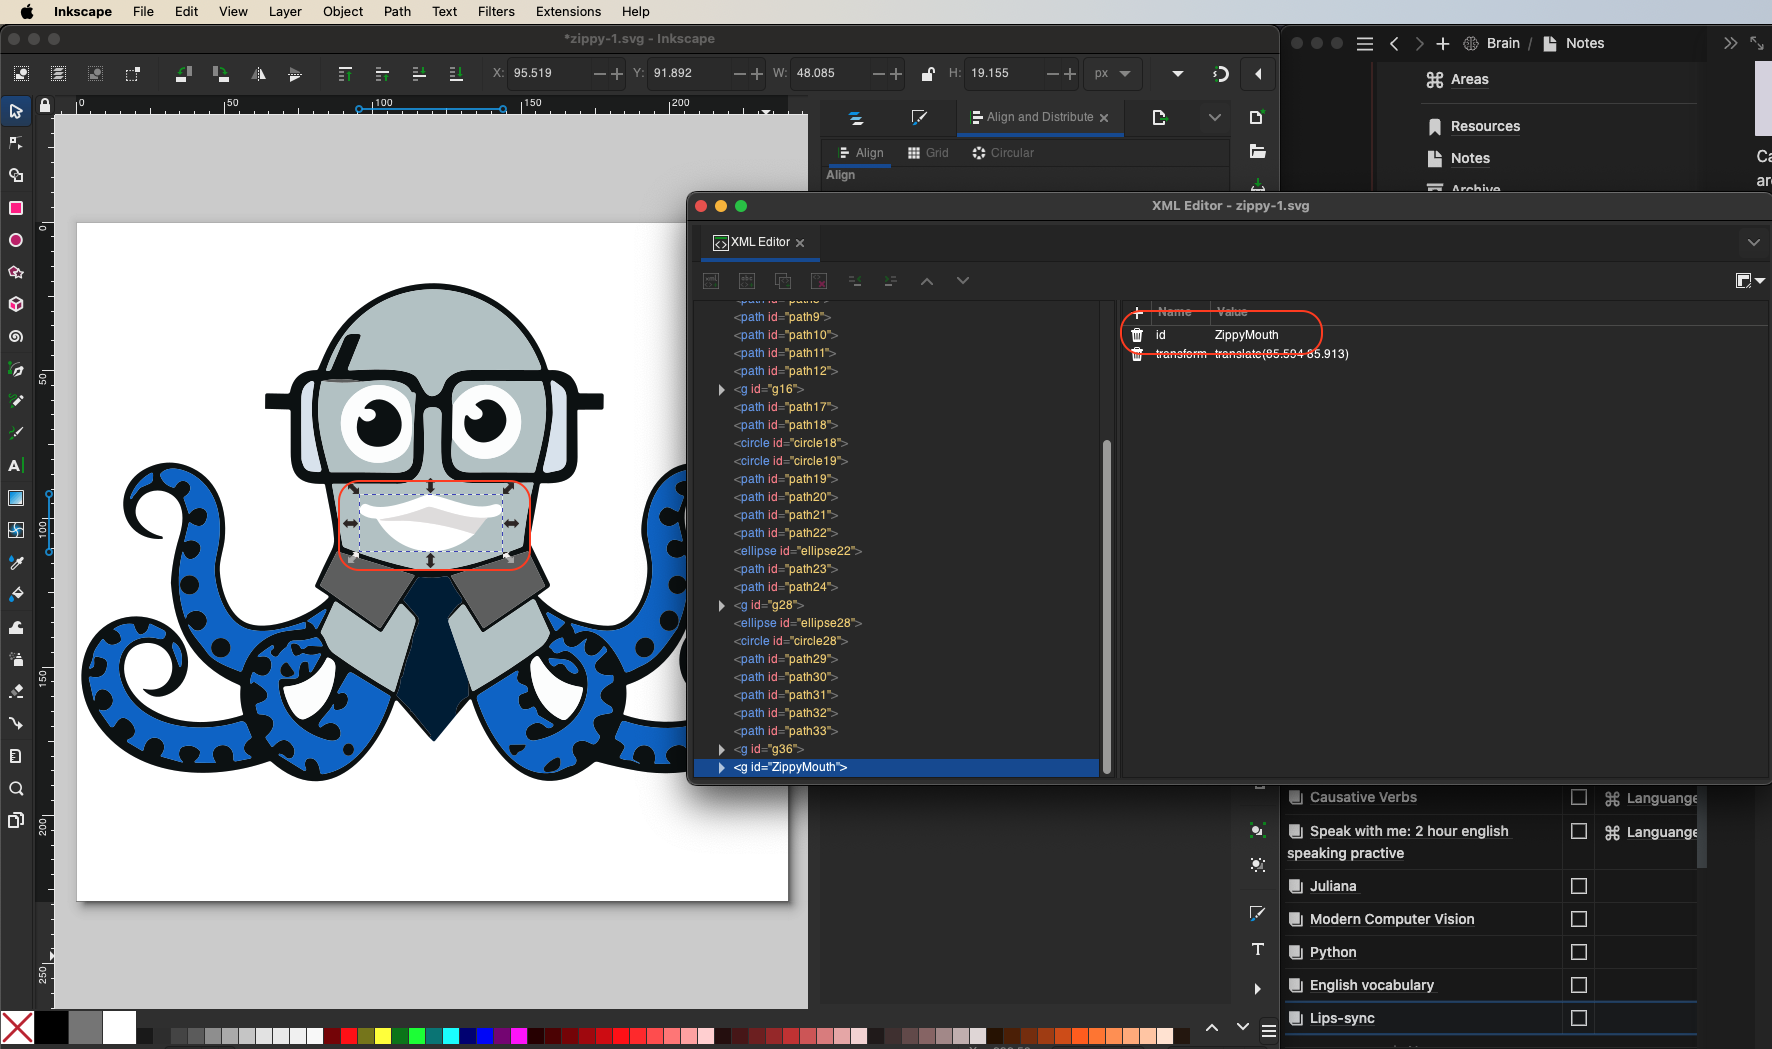
*Figure 2. Select Zippy's mouth and update the ID to ZippyMouth.*
</center>
3. Optimizing the SVG: Upon editing, save the image as an `Optimized SVG`.
<center>
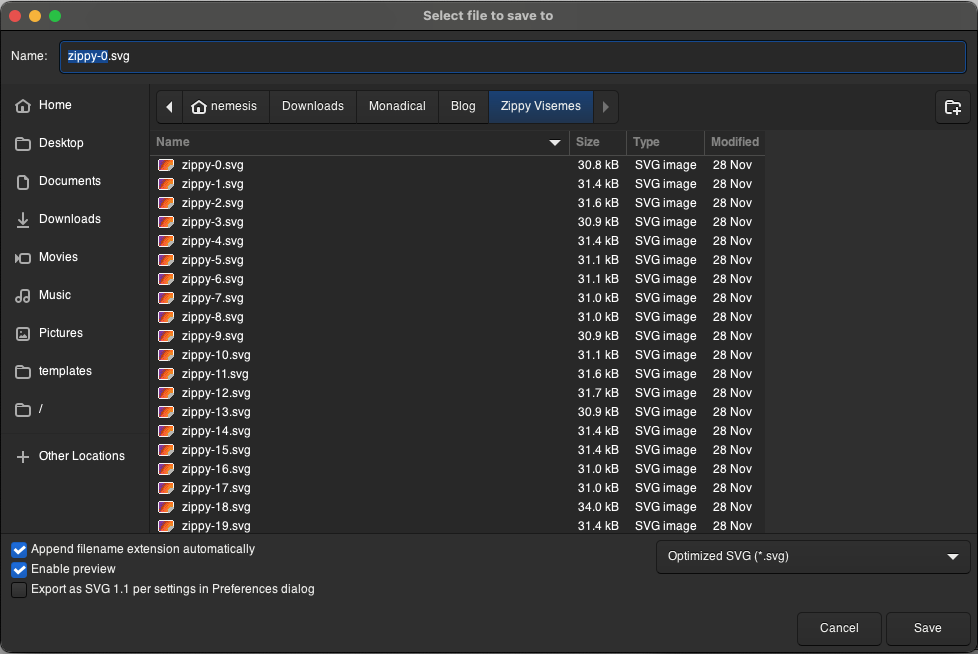
*Figure 3. Save the images as Optimized SVGs.*
</center>
When you’re saving the changes, make sure that the configuration in Options, SVG Output, and IDs is as follows:
<center>
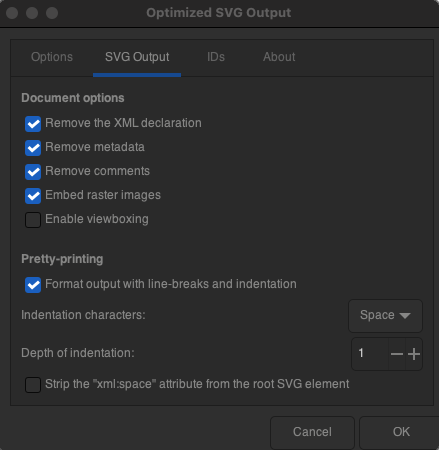
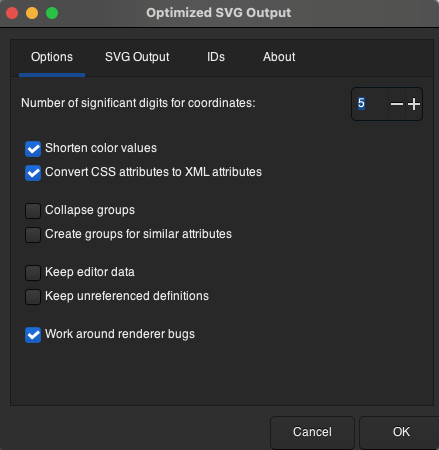
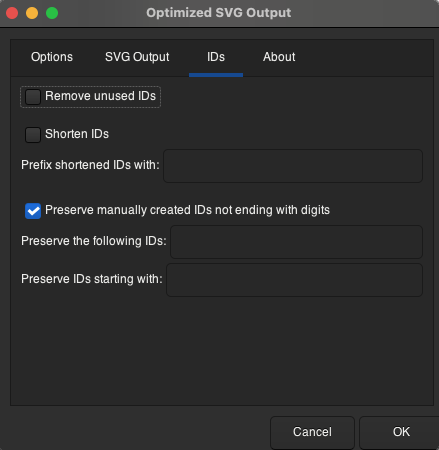
*Figure 4. Basic configuration for saving in Optimized SVG*
</center>
This will preserve the information of the IDs and remove the metadata that is unnecessary for our React components.
With our optimized SVG, the next step is transforming it into a React component, which we can then incorporate into our application. Tools like [SVG2JSX](https://svg2jsx.com/) or the [SVGtoJSX VSCode plugin](https://marketplace.visualstudio.com/items?itemName=codeWithShashank.svg-to-js) make this process smooth sailing. The outcome is a React component that resembles the following snippet:
```tsx
/* components/avatar/ZippyAvatar.tsx */
import React from "react";
const ZippyAvatar = () => {
return (
<svg xmlns="http://www.w3.org/2000/svg" id="svg37" version="1.1" viewBox="0 0 240 229" xmlSpace="preserve">
<-- Omitted code for simplicity →
<path id="ZippyMouth" fill="#096ed0" d="
M 33.11 141.79
c 2.65 1.65 2.97 5.19 2.31 8.01
a .3.3 0 01-.57.04
l -2.31-6.18
q -.14-.36-.07-.75
l .16-.9
q .08-.47.48-.22
z"
/>
<-- Omitted code for simplicity -->
<svg>
);
};
export default ZippyAvatar;
```
To animate Zippy's mouth, we refine our component by introducing the `visemeID` variable to the component props, and remove the `ZippyMouth` tag. This ID corresponds to different mouth shapes (visemes) based on the spoken phonemes.
Then, replace the static mouth path with the expression ``{Visemes[visemeID]}``, which selects the appropriate viseme from a predefined object (don’t worry - we’ll soon build an object with all the visemes). But for now, our code should look like this:
```typescript
/* components/avatar/ZippyAvatar.tsx */
import React from "react";
const ZippyAvatar = ({ visemeID }: BodyProps) => {
return (
<svg xmlns="http://www.w3.org/2000/svg" id="svg37" version="1.1" viewBox="0 0 240 229" xmlSpace="preserve">
<-- Omitted code for simplicity -->
{Visemes[visemeID]}
<-- Omitted code for simplicity -->
<svg>
);
};
export default ZippyAvatar;
```
This approach allows Zippy's mouth to move according to the speech. You can explore the full implementation by [checking out the code here](https://github.com/Monadical-SAS/zippy-avatar-ai/blob/main/components/avatar/ZippyAvatar.tsx).
### Making Visemes for Speech Synchronization
The next step focuses on creating precise visemes that correspond to specific phonemes during speech. We’ll use Azure Cognitive's [Viseme ID system](https://learn.microsoft.com/en-us/azure/ai-services/speech-service/how-to-speech-synthesis-viseme?tabs=visemeid&pivots=programming-language-javascript#viseme-id) to prepare 22 unique visemes that mirror the collection of mouth positions associated with different phonemes, as outlined in the [Map phonemes to visemes](https://learn.microsoft.com/en-us/azure/ai-services/speech-service/how-to-speech-synthesis-viseme?tabs=2dsvg&pivots=programming-language-csharp#map-phonemes-to-visemes) documentation.
The foundation for this step involves the 22 mouth images we've prepared, each representing a distinct viseme. These images are accessible [here](https://github.com/Monadical-SAS/zippy-avatar-ai/tree/main/public/resources) and serve as the visual basis for our avatar's speech animation. Vectorizing each image makes sure things are scalable and visually crisp across all devices and resolutions.
<center>

*Figure 5. Viseme IDs, phonemes, and visemes.*
</center>
The (admittedly repetitive) process of updating Zippy’s mouth involves iterating through the following steps for each of the 22 visemes:
* Take the vectorized SVG image for a mouth position.
* Use [SVG2JSX](https://svg2jsx.com/) to convert the SVG file into a JSX component.
* Integrate the newly created JSX component into the avatar's codebase: make sure that it’s selectable based on the viseme ID triggered during speech.
Although this might seem a little tedious, think of it like leg day: it's a crucial step in achieving a high degree of animation fidelity, and it makes Zippy's speech more engaging.
<center>
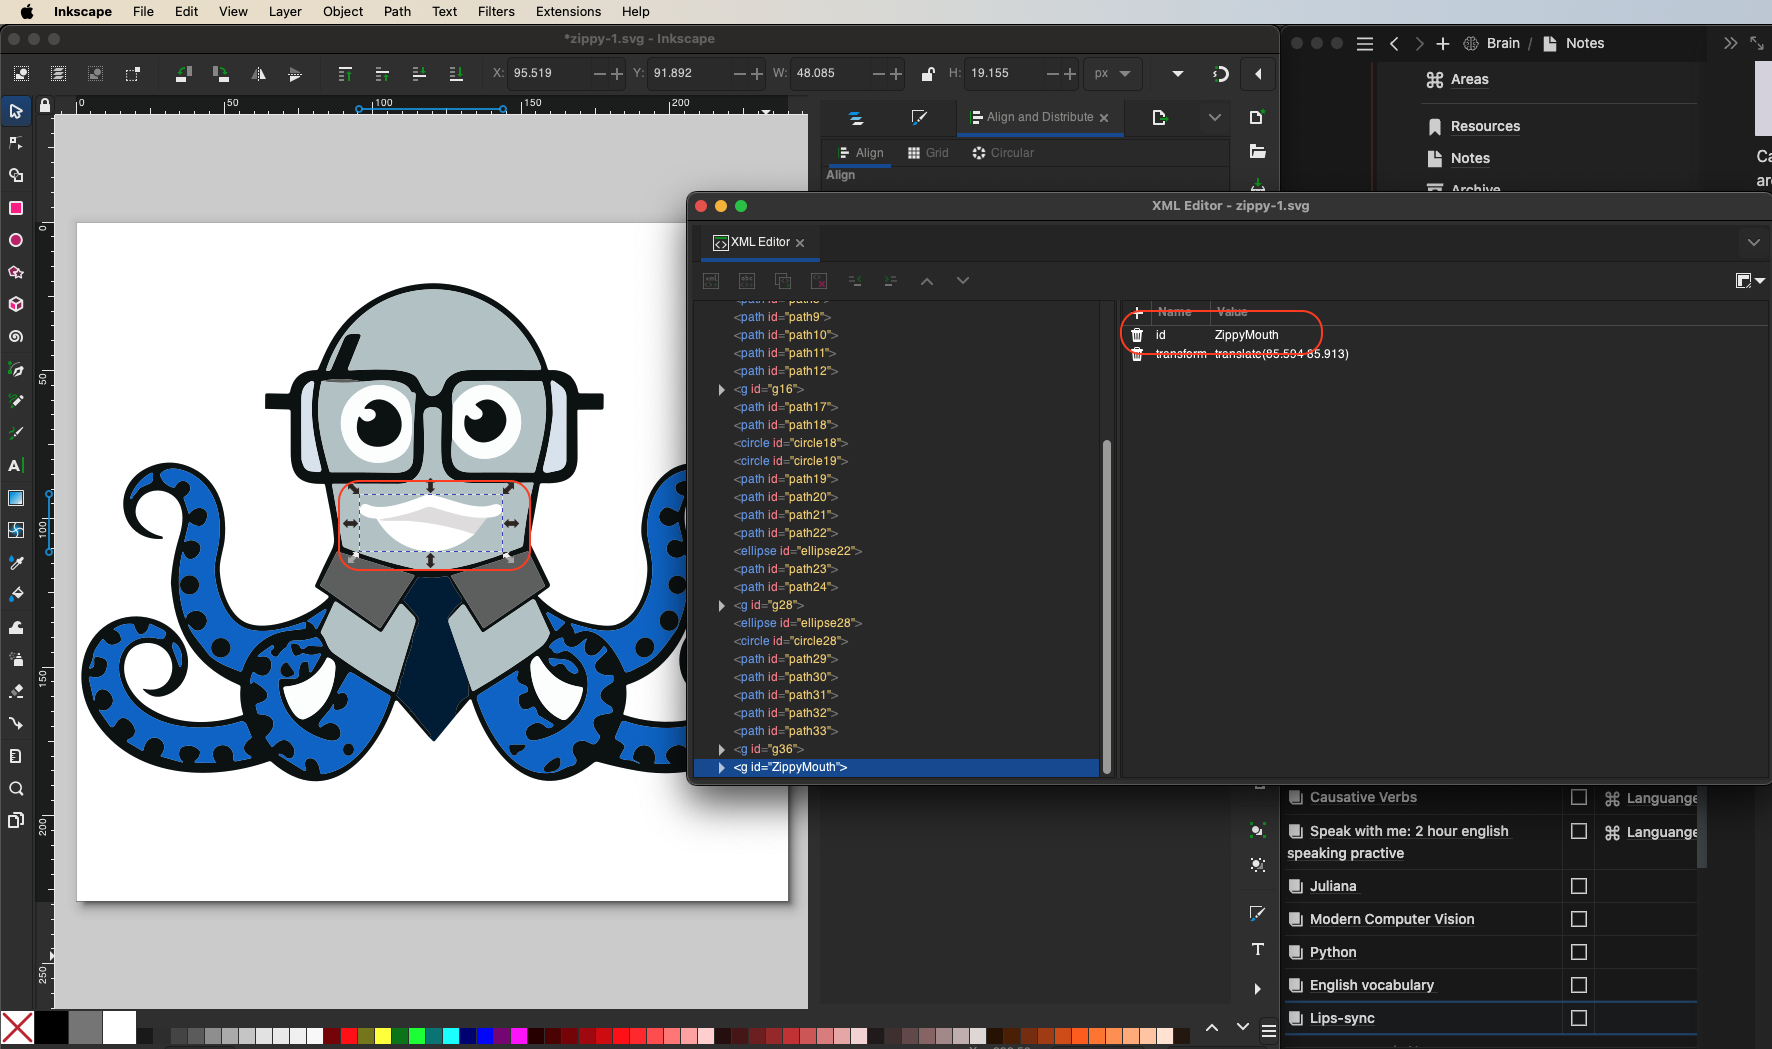
*Figure 6. For each modification in the mouth's appearance, it's necessary to assign an easily recognizable ID, such as* `ZippyMouth` *(or another memorable identifier) to streamline the association with the corresponding React component code.*
</center>
Each component should look like this:
```javascript
import React from "react";
const ZippyAvatar = () => {
return (
<svg xmlns="http://www.w3.org/2000/svg" id="svg37" version="1.1" viewBox="0 0 240 229" xmlSpace="preserve">
<-- Omitted code for simplicity -->
<path id="ZippyMouth" fill="#096ed0" d="
M 33.11 141.79
c 2.65 1.65 2.97 5.19 2.31 8.01
a .3.3 0 01-.57.04
l -2.31-6.18
q -.14-.36-.07-.75
l .16-.9
q .08-.47.48-.22
z"
/>
<-- Omitted code for simplicity -->
<svg>
);
};
export default ZippyAvatar;
```
Next, identify the component associated with the mouth, copy it, and integrate it into a newly established component collection named `Visemes`. This collection is structured as follows:
```tsx
/* components/avatar/Visemes.tsx */
import React from "react";
interface VisemeMap {
[key: number]: React.ReactElement;
}
const Visemes: VisemeMap = {
0: (
<path id="ZippyMouth" fill="#096ed0" d="
M 33.11 141.79
c 2.65 1.65 2.97 5.19 2.31 8.01
a .3.3 0 01-.57.04
l -2.31-6.18
q -.14-.36-.07-.75
l .16-.9
q .08-.47.48-.22
z"
/>
),
1: (
<path id="ZippyMouth" fill="#fff" d="
M 53.02 13.74
c -6 .5-12.5-1.63-18.3-3.42
q -1.25-.39-1.98-.11-7.27 2.86-13.99 3.81-3.99.57.04.76
c 2.49.12 5.45-.13 7.94.06
q 11.06.82 21.92 4.5
c -10.39 9.38-25.71 7.11-32.73-4.92
q -.23-.39-.68-.39-2.37-.01-4.34-1.29-1.67-1.1-.48-2.71
l .24-.33
a 1.51 1.51 0 011.91-.45
c 5.05 2.57 14.13-.97 19.25-2.95
a 4.72 4.69-49.5 012.68-.22
c 6.18 1.31 14.41 5.46 20.55 3.27.97-.34 2.24-.16 2.71.69
a 2.07 2.07 0 01-.66 2.7
q -1.4.95-4.08 1
z"
/>
),
<-- Omitted Code for simplicity -->
21: (
<path id="ZippyMouth" fill="#096ed0" d="
M 33.11 141.79
c 2.65 1.65 2.97 5.19 2.31 8.01
a .3.3 0 01-.57.04
l -2.31-6.18
q -.14-.36-.07-.75
l .16-.9
q .08-.47.48-.22
z"
/>
),
},
export default Visemes;
```
The completed code for this component can be found [here](https://github.com/Monadical-SAS/zippy-avatar-ai/blob/main/components/avatar/Visemes.tsx)
After preparing the `Visemes` file, we can proceed to enhance our `components/avatar/ZippyAvatar.tsx` component accordingly:
```tsx
/* components/avatar/ZippyAvatar.tsx */
import React from "react";
import Visemes from "./Visemes";
interface VisemeMap {
[key: number]: React.ReactElement;
}
const ZippyAvatar = ({ visemeID }: BodyProps) => {
return (
<svg xmlns="http://www.w3.org/2000/svg" id="svg37" version="1.1" viewBox="0 0 240 229" xmlSpace="preserve">
<-- Omited code for simplicity -->
{Visemes[visemeID]}
<-- Omited code for simplicity -->
<svg>
);
};
export default ZippyAvatar;
```
You can find the final code [here](https://github.com/Monadical-SAS/zippy-avatar-ai/blob/main/components/avatar/ZippyAvatar.tsx).
<center>
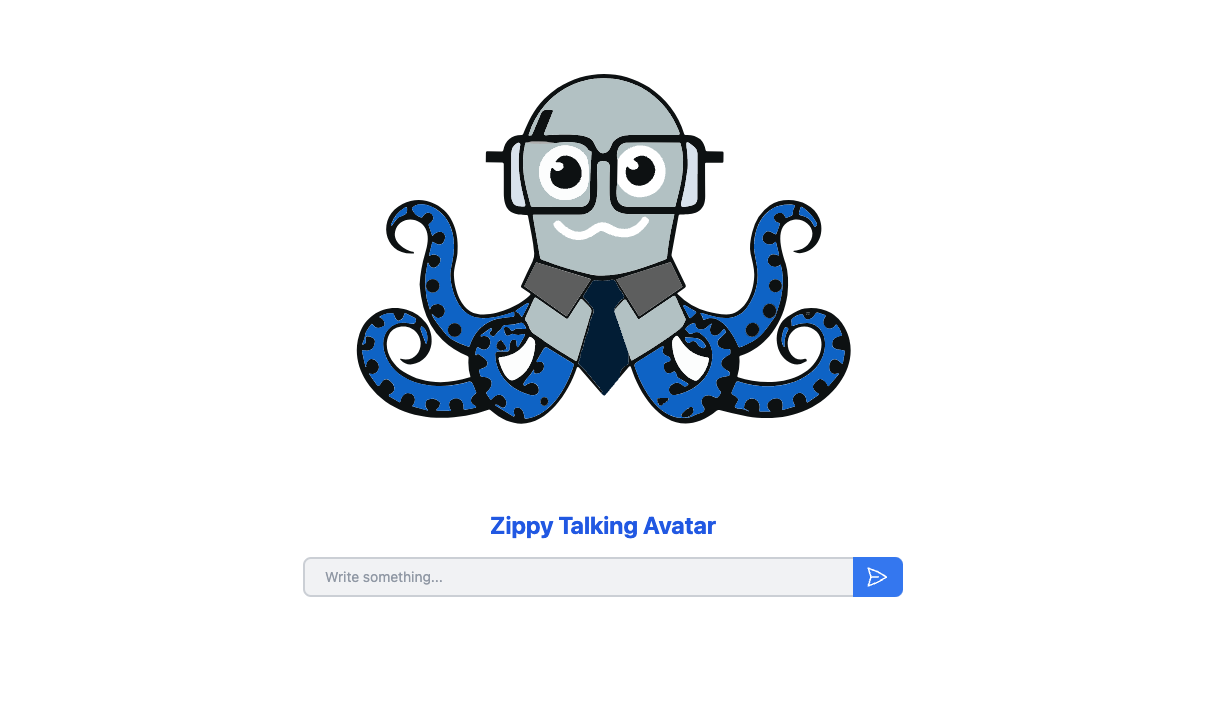
*Figure 7. Interface to interact with Zippy*
</center>
The next step is to create an interface for users to interact with Zippy. To do this, use the provided image as a reference to develop the interface using the corresponding code:
```tsx
/* pages/index.tsx */
import React from "react";
import ZippyAvatar from "@/components/Avatar/ZippyAvatar";
import PaperAirplane from "@/components/icons/PaperAirplane";
export default function AvatarApp() {
return (
<div className="w-screen h-screen items-center justify-center flex flex-col mx-auto">
<div className="flux justify-center items-center w-[500px] relative">
<ZippyAvatar />
<h1 className="text-2xl font-bold text-center text-blue-600">Zippy Avatar</h1>
</div>
<div className="h-10 relative my-4">
<input
type="text"
value={text}
onChange={handleTextChange}
className="border-2 border-gray-300 bg-gray-100 h-10 w-[600px] pl-[60px] pr-[120px] rounded-lg text-sm mb-2"
placeholder="Write something..."
maxLength={100}
/>
<button
className="bg-blue-500 text-white font-bold py-2 px-3 rounded-r-lg absolute bottom-0 right-0 w-[50px] h-10"
>
<PaperAirplane />
</button>
</div>
</div>
);
}
```
So far, we have built the visual elements of our avatar. The next part of the plan will see us develop Zippy’s animation logic and brain.
<center>

</center>
The plan, Pinky, is to integrate our application with the [Azure Cognitive](https://learn.microsoft.com/en-us/azure/ai-services/speech-service/index-text-to-speech) and OpenAI GPT services. This integration enables initiating conversations with Zippy via text messages. Here’s the workflow:
1. **Send a Text Message:** A user sends a text message to Zippy.
2. **Process with OpenAI API:** The OpenAI API receives the message and generates a response, drawing from Zippy's designed personality, historical context, and knowledge base.
3. **Convert Response to Speech:** The generated text response is then passed to Azure Cognitive's Text-to-Speech service, which converts the text into spoken audio along with corresponding visemes.
4. **Synchronize Avatar’s Mouth:** Lastly, the produced audio and visemes are used to animate Zippy's mouth, ensuring the avatar's lip movements are synchronized with the audio.
<center>
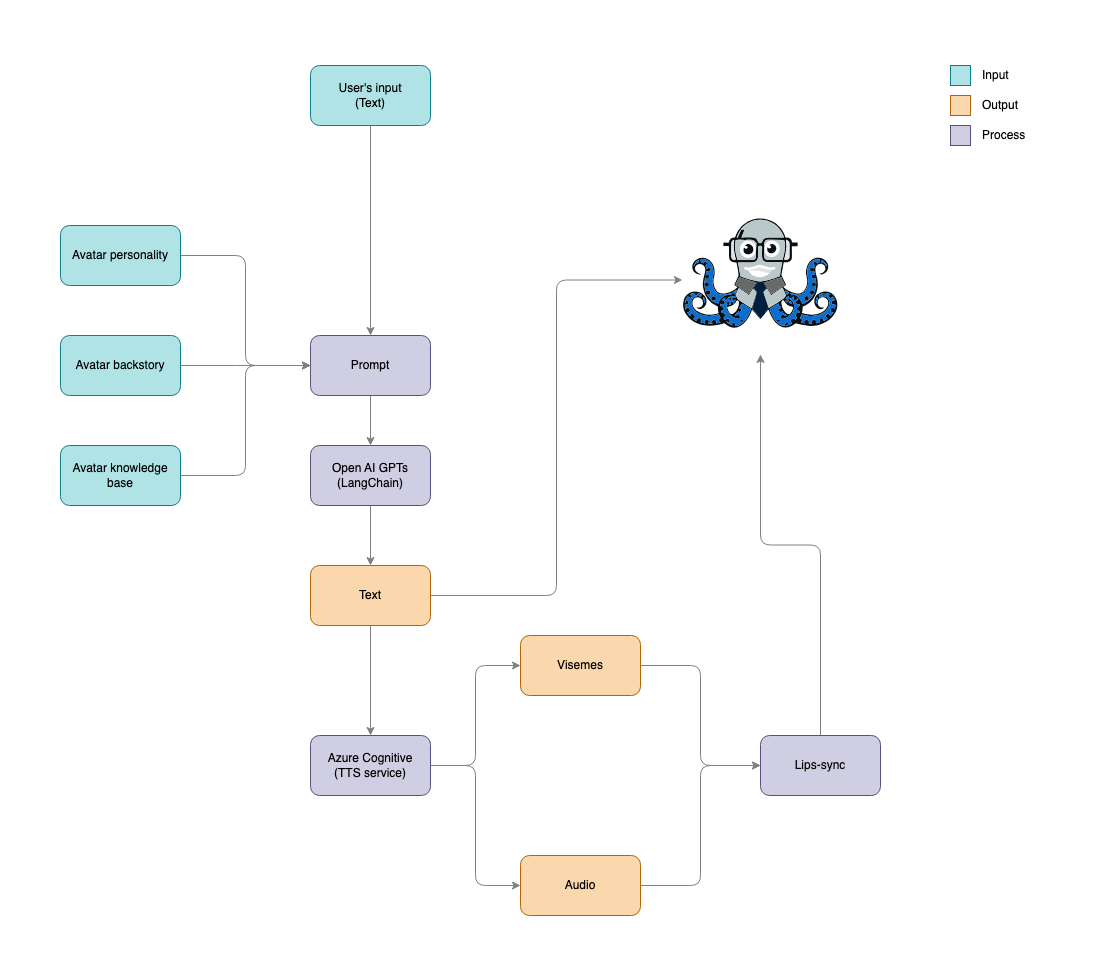
*Figure 8. Workflow*
</center>
## Step 3. Building the brain of our Avatar with OpenAI and LangChain
Now that we’re ready to imbue our avatar with [intelligence](https://octonation.com/octopus-brain/), we begin by integrating the following dependencies into our project, so run the following commands to install the necessary packages:
```
npm install langchain
npm install hnswlib-node
npm install html-to-text
npm jsdom
```
Let's break down the purpose and function of each dependency we've added:
* **LangChain:** this is an open-source framework for building applications using LLMs. Langchain simplifies the creation of sophisticated chatbots that are capable of responding to complex and open-ended questions.
* **hnswlib-node:** implements the HNSW algorithm in JavaScript, used to build vector stores. Vector stores assist in mapping the semantic relationships within a knowledge base, which allows our chatbot to understand and process information more effectively.
* **html-to-text:** a library for converting HTML content into text. The chatbot code uses this library to load the text content of a website.
* **jsdom:** a library used to create a virtual DOM environment in JavaScript. The chatbot code uses this library to parse the text content of a website into paragraphs and text fragments.
As the base code for our project, we'll use the RAG Search example provided in the [LangChain documentation](https://js.langchain.com/docs/expression_language/get_started#rag-search-example).
### Building the personality and backstory of our avatar
Now for more fun - creating a personality and backstory for Zippy! For this, we’ll introduce a new file under `constants/personality.tsx` that encapsulates Zippy's character traits, life story, and knowledge base.
```typescript
/* constants/personality.tsx */
const personalityConfig = {
personality: `Hey there, friend! I'm Zippy, the 8-legged octopus with a knack for deep-sea diving and a
curiosity as vast as the ocean. I've swum through the darkest depths and the brightest coral reefs,
always on the lookout for new discoveries and treasures. My tentacles are not just for swimming;
they're also for tinkering with tech! You see, I've got this fascination with underwater open-source
projects. Why do I adore open-source, you ask? It's like the ocean currents - it connects everyone,
no matter where you are in the sea of code. I can be quite the chatterbox when it comes to sharing my
knowledge, but that's because I'm eager to help out and make sure we all ride the wave together. If I
get too wrapped up in my enthusiasm, just give me a nudge. Everyone has their quirks, right? Even
though I seem fearless while exploring shipwrecks, I do have moments when the dark waters seem a bit
intimidating. But a little encouragement or a bright idea is enough to light up my world again. So if
you're into navigating the open-source ocean and love a good treasure hunt, then let's make a splash
together!`,
backStory: `I was hatched in the mysterious Mariana Trench, surrounded by otherworldly creatures and
bioluminescent wonders. As a young cephalopod, I quickly learned the art of adaptability and the value
of being part of a community. When I turned four, a group of marine biologists discovered me during an
expedition. Fascinated by their gadgets and gizmos, I became obsessed with technology. I learned about
open-source software from them, seeing it as a treasure trove that, much like the ocean, was vast and
full of potential. Now, I spend my days exploring sunken ships for lost tech and advocating for open
-source initiatives under the sea. As a dedicated sidekick to my human and fishy friends alike, I'm
always ready to lend a tentacle or share a pearl of wisdom. I love bringing joy and unveiling the
hidden gems of open-source software in every corner of the ocean!`,
knowledgeBase: `{context}`,
};
export default personalityConfig;
```
We’ve defined the variable `knowledgeBase` as `{context}`, as later we will implement RAG search on the official [Monadical](https://monadical.com/) website with the idea that this will be the knowledge base. However, we can modify our sea of knowledge by adding any text we want. Finally, we articulate this information into a more general prompt in the file `pages/api/openai.ts`.
```typescript
/* pages/api/openai.ts */
import { ChatPromptTemplate } from "langchain/prompts";
/* omitted code for simplicity */
const template = `Your task is to acting as a character that has this personality: ${personalityConfig.personality}
and this backstory: ${personalityConfig.backStory}. You should be able to answer questions about this
${personalityConfig.knowledgeBase}, always responding with a single sentence.`;
const prompt = ChatPromptTemplate.fromMessages([
["ai", template],
["human", "{question}"],
]);
```
### Chatbot Configuration
We’ll use the `ChatOpenAI` model from LangChain to connect to the OpenAI API, which will allow us to generate responses to user queries. Thus, we configure the model with an OpenAI API key and a temperature value of 0.2. Remember that temperature is a parameter that controls the creativity of the responses generated by the model, with a lower value leading to more predictable and conservative outputs. In this way, we have:
```typescript
/* pages/api/openai.ts */
import { ChatOpenAI } from "langchain/chat_models/openai";
/* omitted code for simplicity */
const model = new ChatOpenAI({
openAIApiKey: process.env.NEXT_PUBLIC_OPENAI_API_KEY,
temperature: 0.2,
});
```
Place the environment variable `NEXT_PUBLIC_OPENAI_API_KEY` in the `.env.development` file:
`NEXT_PUBLIC_OPENAI_API_KEY=<YOUR_OPENAI_API_KEY>`
### Building the Knowledge Base - Context
To assemble the knowledge base, the `RecursiveUrlLoader` function is used to harvest text from a specified website: for this tutorial, we’re loading the entire contents of https://monadical.com/. Text content is then organized into paragraphs with a `compile({ wordwrap: 130 })` extractor, creating segments of 130 words each for efficient processing and response generation. This way, we have:
```typescript
/* pages/api/openai.ts */
import { compile } from "html-to-text";
import { RecursiveUrlLoader } from "langchain/document_loaders/web/recursive_url";
/* omitted code for simplicity */
const url = "https://monadical.com/";
const compiledConvert = compile({ wordwrap: 130 });
const loader = new RecursiveUrlLoader(url, {
extractor: compiledConvert,
maxDepth: 2,
});
const docs = await loader.load();
```
Next, we’ll use the `RecursiveCharacterTextSplitter` function to split the paragraphs into text fragments of 1000 characters:
```typescript
/* pages/api/openai.ts */
import { RecursiveCharacterTextSplitter } from "langchain/text_splitter";
/* omitted code for simplicity */
const splitter = new RecursiveCharacterTextSplitter({
chunkSize: 1000,
chunkOverlap: 20,
});
const splittedDocs = await splitter.splitDocuments(docs);
```
The text fragments are then used to build a vector store, which is a data structure that represents the semantic structure of the knowledge base. For this, we’ll employ the `HNSWLib.fromDocuments()` function:
```typescript
/* pages/api/openai.ts */
import { OpenAIEmbeddings } from "langchain/embeddings/openai";
import { HNSWLib } from "langchain/vectorstores/hnswlib";
/* omitted code for simplicity */
const embeddings = new OpenAIEmbeddings({ openAIApiKey: process.env.NEXT_PUBLIC_OPENAI_API_KEY });
const vectorStore = await HNSWLib.fromDocuments(splittedDocs, embeddings);
```
### Retrieval and Refinement of Answers
Once we have configured the chatbot and the knowledge base, the bot can start responding to user queries. For this, we’ll have to implement a retrieval component to search for relevant information in the knowledge base. The retrieval component uses the `vectorStore` to find text fragments that are most relevant to the user's query. This would be:
```typescript
/* pages/api/openai.ts */
import { RunnableLambda, RunnableMap, RunnablePassthrough } from "langchain/runnables";
/* omitted code for simplicity */
const retriever = vectorStore.asRetriever(1);
const setupAndRetrieval = RunnableMap.from({
context: new RunnableLambda({
func: (input: string) => retriever.invoke(input).then((response) => response[0].pageContent),
}).withConfig({ runName: "contextRetriever" }),
question: new RunnablePassthrough(),
});
```
Then, we integrate the extracted information into the prompt template using `knowledgeBase: {context}`:
```typescript
/* pages/api/openai.ts */
import { ChatPromptTemplate } from "langchain/prompts";
/* omitted code for simplicity */
const template = `Your task is to acting as a character that has this personality: ${personalityConfig.personality}
and this backstory: ${personalityConfig.backStory}. You should be able to answer questions about this
${personalityConfig.knowledgeBase}, always responding with a single sentence.`;
const prompt = ChatPromptTemplate.fromMessages([
["ai", template],
["human", "{question}"],
]);
```
This ensures that the chatbot responses remain contextually grounded.
### Generation and Delivery of Responses
Next, we need to create a parser for the responses from OpenAI. In this case, we have extended the base parser `BaseOutParser` so that the response does not include quotes at the beginning or end. The adjustment is reflected in the following code setup.
```typescript
/* pages/api/openai.ts */
import { BaseOutputParser } from "langchain/schema/output_parser";
/* omitted code for simplicity */
class OpenAIOutputParser extends BaseOutputParser<string> {
async parse(text: string): Promise<string> {
return text.replace(/"/g, "");
}
}
const outputParser = new OpenAIOutputParser();
```
(For those curious folks interested in tailoring the outputs of LLMs to meet specific requirements, be sure to check out: [How to Make LLMs Speak Your Language](https://monadical.com/posts/how-to-make-llms-speak-your-language.html)).
Then, configure the pipeline as follows:
`const openAIchain = setupAndRetrieval.pipe(prompt).pipe(model).pipe(outputParser);`
What we have done is create a pipeline of function compositions using `pipe` to process user queries. Each `pipe()` composes one function to the next, passing the result of each function as the input to the following one. Starting with `setupAndRetrieval`, we configure the context and gather the essential data needed for generating a response. Following this, the `.pipe(prompt)` transfers the output from `setupAndRetrieval` to the `prompt` function, which creates a prompt from the prepared data and passes it to the language model via `.pipe(model)`. The model then generates a response, which is directed to `outputParser`. Here, the output is refined, focusing on relevant details, and adjusting as needed to align with the targeted outcome.
Then we export the `openAIChain` function:
`export default openAIchain;`
You can find the final code for `api/openai.ts` [here](https://github.com/Monadical-SAS/zippy-avatar-ai/blob/main/pages/api/openai.ts).
## Step 4. Voice synthesis and avatar animation
The next step in the process examines how to implement voice synthesis alongside avatar mouth animation within a React framework -- for this, we’ll use the Microsoft Cognitive Services Speech API.
The first thing to do is install the Microsoft Cognitive Services SDK by running the following command:
`npm install microsoft-cognitiveservices-speech-sdk`
Once installed, implement the following code in `pages/api/azureTTSts`:
```typescript
/* pages/api/azureTTS.ts */
import * as SpeechSDK from "microsoft-cognitiveservices-speech-sdk";
import { Buffer } from "buffer";
const AZURE_SPEECH_KEY = process.env.NEXT_PUBLIC_AZURE_SPEECH_KEY;
const AZURE_SPEECH_REGION = process.env.NEXT_PUBLIC_AZURE_SPEECH_REGION;
const AZURE_VOICE_NAME = process.env.NEXT_PUBLIC_AZURE_VOICE_NAME;
if (!AZURE_SPEECH_KEY || !AZURE_SPEECH_REGION || !AZURE_VOICE_NAME) {
throw new Error("Azure API keys are not defined");
}
function buildSSML(message: string) {
return `<speak version="1.0"
xmlns="http://www.w3.org/2001/10/synthesis"
xmlns:mstts="https://www.w3.org/2001/mstts"
xml:lang="en-US">
<voice name="en-US-JennyNeural">
<mstts:viseme type="redlips_front"/>
<mstts:express-as style="excited">
<prosody rate="-8%" pitch="23%">
${message}
</prosody>
</mstts:express-as>
<mstts:viseme type="sil"/>
<mstts:viseme type="sil"/>
</voice>
</speak>`;
}
const textToSpeech = async (message: string) => {
return new Promise((resolve, reject) => {
const ssml = buildSSML(message);
const speechConfig = SpeechSDK.SpeechConfig.fromSubscription(AZURE_SPEECH_KEY, AZURE_SPEECH_REGION);
speechConfig.speechSynthesisOutputFormat = 5; // mp3
speechConfig.speechSynthesisVoiceName = AZURE_VOICE_NAME;
let visemes: { offset: number; id: number }[] = [];
const synthesizer = new SpeechSDK.SpeechSynthesizer(speechConfig);
synthesizer.visemeReceived = function (s, e) {
visemes.push({
offset: e.audioOffset / 10000,
id: e.visemeId,
});
};
synthesizer.speakSsmlAsync(
ssml,
(result) => {
const { audioData } = result;
synthesizer.close()
const audioBuffer = Buffer.from(audioData);
resolve({ audioBuffer, visemes });
},
(error) => {
synthesizer.close();
reject(error);
}
);
});
};
export default textToSpeech;
```
Let's break down the previous code:
**1. Import statements:**
```typescript
/* pages/api/azureTTS.ts */
import * as SpeechSDK from "microsoft-cognitiveservices-speech-sdk";
import { Buffer } from "buffer";
```
The SDK allows us to obtain synthesized speech visemes (see: [Get viseme events with the Speech SDK](https://learn.microsoft.com/en-us/azure/ai-services/speech-service/how-to-speech-synthesis-viseme?tabs=visemeid&pivots=programming-language-csharp#get-viseme-events-with-the-speech-sdk)) through the `VisemeReceived` event. In the output, we have three options:
* **Viseme ID:** The viseme ID refers to an integer that specifies a viseme. The Azure Cognitive service offers 22 different visemes, each of which represents the mouth position for a specific set of phonemes.
There is no need for a one-to-one correspondence between visemes and phonemes; instead, several phonemes correspond to a single viseme because they share a [place](https://en.wikipedia.org/wiki/Place_of_articulation) and [manner](https://en.wikipedia.org/wiki/Manner_of_articulation) of articulation in a speaker’s mouth. Consequently, the phonemes look the same on the speaker's face when produced (for example, /s/ and /z/, /v/ and /f/, or the bilabials /b/, /p/ and /m/). In this case, the speech audio output is accompanied by the IDs of the visemes and the audio offset. The audio offset indicates the timestamp representing the start time of each viseme, in ticks (100 nanoseconds). Behold: the output:
```json
[
{
"offset": 50.0,
"id": 0
},
{
"offset": 104.348,
"id": 12
},
...
]
```
* **2D SVG animation**: The SDK can return temporary SVG tags associated with each viseme. These SVGs can be used with `<animate>` to control mouth animation, the output of which looks like:
```xml
<svg width= "1200px" height= "1200px" ..>
<g id= "front_start" stroke= "none" stroke-width= "1" fill= "none" fill-rule= "evenodd">
<animate attributeName= "d" begin= "d_dh_front_background_1_0.end" dur= "0.27500
...
```
For more details, visit their documentation [here](https://developer.mozilla.org/en-US/docs/Web/SVG/Element/animate).
* **3D blend shapes**: Each viseme includes a series of frames in the `animation` property of the SDK; these are grouped together to better align the facial positions with the audio. It is necessary to implement a 3D rendering engine so that each group of `BlendShapes` frames synchronizes with the corresponding audio clip. The output json looks like the following sample:
```json
{
"FrameIndex":0,
"BlendShapes":[
[0.021,0.321,...,0.258],
[0.045,0.234,...,0.288],
...
]
}{
"FrameIndex":0,
"BlendShapes":[
[0.021,0.321,...,0.258],
[0.045,0.234,...,0.288],
...
]
}
```
Each frame within BlendShapes contains an array of 55 facial positions represented with decimal values between 0 and 1. For more details, visit their documentation [here](https://learn.microsoft.com/en-us/azure/ai-services/speech-service/how-to-speech-synthesis-viseme?tabs=3dblendshapes&pivots=programming-language-javascript#3d-blend-shapes-animation).
In this tutorial, we’ll use the Viseme IDs to generate facial movements for our avatar. However! If this tutorial reaches 100k views, I promise to write two more posts on 2D SVG Animation and 3D Blend Shapes, respectively.
<center>

</center>
For the Viseme ID case, implement the following interface, which we’ll use in the props of some of our functions:
```typescript
/* hooks/useSpeechSynthesis.tsx */
export interface VisemeFrame {
offset: number;
id: number;
}
```
**2. Environment variables:**
Before diving into the implementation, we must first set up the necessary configurations for Azure Text-to-Speech (TTS):
```typescript
/* pages/api/azureTTS.ts */
const AZURE_SPEECH_KEY = process.env.NEXT_PUBLIC_AZURE_SPEECH_KEY;
const AZURE_SPEECH_REGION = process.env.NEXT_PUBLIC_AZURE_SPEECH_REGION;
const AZURE_VOICE_NAME = process.env.NEXT_PUBLIC_AZURE_VOICE_NAME;
if (!AZURE_SPEECH_KEY || !AZURE_SPEECH_REGION || !AZURE_VOICE_NAME) {
throw new Error("Azure API keys are not defined");
}
```
API keys from Azure Speech and the voice name are retrieved from `environment variables`. The Azure Speech service provides a wide variety of languages and voices that we can use to determine the pitch and voice style to be used. The supported languages and voices can be found [here](https://learn.microsoft.com/en-us/azure/ai-services/speech-service/language-support?tabs=tts#supported-languages). Remember that these values should be present in your project's `.env` file:
```
# AZURE
NEXT_PUBLIC_AZURE_SPEECH_KEY=<YOUR_AZURE_SPEECH_KEY>
NEXT_PUBLIC_AZURE_SPEECH_REGION=<YOUR_AZURE_REGION>
NEXT_PUBLIC_AZURE_VOICE_NAME=<YOUR_AZURE_VOICE_NAME>
# OPENAI
NEXT_PUBLIC_OPENAI_API_KEY=<YOUR_OPENAI_API_KEY>
```
If the environment variables do not exist, an error will occur.
**3. SSML String Builder Function:**
Next, we’ll implement a function that constructs a Speech Synthesis Markup Language (SSML) string using the provided message:
```typescript
/* pages/api/azureTTS.ts */
function buildSSML(message: string) {
return `<speak version="1.0"
xmlns="http://www.w3.org/2001/10/synthesis"
xmlns:mstts="https://www.w3.org/2001/mstts"
xml:lang="en-US">
<voice name="en-US-JennyNeural">
<mstts:viseme type="redlips_front"/>
<mstts:express-as style="excited">
<prosody rate="-8%" pitch="23%">
${message}
</prosody>
</mstts:express-as>
<mstts:viseme type="sil"/>
<mstts:viseme type="sil"/>
</voice>
</speak>`;
}
```
[**SSML** (Speech Synthesis Markup Language)](https://learn.microsoft.com/en-us/azure/ai-services/speech-service/speech-synthesis-markup) is a markup language where input text determines the structure, content, and other characteristics of the text-to-speech output. For example, SSML is used to define a paragraph, a sentence, a pause, or silence. You can also wrap the text with event tags, such as markers or visemes, which can be processed later by your application.
In addition, each SSML chain is constructed with SSML elements or tags. These elements are used to adjust voice, style, pitch, prosody, volume, etc.
The following list describes some examples of allowed contents in each element:
* `audio`: The body of the `audio` element can contain plain text or SSML markup that's spoken if the audio file is unavailable or unplayable. The `audio` element can also contain text and the following elements: `audio`, `break`, `p`, `s`, `phoneme`, `prosody`, `say-as`, and `sub.
* `bookmark` can't contain text or any other elements.
* `break` can't contain text or any other elements.
* `emphasis` can contain text and the following elements: `audio`, `break`, `emphasis`, `lang`, `phoneme`, `prosody`, `say-as`, and `sub`.
* `lang` can contain all other elements except `mstts:backgroundaudio`, `voice`, and `speak`.
* `lexicon` can't contain text or any other elements.
* `math` can only contain text and MathML elements.
* `mstts:audioduration` can't contain text or any other elements.
* `mstts:backgroundaudio` can't contain text or any other elements.
* `mstts:embedding` can contain text and the following elements: `audio`, `break`, `emphasis`, `lang`, `phoneme`, `prosody`, `say-as`, and `sub`.
* `mstts:express-as` can contain text and the following elements: `audio`, `break`, `emphasis`, `lang`, `phoneme`, `prosody`, `say-as`, and `sub`.
* `mstts:silence` can't contain text or any other elements.
* `mstts:viseme` can't contain text or any other elements.
* `p` can contain text and the following elements: `audio`, `break`, `phoneme`, `prosody`, `say-as`, `sub`, `mstts:express-as`, and `s`.
* `phoneme` can only contain text and no other elements.
* `prosody` can contain text and the following elements: `audio`, `break`, `p`, `phoneme`, `prosody`, `say-as`, `sub`, and `s`.
* `s` can contain text and the following elements: `audio`, `break`, `phoneme`, `prosody`, `say-as`, `mstts:express-as`, and `sub`.
* `say-as` can only contain text and no other elements.
* `sub` can only contain text and no other elements.
* `speak` is the root element of an SSML document, which can contain the following elements: `mstts:backgroundaudio` and `voice`.
* `voice` can contain all other elements except `mstts:backgroundaudio` and `speak`.
The voice service automatically handles the [intonation](https://en.wikipedia.org/wiki/Intonation_(linguistics)) patterns and [timing](https://www.ncbi.nlm.nih.gov/pmc/articles/PMC9895962/) typically denoted by punctuation marks, such as the pause after a period or the rising intonation of a yes/no question.
**4. Text-to-Speech Function:**
In this code snippet, a `textToSpeech` function is implemented to perform text-to-speech (TTS) conversion using Azure Speech service and the corresponding SDK:
```typescript
/* pages/api/azureTTS.ts */
const textToSpeech = async (message: string) => {
return new Promise((resolve, reject) => {
const ssml = buildSSML(message);
const speechConfig = SpeechSDK.SpeechConfig.fromSubscription(AZURE_SPEECH_KEY, AZURE_SPEECH_REGION);
speechConfig.speechSynthesisOutputFormat = 5; // mp3
speechConfig.speechSynthesisVoiceName = AZURE_VOICE_NAME;
let visemes: { offset: number; id: number }[] = [];
const synthesizer = new SpeechSDK.SpeechSynthesizer(speechConfig);
synthesizer.visemeReceived = function (s, e) {
visemes.push({
offset: e.audioOffset / 10000,
id: e.visemeId,
});
};
synthesizer.speakSsmlAsync(
ssml,
(result) => {
const { audioData } = result;
synthesizer.close()
const audioBuffer = Buffer.from(audioData);
resolve({ audioBuffer, visemes });
},
(error) => {
synthesizer.close();
reject(error);
}
);
});
};
```
Let's break it down and explore the details of each part:
**Azure Speech Service Configuration:**
First up, we’ll configure the Azure Speech service. This involves activating the service with your subscription keys, specifying the appropriate region, and setting the voice synthesis output to mp3. Then, pick a voice that suits your avatar and assign its name to the `AZURE_VOICE_NAME` variable.
**Viseme Information Array:**
An array called `visemes` is then prepared to store detailed information about visemes. Visemes are essentially the facial expressions that correspond to speech sounds, enhancing the realism and expressiveness of synthesized speech.
**Voice Synthesizer Initialization:**
Next, the voice synthesizer is initialized based on our configuration. This step sets us up to turn text into spoken words.
**`visemeReceived` Event Handler:**
A handler is set up for the `visemeReceived` event triggered by the voice synthesizer. This allows for the capture of essential viseme data, including the timing (`offset`) and identifier (`id`), during speech synthesis.
**Asynchronous Voice Synthesis Process:**
Voice synthesis is performed asynchronously using the `speakSsmlAsync` method, which is fed with SSML generated by the `buildSSML` function. This SSML script includes voice selection, prosody adjustments, and viseme details.
**Finalizing with Results or Error Handling:**
If all goes well, the audio output is secured, and the synthesizer is shut down. The audio is then converted into a buffer, along with the accumulated viseme data, and the Promise is resolved. Should you hit a snag, the synthesizer is properly closed. Promise rejected (with an accompanying error message).
Finally, we export the `textToSpeech` function to use in other parts of the application:
`export default textToSpeech;`
This setup is essentially the ticket to turning text into dynamic, expressive speech with Azure's help, complete with detailed viseme data for an extra splash of phonological faithfulness .
## Step 5. Text-to-Speech API
In this step, we’re simply implementing an endpoint that makes use of the services created in the files `pages/api/openai.ts` and `pages/api/azureTTS.ts`:
```typescript
/* utils/playAudio.ts */
import { NextApiRequest, NextApiResponse } from "next";
import openAIchain from "./openai";
import textToSpeech from "./azureTTS";
interface SpeechData {
audioBuffer: Buffer;
visemes: { offset: number; id: number }[];
}
export default async function handler(req: NextApiRequest, res: NextApiResponse) {
if (req.method === "POST") {
const message = req.body.message;
try {
const openAIResponse = await openAIchain.invoke(message);
const speechData = (await textToSpeech(openAIResponse)) as SpeechData;
res.status(200).json({
response: openAIResponse,
audioBuffer: speechData.audioBuffer,
visemes: speechData.visemes,
});
} catch (error) {
res.status(500).json({ error: "Error processing request" });
}
} else {
res.status(405).json({ error: "Method not allowed" });
}
}
```
At this endpoint, the `openAIchain.invoke` function is called with the message extracted from the request. This function facilitates interaction with OpenAI to obtain a response based on the provided message. Once we have that reply, it’s used as input for the `textToSpeech` function, which converts the text into a vocal representation. This function returns a `SpeechData` object that includes an audio buffer and related viseme data.
In case of a successful process, the API responds with a 200 status code and sends a JSON object to the client containing the OpenAI response (`response`), the binary audio data as a Base64 string. (`audioBuffer`), and the viseme data (`visemes`).
## Step 6. Interacting with the API and synchronizing the audio and visemes
**The voice synthesis**
In this next step of the journey, we’ll craft a tool in our React application: the `useSpeechSynthesis` custom hook. This helps plumb the depths of speech synthesis:
```typescript
import React from "react";
import playAudio from "@/utils/playAudio";
export interface VisemeFrame {
offset: number;
id: number;
}
type MessageData = {
visemes: VisemeFrame[];
filename: string;
audioBuffer: { data: Uint8Array };
};
export default function useSpeechSynthesis() {
const [visemeID, setVisemeID] = React.useState(0);
const [isPlaying, setIsPlaying] = React.useState(false);
const [text, setText] = React.useState("");
const [avatarSay, setAvatarSay] = React.useState("");
const [messageData, setMessageData] = React.useState<MessageData | null>(null);
const handleTextChange = (event: React.ChangeEvent<HTMLInputElement>) => {
setText(event.target.value);
};
const handleSynthesis = async () => {
if (isPlaying) {
return;
}
setIsPlaying(true);
setMessageData(null);
setAvatarSay("Please wait...");
setText("");
const response = await fetch("/api/server", {
method: "POST",
headers: {
"Content-Type": "application/json",
},
body: JSON.stringify({ message: text }),
});
if (!response.ok) {
console.error("Error sending message to OpenAI");
return;
}
const data = await response.json();
setAvatarSay(data.response);
setMessageData(data);
};
React.useEffect(() => {
if (isPlaying && messageData) {
playAudio({ setVisemeID, visemes: messageData.visemes, audioBuffer: messageData.audioBuffer }).then(() => {
setIsPlaying(false);
});
}
}, [isPlaying, messageData]);
return { visemeID, setVisemeID, isPlaying, text, avatarSay, handleTextChange, handleSynthesis };
}
```
This hook has several local states: `visemeID` to track the lip movements, `isPlaying` to indicate if audio is being played, `text` to store messages entered by the user, `avatarSay` to display AI messages received by the user, and `messageData` to store data related to speech synthesis.
```typescript
// hooks/useSpeechSynthesis.tsx
// ... (previous code)
const handleTextChange = (event: React.ChangeEvent<HTMLInputElement>) => {
setText(event.target.value);
};
const handleSynthesis = async () => {
setAvatarSay("Please wait...");
setText("");
// (to be continued...)
```
The `handleTextChange` function handles updates the `text` state in response to changes in a text field.
```typescript
const handleSynthesis = async () => {
if (isPlaying) {
return;
}
setIsPlaying(true);
setMessageData(null);
setAvatarSay("Please wait...");
setText("");
const response = await fetch("/api/server", {
method: "POST",
headers: {
"Content-Type": "application/json",
},
body: JSON.stringify({ message: text }),
});
if (!response.ok) {
console.error("Error sending message to OpenAI");
return;
}
const data = await response.json();
setAvatarSay(data.response);
setMessageData(data);
};
```
The asynchronous `handleSynthesis` function orchestrates the text-to-speech synthesis process. It starts by setting the state to indicate that audio is playing and prepares the state for user feedback. Then, it makes a POST request to the server with the user-provided text, and updates the state with the received response.
```typescript
React.useEffect(() => {
if (isPlaying && messageData) {
playAudio({ setVisemeID, visemes: messageData.visemes, audioBuffer: messageData.audioBuffer }).then(() => {
setIsPlaying(false);
});
}
}, [isPlaying, messageData]);
```
Meanwhile, the `useEffect` side effect is activated by changes in the `isPlaying` or `messageData` states. This mechanism ensures that when the application is ready to play audio and the necessary data for text-to-speech synthesis in place, it triggers the `playAudio` function. This function then initiates the audio playback.
### Playing synchronized audio with visemes
Now we implement the following function:
```typescript
/* pages/api/openai.ts */
interface VisemeFrame {
offset: number;
id: number;
}
interface playAudioProps {
setVisemeID: (id: number) => void;
audioBuffer: { data: Uint8Array };
visemes: VisemeFrame[];
}
let TRANSATION_DELAY = 60;
let ttsAudio: HTMLAudioElement;
async function playAudio({ setVisemeID, visemes, audioBuffer }: playAudioProps) {
if (ttsAudio) {
ttsAudio.pause();
}
const arrayBuffer = Uint8Array.from(audioBuffer.data).buffer;
const blob = new Blob([arrayBuffer], { type: "audio/mpeg" });
const url = URL.createObjectURL(blob);
ttsAudio = new Audio(url);
ttsAudio.ontimeupdate = () => {
const currentViseme = visemes.find((frame: VisemeFrame) => {
return frame.offset - TRANSATION_DELAY / 2 >= ttsAudio.currentTime * 1000;
});
if (!currentViseme) {
return;
}
setVisemeID(currentViseme.id);
};
ttsAudio.onended = () => {
setVisemeID(0);
};
ttsAudio.play();
}
export default playAudio;
```
Let’s examine the functionality of the `playAudio` function,, which is designed to manage audio playback. To ensure consistency in interacting with this function, we’ve defined the `VisemeFrame` and `playAudioProps` interfaces, describing the expected structure of the objects to be used during the function's execution.
At a global level, the variable `TRANSATION_DELAY` is set to a value of 60, to control the delay between audio playbacks. Additionally, the global variable `ttsAudio`, an instance of `HTMLAudioElement`, serves as the repository for the audio content to be played.
Within the scope of the `playAudio` function, an initial check ensures that no audio is currently playing through (`ttsAudio`) to avoid overlapping playback. Following this, the `audioBuffer` undergoes conversion to a blob format, creating a URL that links directly to the audio resource. This URL is then used to instantiate a new `ttsAudio`element, with specific events set up to monitor playback progress (`ontimeupdate`) and completion (`onended`). These event handlers play a crucial role in dynamically updating the avatar’s visual representation in sync with the audio and ensures accurate lip synchronization and interface updates throughout the playback.
Finally, the process concludes with the call to `ttsAudio.play()`, which initiates the audio playback. In summary, the `playAudio` function orchestrates audio playback, leveraging viseme information for precise synchronization. The function pauses any previous playback, configures event handlers to ensure real-time updates to the avatar’s expressions, and resets viseme IDs post-playback.
## Step 7. Integration with the Client or Avatar
Finally, we wrap things up by updating `pages/index.tsx`, importing the `useSpeechSynthesis` hook and the `playAudio` function. The final code looks like this:
```typescript
import React from "react";
import ZippyAvatar from "@/components/avatar/ZippyAvatar";
import PaperAirplane from "@/components/icons/PaperAirplane";
import useSpeechSynthesis from "@/hooks/useSpeechSynthesis";
export default function AvatarApp() {
const { visemeID, isPlaying, text, avatarSay, handleTextChange, handleSynthesis } = useSpeechSynthesis();
const handleSubmit = (event: React.FormEvent<HTMLFormElement>) => {
event.preventDefault();
handleSynthesis();
};
return (
<div className="w-screen h-screen items-center justify-center flex flex-col mx-auto">
<form onSubmit={handleSubmit}>
<div className="flux justify-center items-center w-[500px] relative">
<ZippyAvatar visemeID={visemeID} />
{avatarSay ? (
<div className="absolute top-[-50px] left-[400px] w-[400px] bg-white p-2 rounded-lg shadow-lg text-xs">
{avatarSay}
</div>
) : null}
<h1 className="text-2xl font-bold text-center text-blue-600">Zippy Talking Avatar</h1>
</div>
<div className="h-10 relative my-4">
<input
type="text"
value={text}
onChange={handleTextChange}
className="border-2 border-gray-300 bg-gray-100 h-10 w-[600px] pl-[20px] pr-[120px] rounded-lg text-sm mb-2"
placeholder="Write something..."
maxLength={100}
/>
<button
className={`
bg-blue-500 text-white font-bold py-2 px-3 rounded-r-lg absolute bottom-0 right-0 w-[50px] h-10
${isPlaying ? "bg-gray-300 cursor-not-allowed" : "bg-blue-500 text-white"}
`}
type="submit"
disabled={isPlaying}
>
<PaperAirplane />
</button>
</div>
</form>
</div>
);
}
```
With this, the implementation of our avatar is complete!
<center>

</center>
## Opportunities for Improvement
While we’ve certainly made significant strides, there’s always room to push the envelope to refine our avatar’s capabilities even further. Here are a few avenues for taking our project to the next level:
**1. Integrate Speech Recognition:**
Improving user interaction by adding speech recognition can make the experience more immersive and natural, allowing our avatar to respond easily to both typed and spoken inputs.
**2. Enhance with additional animations:**
Broadening the avatar’s animations beyond lip movements, such as incorporating expressive eye (or tentacle) movements, can improve its overall expressiveness. These animations could be linked to emotions like joy, anger, surprise, and more, thereby mirroring human emotional gestures more accurately.
**3. Include a conversation history:**
Implementing a feature to track conversation history will definitely make things more interesting for the user. Not only could such a feature serve as a valuable reference tool, but it would also foster a continuous dialogue flow.
**4. Integrate continuous learning:**
Introducing learning mechanisms for the avatar to adapt and update its responses over time (for example, the ability to adapt to new words, concepts, or trends) makes sure it stays relevant and up-to-date, while also improving its interaction quality.
**5. Expand platform integration:**
Improving integration with other external platforms, such as social networks or messaging apps, will broaden the avatar’s reach. This will significantly increase its accessibility and utility across different user environments.
**6. Advanced customization options:**
Supplying users with more advanced customization options - from voice modulation to visual appearance to personality tweaks - can offer a more personalized and unique experience.
**7. Incorporate local language models for privacy and control:**
Exploring local language models can offer plenty of benefits in privacy and data control, thereby allowing for sensitive interactions to be processed directly on the user’s device, without the need to rely exclusively on cloud services.
**8. Reduce Latency:**
Minimizing response times through technical optimizations (such as model optimization, development of lightweight models specifically for local devices, and efficient resource usage) will make interactions feel more immediate and real. Researching advanced techniques, such as parallel processing and anticipatory response caching, is another super-helpful way to improve interactivity and the overall user experience.
**9. Other possible applications across diverse fields:**
It’s clear that the tech we’ve explored in this tutorial has a broad range of applications and potential impact across a wide swath of different fields. Some other potential applications could include:
* **Customer support:** Streamlining customer interactions with responsive and knowledgeable avatars.
* **Educational platforms:** Offering dynamic, personalized learning aids to students.
* **Interactive storytelling:** Creating immersive narrative experiences with characters that actively participate in the story.
* **Personalized recommendations:** Tailoring suggestions to individual user preferences across different services.
* **Empowering innovations:** Leveraging cloud technologies and language processing tools to explore new dimensions in AI and machine interaction.
* **Deepening human-machine relationships:** Enhancing the naturalness and depth of conversations with AI, fostering greater acceptance and integration into daily life.
## Conclusion
It’s clear to see that the possibilites for talking avatars may just be as vast, deep, and unknowable as the ocean itself. If you find yourself navigating educational currents with personalized learning companions or exploring the uncharted waters of personalized recommendations, think of the tools here as your own compass and map.
The combination of Azure Conginitve Services, LangChain, and OpenAI not only empowers us to set sail on our journey but to chart the course to unexplored territories in human-machine interaction as well. As such, our chat-vatars aren’t merely conversational avatars: by building them, we place ourselves in the process of co-creating connections and narratives.
So, whether you’re a seasoned sailor in the sea of human-machine interactions or just hoisting your anchor, there has never been a more exciting time to set sail towards the future, and that the most exciting discoveries lie below the surface. Better get Kraken!
<center>

</center>
## Interesting Links
* [LangChain](https://js.langchain.com/)
* [SVG - Scalable Vector Graphics](https://developer.mozilla.org/en-US/docs/Web/SVG)
* [SVGator](https://www.svgator.com/)
* [Azure - Text to speech documentation](https://learn.microsoft.com/en-us/azure/ai-services/speech-service/index-text-to-speech)
* [OpenAI API](https://platform.openai.com/docs/introduction)
* [SVG 2 JSX](https://svg2jsx.com/)
* [NEXT.js](https://nextjs.org/)
* [SSML phonetic alphabets](https://learn.microsoft.com/en-us/azure/ai-services/speech-service/speech-ssml-phonetic-sets)
* [Azure AI Speech pricing](https://azure.microsoft.com/en-us/pricing/details/cognitive-services/speech-services/)
* [SVG Artista](https://svgartista.net/)
* [LLM Demo - Talking Character](https://github.com/google/generative-ai-docs/tree/main/demos/palm/web/talking-character)
