<center>
# From Chaos to Cohesion: Architecting Your Own Monorepo
<big>
**Build a simple monorepo using GitHub Actions as a CI/CD tool.**
</big>
*Written by Angel Rey and Hanna Jodrey. Originally published 2023-10-24 on the [Monadical blog](https://monadical.com/blog.html).*
</center>
Managing a massive codebase is not an easy task, yet the most influential and successful tech companies in the world seem to handle it with ease. Take Google, for instance: [back in 2015](https://qeunit.com/blog/how-google-does-monorepo), when Google was still significantly smaller than today (with a mere 2 billion lines of code), it made a bold and significant move to faciliate its code management: it migrated to a monorepo, a single repository that contains multiple projects (often with different languages and technologies). This strategy enabled its developers to share code, tools, and resources across teams and products.
In this article, we’ll follow in Google’s footsteps. You’ll learn how to:
- Create a simple monorepo using GitHub Actions as a CI/CD tool
- Implement the minimal features: detecting changes in specific projects and triggering pipelines accordingly
- Use a simple monorepo that contains a small Python application and is built using Docker
## What is a monorepo?
In short, [a monorepo](https://monorepo.tools/#what-is-a-monorepo) is a single repository that contains multiple related projects and simplifies dependency management For example, a monorepo can contain libraries, APIs, front-end applications, mobile applications, infrastructure as code, CI/CD pipelines, and more. When you make a change in one project, the monorepo only rebuilds and tests the affected projects, saving time and resources.
So what are the main differences between this and a big repo, which is just a large repository that contains many unrelated projects? At its core, a monorepo (unlike a big repo) should have a clear structure and hierarchy that reflects the relationships and dependencies among its interconnected projects. Another notable difference is that the continuous integration and continuous deployment pipelines should be designed specifically for the monorepo.
## What are the differences between a monorepo and a monolith?
A common misconception is that a monorepo is the same as a [monolith](https://www.techtarget.com/whatis/definition/monolithic-architecture#:~:text=Monolithic%20applications%20are%20single%2Dtiered,cumbersome%20to%20manage%20over%20time.). However, these two terms refer to different aspects of software development. A monorepo is about code organization, while a monolith is about software architecture.
A monolith is an application or software system that has most of its components [tightly coupled](https://www.baeldung.com/cs/cohesion-vs-coupling). This means that changing one part of the system can affect many other parts, making it hard to maintain and scale. A typical example of a monolith is a web application based on frameworks like Rails, Laravel, CodeIgniter, Symfony, Django, etc., that follows the Model-View-Controller pattern (or similar).
A monorepo can contain a monolith, but it can also contain other types of projects that are modular and decoupled (i.e., projects that have well-defined components communicating with each other through interfaces or APIs).
Taking everything into consideration, there are four possible combinations of code organization and software architecture:
- **Monolith-monorepo:** a single repository that contains a single application or software system. This is the most common case for small to medium-sized projects (like when you’re working on a Django project hosted in GitHub).
- **Modular-multirepo:** multiple repos that contain different components or modules of an application or software system that are loosely coupled. This is the typical case for open source projects. They have a core repo and additional plugins or extensions are developed in separate Git repositories.
- **Monolith-multirepo:** multiple repos that contain independent applications or software systems; it’s also the common case for large businesses. They consist of multiple repos and different teams developing different components. These applications are usually deployed and linked through a corporate portal. Some companies use this approach because of access control, privacy, and other policies.
- **Modular-monorepo:** a single repository that contains multiple projects that are loosely coupled. This is the case for some of the biggest companies like Google and Facebook, which use advanced tools and techniques to manage their huge codebases efficiently.
## How do we architect a simple monorepo?
### Organization
One of the first decisions you need to make when creating a monorepo is how to organize your code. There is no one-size-fits-all solution for this, and it will depend on the nature and scope of your projects and teams. Some possible ways to group your code are:
- by packages (e.g., in Java, com.co.company or in Python, sound.effects.echo)
- by programming language
- by layer (e.g., frontend, backend, etc.)
- by project (e.g., a CRM developed internally in the company, or a machine learning supported e-learning platform)
- by feature or functionality
- by deployment type
My preferred way of organizing code in a monorepo is by layer, and then by build and deployment type. This helps avoid frustration with a consistent convention that does not change frequently. For instance, you can have a frontend folder that contains subfolders for different web applications that use different tools like [Docker](https://www.docker.com), [NPM](https://www.npmjs.com), or [Yarn](https://yarnpkg.com/) to build and deploy.
One of the benefits of this strategy is that you can have separate builds for different parts of the monorepo. This means that you can generate different artifacts from different parts of the monorepo that have been changed or updated.
Another benefit is that this allows you to simplify the dependency management and deployment process. If you have a system that depends on different components, and these components are located in different repos, you have to clone all the repos and deploy them in a smart way, taking into account the dependencies. But with a monorepo, you only have to clone one repo and let the monorepo handle the deployment of all the required components in the right order.
This means that the developer can focus on the part of the monorepo that they are working on or interested in. But if they need to change something else that is related to their project, they can do it easily in the same repo. This gives them more flexibility and control over their code.
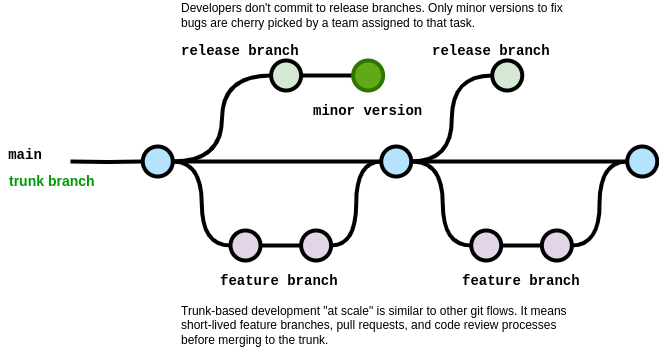
### Branching strategy: trunk-based development
Another important aspect of working with a monorepo is choosing a branching strategy that suits your workflow and collaboration style. For instance, a complex and bureaucratic branching strategy with many approvals can make a monorepo a nightmare to manage. A simpler and more agile approach is to use [trunk-based development](https://trunkbaseddevelopment.com/).
Essentially, trunk-based development is a source-control branching model where developers collaborate on code in a single branch called a ‘trunk’ and avoid creating other long-lived development branches. They use techniques such as feature toggles, short-lived feature branches, pull requests, and continuous integration to ensure code quality; as a result, they [“avoid merge hell, do not break the build, and live happily ever after.”](https://trunkbaseddevelopment.com/)
<center>
</center>
Trunk-based development is a branching strategy that has some clear benefits for a project:
- You only have to deal with the trunk and sometimes create release branches from the current state of the monorepo. You don’t have to worry about maintaining many different long-term branches.
- You can ensure the quality of your code by having automated tests that cover most of your code. If something goes wrong in the trunk, it will be noticed and fixed quickly. ([Read more](https://martinfowler.com/articles/practical-test-pyramid.html) [here](https://buttondown.email/hillelwayne/archive/i-have-complicated-feelings-about-tdd-8403)). While it’s true that trunk-based development requires more interactions with the main branch and more effort for test automation - since the code should be production-ready - this is not a drawback! This is a good practice and something that every project should do.
- You can find and solve any conflicts with other projects faster, since everything is in the trunk.
- You can improve the communication and collaboration among your team members, since they have to work on the same branch and share ideas constantly.
- You can refactor your code more easily, since you can include the complete refactor in a single pull request.
By using trunk-based development, you can increase the speed and quality of your development process. Of course, this also requires adopting some best practices such as automated testing, coding standards, design patterns, peer reviews and improving the collaboration among the different team members.
### What are the minimal requirements we’ll need?
While admittedly there are a lot of “nice-to-haves” (like local computation caching, code sharing and code generation, etc.), none of these features are really required when building your own monorepo.
To create a successful monorepo, you should consider implementing at least these features:
- A way to detect changes in specific projects within the monorepo: This will allow you to trigger the appropriate actions for each project, such as testing, building, or deploying. Use some existing tools that support monorepo management, such as [Lerna](https://lerna.js.org/), [Nx](https://nx.dev/), or [Bazel](https://bazel.build/), or write your own script in Python, bash, or any other language that can access the Git history and compare the files that have changed.
- A set of CI and CD pipelines that can handle different types of projects in the monorepo: Avoid writing custom workflows for each project, since this can be tedious and error-prone. Instead, standardize as much as possible the processes for testing, building, and deploying your projects, using common tools and configurations.
## How do we implement our monorepo using GitHub Actions?
### Design
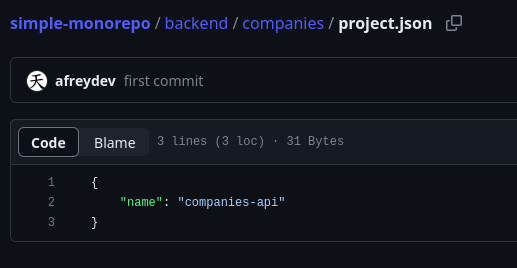
One of the first things to do when creating a monorepo is to define a way for the monorepo logic to identify which folders are projects (or parts of projects). A simple method is to add a file that marks the root of a project. In our [demo project](https://github.com/afreydev/simple-monorepo/), I’ve used a file called project.json for this purpose. This file serves two functions: first, it signals to the monorepo logic that this folder is a project; second, it contains some useful metadata about the project, such as its name and id.
<center>
</center>
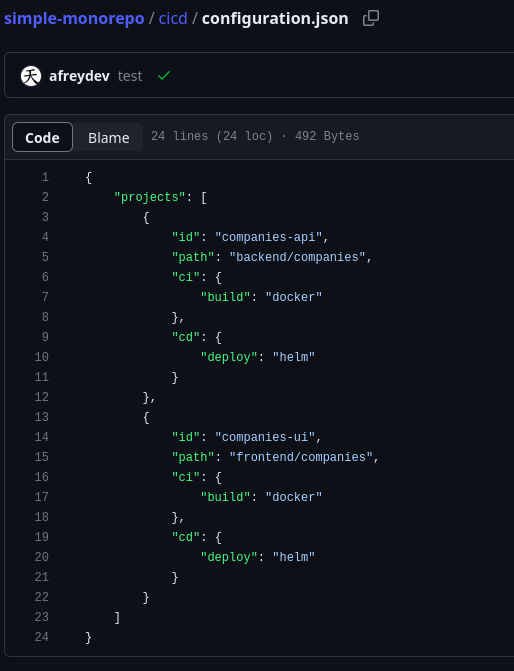
The monorepo has a file (called configuration.json) that contains some additional information about the different projects. This information can include the main path of the component and the different methods used to build and deploy it.
If you need to add more projects in the monorepo, this file should include the related information. Basically, this file will be the main configuration file in the monorepo.
<center>
</center>
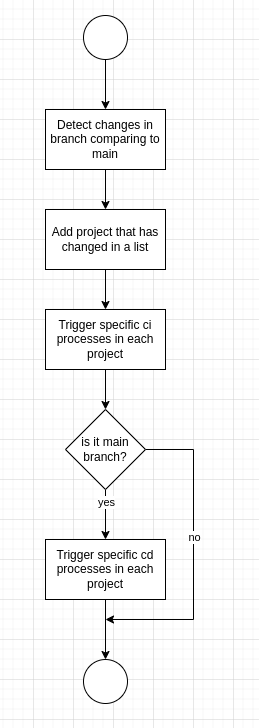
The flow diagram below describes the general CI/CD process that we will implement:
<center>
</center>
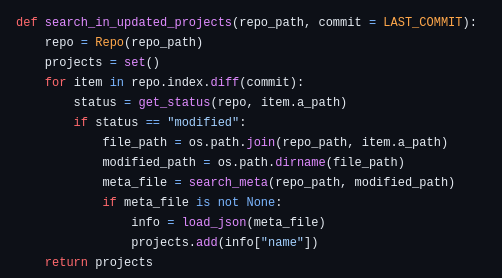
### Detecting what files have changed in a project
To detect which files might have changed in a project, you’ll need to write a script that compares the current state of the code with the last commit (or a specific branch). The script will do the following:
- It creates a new git repo object using the repo path as an argument.
- It gets the differences between the current commit and the last one (or a branch).
- It iterates over the different files that have changed, checking their status. If the status is modified, added, or deleted, it searches the project.json file.
- If it finds any metadata file, the script extracts the name of the project and adds it to a set (to avoid duplicated info in case a project has multiple files distributed across the monorepo codebase).
<center>
</center>
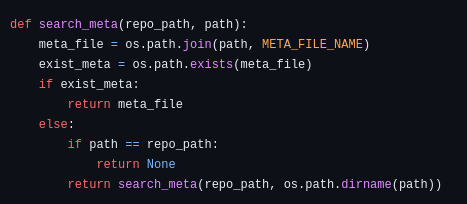
The script uses a function that takes a file path as an argument and tries to find the configuration.json file in the same folder or any of its parent folders. The function does the following:
- It checks if the file path is the root project folder. If yes, it returns None, as there is no configuration.json file above it.
- It checks if there is a configuration.json file in the same folder as the file path. If yes, it returns the path of the configuration.json file.
- If neither of the above conditions are met, it calls itself recursively with the parent folder of the file path as the new argument, and repeats the process until it finds a configuration.json file or reaches the root project folder.
<center>
</center>
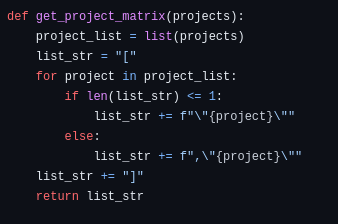
In this case, the Python script is designed to work with GitHub Actions as a CI/CD tool. It returns the list of projects that have changed in a format that GitHub Actions can use to iterate over them and deploy them accordingly.
<center>
</center>
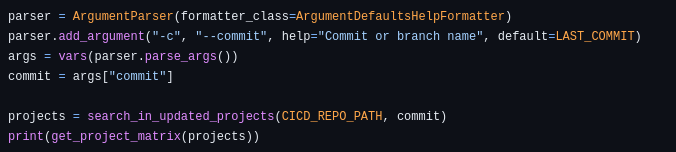
You can run this script by passing a single argument, which is either the commit sha or the branch name that you want to compare with.
<center>
</center>
### How do we set up GitHub Actions for building and deploying different projects?
This article assumes that you are familiar with how GitHub Actions work, and instead focuses on the main aspects of designing the required workflows.
#### CI/CD workflow
The goal of this workflow is to detect the projects that have changed and to call the other workflows CI and CD.
#### CI
This process is defined in the GitHub Actions workflow file: .github/workflows/cicd.yaml.
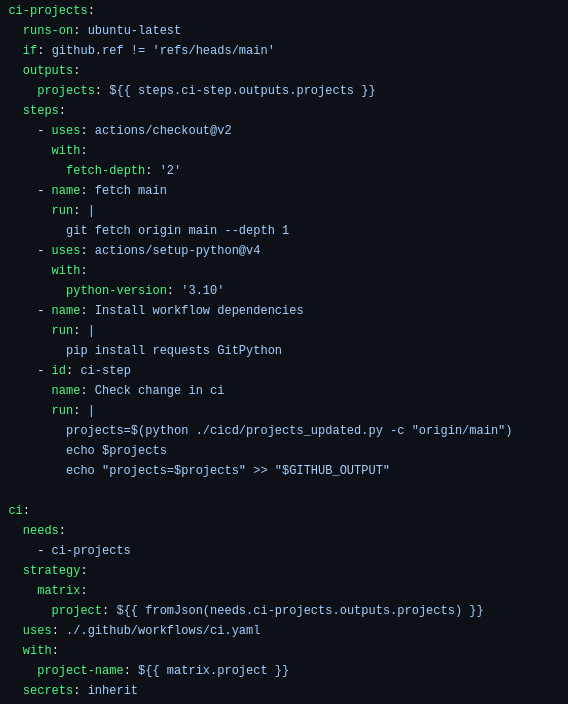
The first job (ci-projects job) uses the projects_updated.py script to obtain the list of projects that need to be updated. The result is stored in an output variable called projects. The output variable projects is then used as an input for the CI job, which is a matrix that contains the names of the projects. GitHub Actions will iterate over this matrix and call the CI workflow for each project. This workflow is specified in: .github/workflows/ci.yaml file.
<center>
</center>
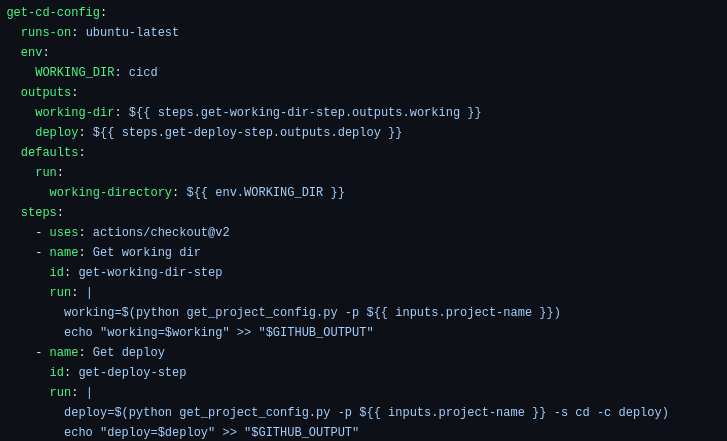
The first part of the CI workflow is to extract the configuration information from the cicd/configuration.json file for each project. The goal is to get the root path of the project and the build method (in this example, it is Docker).
<center>
</center>
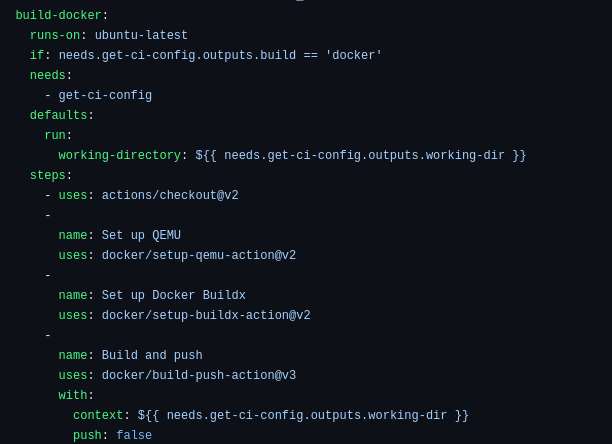
The second part of the workflow is to execute the specific build method for each project. Notice that there is an “if” condition that checks if the build variable is Docker, after which the corresponding commands are executed.
<center>
</center>
#### CD
This process is defined in the GitHub Actions workflow file: .github/workflows/cicd.yaml.
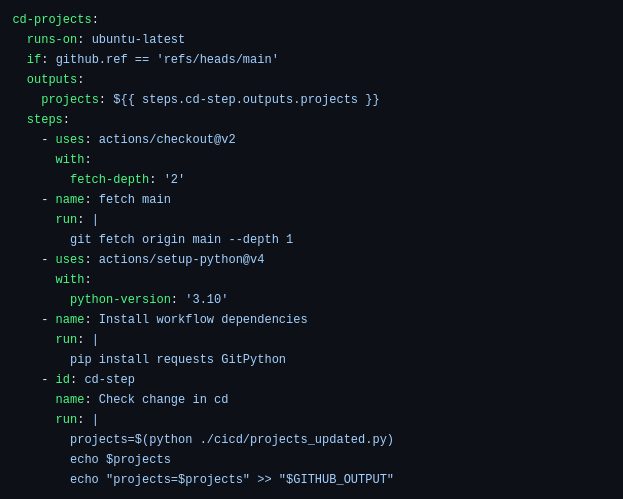
The first part of the CD workflow is to get the list of projects that need to be updated from the output variable projects, which was generated by the projects_updated.py script in the .github/workflows/cd.yaml file.
<center>
</center>
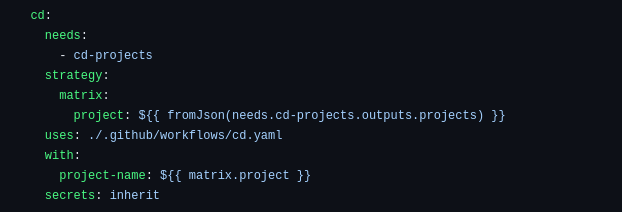
The output variable “projects” actually serves as an input for the CD job. This “projects” variable represents a matrix that contains a set of the projects; consequently, GitHub Actions will start to iterate over this matrix, triggering the CD workflow. This workflow is saved in .github/workflows/cd.yaml file.
<center>
</center>
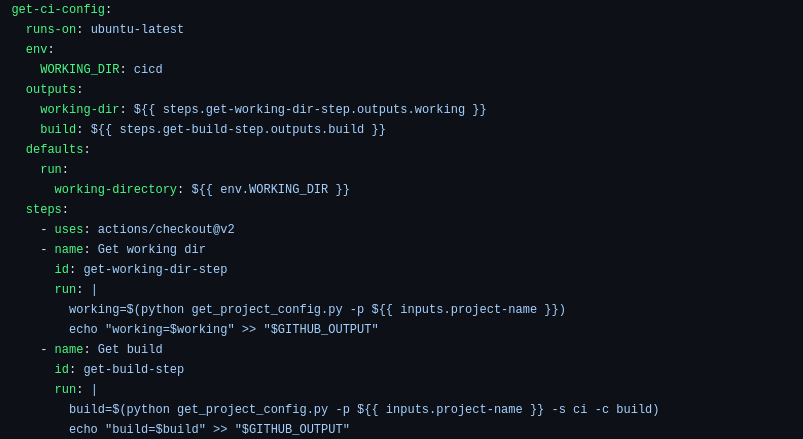
The initial phase of the CD workflow primarily involves extracting configuration info from the cicd/configuration.json file. The goal is to retrieve both the project’s root path and the deployment method (here, the example case is [Helm](https://helm.sh/)).
<center>
</center>
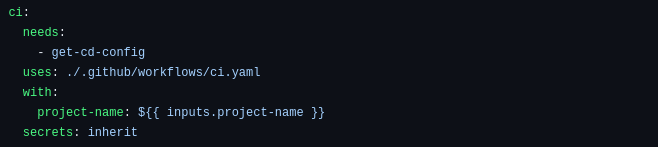
The second phase of the workflow is to run the CI workflow for each project, as a prerequisite for deploying them. This can be done by calling the ci.yaml file directly from GitHub Actions.
<center>
</center>
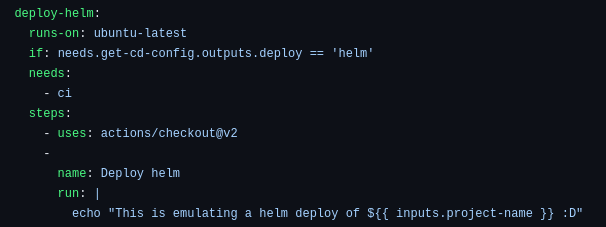
The third phase of the workflow is to execute the specific deployment method for each project. You can see that there is an “if” condition that checks if the build variable is Helm, and then runs the corresponding commands. In our demo, the specific commands for deploying an application using Helm are omitted.
<center>
</center>
### Triggering the pipelines
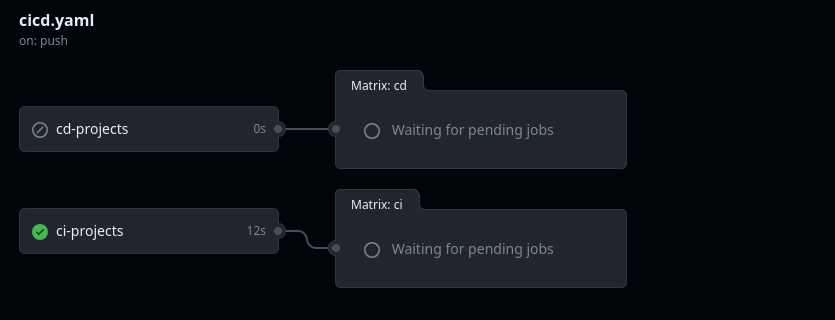
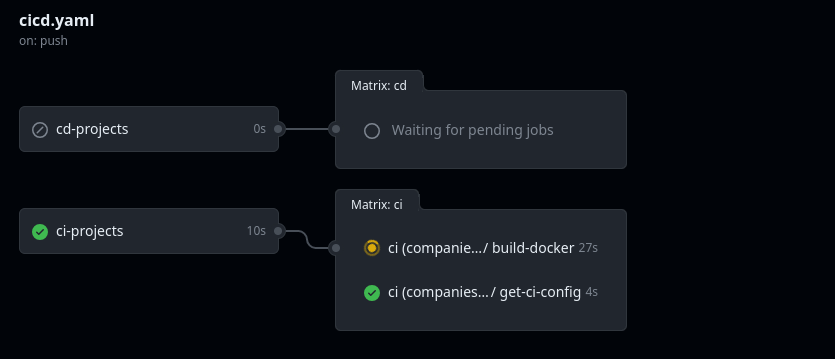
Whenever you push a commit to a feature branch that includes any modifications within the company's project, Github Actions will trigger the CI pipeline. You can verify that everything is running well by checking the GitHub Actions project page. Notice that it will only run the CI processes because the CD steps run only within the main branch.
<center>
</center>
<center>
</center>
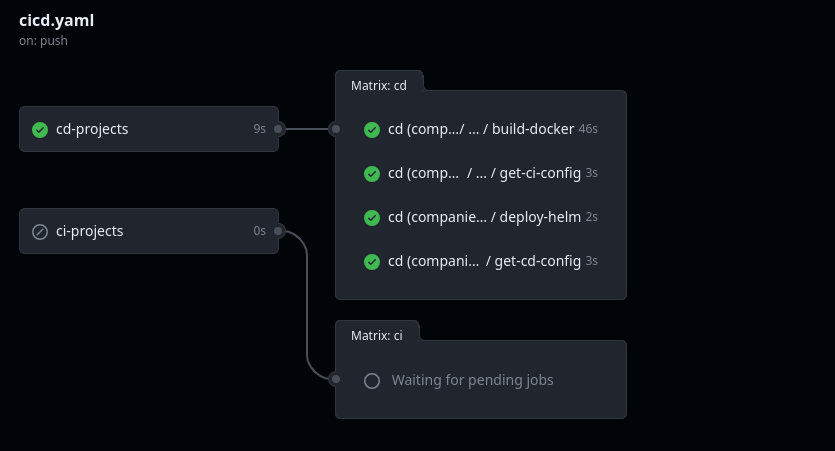
Et voilà! Upon merging your changes into the main branch, the CD steps for your project will be triggered; these include the build steps and later, the deployment, using the specific tool defined in the configuration.yaml file.
<center>
</center>
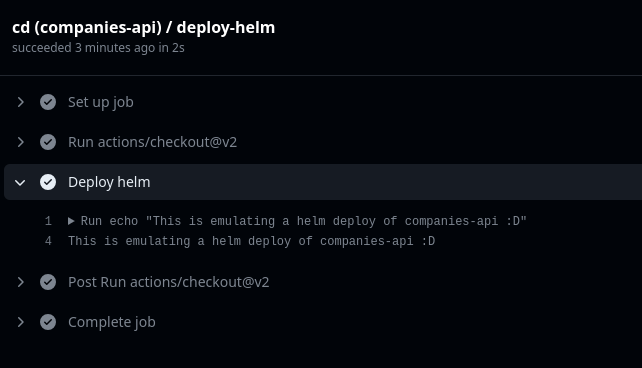
In our demo, we are not actually deploying our application in a Kubernetes cluster; instead, a small message is displayed.
<center>
</center>
## Conclusion
Let's summarize: in this article, we’ve peeled back the layers of monorepos, unveiling their unique properties and distinguishing them from monoliths. Beyond this, we’ve grasped the essential requirements for implementing a streamlined monorepo, brought to life through the practical lens of Github Actions.
Even though this example has only one minor hurdle - the demand for unified commits during merges - fear not, for the ingenious git squash stands ready to play the hero.
Apart from that, the stage is set for your own journey; you’re now equipped with the potential to develop a functional, dynamic monorepo for your company’s projects or your personal passions.
Now, the thrill of hands-on experience and experimentation awaits! Explore the [example codebase available here](https://github.com/afreydev/simple-monorepo/) and wield your newfound knowledge. Then drop a line in the comments and let us know how it goes!

Angel Rey
is a Devops, Technology and Innovation of Monadical