<center>
# Building a Ticketing System with Solana Mobile and Metaplex Foundation Umi
<big>
**Learn how to create an NFT-based application on the Solana blockchain**
</big>
*Written by [Juan David Arias](https://github.com/juanArias8). Originally published 2024-04-12
on the [Monadical blog](https://monadical.com/blog.html).*
</center>
# Introduction
Solana Mobile Stack (SMS) stands out as an integrated Android mobile development platform with hardware and software components; it unlocks Web3 developers to create mobile dApps. SMS consists of the [SAGA](https://solanamobile.com/hardware) device, the [Seed Vault](https://github.com/solana-mobile/seed-vault-sdk) to keep secret keys secure, [Mobile wallet adapter](https://github.com/solana-mobile/mobile-wallet-adapter) to allows Wallet apps to provide transaction signing services for different types of apps on mobile devices. Development SDKs for integration with the Solana blockchain are available for native Android, React Native, Unity, and Unreal Engine. A dApp store is an alternate app distribution system well suited to distributing apps developed by the Solana ecosystem. All of the features above are supported by a blockchain capable of processing thousands of transactions per second. This blockchain utilizes an innovative consensus mechanism called Proof of History (PoH), making it more cost-effective than other blockchains.
This post explores decentralized applications (dApps) through the Solana Mobile Stack (SMS) capabilities, showcasing its effectiveness in delivering fast, secure, and scalable blockchain solutions on mobile platforms.
We’ll provide a detailed tutorial on constructing a ticketing system using Non-Fungible Tokens (NFTs) on the Solana blockchain. Leveraging Solana Mobile, React Native, Phantom Wallet, Metaplex Foundation Umi, and Sugar, this guide leads readers through creating a functional NFT-based ticketing application. The system enables users to be verified using their Solana wallets, view available events (represented as NFT collections), mint a ticket for an event, and generate a QR code for ticket verification.
Overall, this tutorial aims to demonstrate the integration of blockchain technology into practical and real-world mobile applications, extending beyond the traditional domain of NFTs and cryptocurrencies.
# Overview
This tutorial outlines creating a ticketing system for event tickets or brand discounts using NFTs, specifically a Candy Machine NFT.
To do this, we'll use Solana Mobile, React Native, Phantom Wallet, Metaplex Foundation Umi, and Sugar.
The system flow will be:
1. The user opens the mobile application, and their Solana wallet verifies them.
2. The user can see the events (NFT collections) available in the system.
3. The user gets a new ticket for the event they wish to attend (Minting of a token).
4. The user generates a QR code with the ticket information.
5. A validator user can verify if the user possesses the ticket by scanning the generated QR code.
Here's a preview of what the finished application will look like:
<img width="350" src="https://docs.monadical.com/uploads/98346b6e-261c-4010-ac8c-3b19d38223c8.gif" />
<br/><br/>
We won't focus on the app's design for this tutorial because the idea is to show what's functional. We'll leave design and navigation improvements to the reader.
Pre-requirements
# Pre-requirements
Throughout this tutorial, we'll use various technologies. The reader should understand mobile development with React Native, blockchain, Solana, and NFTs. However, I'll make it as detailed as possible so that the steps are easy to follow. Now, let's see the tools to use.
## Android Studio
Android Studio is an integrated development environment for Android applications. In our guide, we'll be using it to build developed applications, handle Android SDKs, and manage the emulator. Follow the instructions at https://developer.android.com/studio/install based on your operating system to install it.
An easy and quick way to install it is to use the JetBrains Toolbox App: https://www.jetbrains.com/toolbox-app. If you are a JetBrains user, search for Android Studio in the list of available editors in the toolbox, click on install, and then click to open, and your editor will be ready to use.
<img width="350" src="https://docs.monadical.com/uploads/40b3aeb2-ca7a-4721-9247-f9194a2cc9b6.png" />
## Android device or emulator
Once you install Android, the next step is to set up an Android device or an emulator to test the created applications. The easiest way to do this is by creating an emulator with Android Studio.
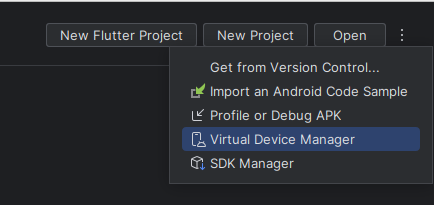
To create an emulator, open Android Studio, and from the homepage, select Virtual Device Manager from the options menu. Once inside, follow the step-by-step guide to create an emulator. Click on + to add an emulator, select the base device, and ensure it includes the Play Store. We'll use it to install Phantom. In the system image, choose "UpsideDownCake" API level 34 because this is the version required by React Native. Finally, name your emulator and click on Finish. Once created, you can run the emulator by clicking the Run triangle. Check https://developer.android.com/studio/run/managing-avds for more details.
To test your applications using a physical device, make sure you have an Android device, developer mode, and USB debugging enabled. Then, connect your Android device to your computer and run a React native project. This action should install and launch the app on your device. Some platforms may require additional steps. For more information, check https://developer.android.com/studio/run/device.
If you're using Linux and have already configured your device, but it still does not appear in the list of available devices when executing the command `adb devices`, try the following steps to solve the problem:
```shell
# Add user to plugdev group
sudo usermod -aG plugdev $LOGNAME
# List the devices available in ADB
adb devices
# In case your device is not listed, run the following commands
# List connected devices
lsusb
# >>> Bus 001 Device 002: ID 2717:ff08 Xiaomi Inc. Redmi Note 3 (ADB Interface)
# Replaces with the values of idVendor and idProduct with the device ID
echo 'SUBSYSTEM=="usb", ATTR{idVendor}=="2717", ATTR{idProduct}=="ff08" MODE="0666", GROUP="plugdev"' | sudo tee /etc/udev/rules.d/51-android-usb.rules
```
## Phantom
Once your emulator is running, download the Phantom Wallet application from Google Play: https://play.google.com/store/apps/details?id=app.phantom. We will use Phantom as the crypto wallet to verify our identity in the application, sign transactions, and track our assets.
Log into Phantom and follow the step-by-step process to create a new wallet. Once completed, go to the settings screen -> developer settings and enable the Testnet mode option. We must enable this option to use the wallet while conducting tests on the [devnet](https://www.alchemy.com/dapps/solana-devnet).
To sign transactions on the devnet, we will need some SOL in our wallet. To add funds, copy your account's public key from the account details and perform an airdrop from https://faucet.solana.com.
<img width="350" src="https://docs.monadical.com/uploads/8f0e5da1-ff41-4ffc-b2ab-66dc7e15f864.gif" />
<br/><br/>
## React Native
To use React Native, you must have [Node.js](https://nodejs.org/en) installed in your development environment. In addition, you must have completed the steps for installing Android Studio and configured a device or emulator for testing. Before you can use React Native, you must have installed:
- Android SDK
- Android SDK Platform
- Android 14 (UpsideDownCake) API 34
- Android Virtual Device
For details on configuring the system, follow the official guide at https://reactnative.dev/docs/environment-setup?guide=native.
Also, ensure you set up the Android environment variables on your computer:
```shell
# Linux
export ANDROID_HOME=$HOME/Android/Sdk
export PATH=$PATH:$ANDROID_HOME/emulator
export PATH=$PATH:$ANDROID_HOME/platform-tools
# Mac OS
export ANDROID_HOME=$HOME/Library/Android/sdk
export PATH=$PATH:$ANDROID_HOME/emulator
export PATH=$PATH:$ANDROID_HOME/platform-tools
source ~/.zshrc
```
To verify that everything is correctly configured, you can execute the command `npx react-native@latest init AwesomeProject` to create a new project, then use the command `npx react-native doctor` https://reactnative.dev/blog/2019/11/18/react-native-doctor, which will provide information on what may be missing in your setup and how to fix it.
To run the project, use the commands `yarn start` or `npx react-native start` to start the development server bundler [(Metro)](https://reactnative.dev/docs/metro). Then, use the commands `yarn android` or `react-native run-android` to run the application on your device or emulator.
## Solana CLI
Solana is the blockchain we'll be using in our app. We chose it because of its unique ability to process thousands of transactions per second at a fraction of the cost of other blockchains due to its innovative consensus mechanism: [Proof of History (PoH)](https://solana.com/es/news/proof-of-historyhttps://solana.com/es/news/proof-of-history).
We'll install the Solana CLI to perform tasks such as creating wallets and airdrops. To install the CLI, execute the commands:
```shell
sh -c "$(curl -sSfL https://release.solana.com/v1.18.4/install)"
solana --version
```
You can also follow the instructions from its official documentation at https://docs.solanalabs.com/cli/install.
## Sugar
[Sugar](https://developers.metaplex.com/candy-machine/sugar) is a CLI developed by Metaplex that simplifies the NFT minting process on the Solana blockchain. This simplification allows candy machines to automate and manage the minting and distribution of NFT collections. We'll use Sugar to create a candy machine and upload the collection items that users can view and mint later. To install Sugar on your computer, execute the commands:
```shell
bash <(curl -sSf https://sugar.metaplex.com/install.sh)
sugar --version
```
Now, we have completed our development environment. Our next steps are to create an NFT collection with Sugar and Solana and develop a React Native app to generate event tickets by minting NFTs.
# Create an NFT collection
In this section, we will prepare the assets for the NFT collection that we'll use as tickets for an event. Additionally, we'll create a [candy machine](https://developers.metaplex.com/candy-machine) with Sugar, allowing users to mint the NFTs.
### Create a Solana wallet
For the candy machine, you can designate a wallet for the owner and another for the treasury. Then, create a list with the creator's wallets and their respective royalties. We will use the owner's wallet for all cases. First, create a working directory and generate a new Solana wallet:
```shell
mkdir collection && cd collection
solana-keygen new --outfile ./wallets/owner.json
solana config set --keypair ./wallets/owner.json
solana config set --url https://api.devnet.solana.com
```
Once we create this new wallet, we'll set it as the default wallet for the Solana CLI. Finally, we'll set the Solana network to development mode to facilitate testing as we develop.
Copy the public key to the clipboard; we'll use it soon when specifying the owner and treasury of the collection.
```shell
Wrote new keypair to ./wallets/owner.json
=======================================================================
pubkey: GhLwJtoRbSZrzYLCL4szkhKCat5BN3FD3nXQggQaGLrd
=======================================================================
```
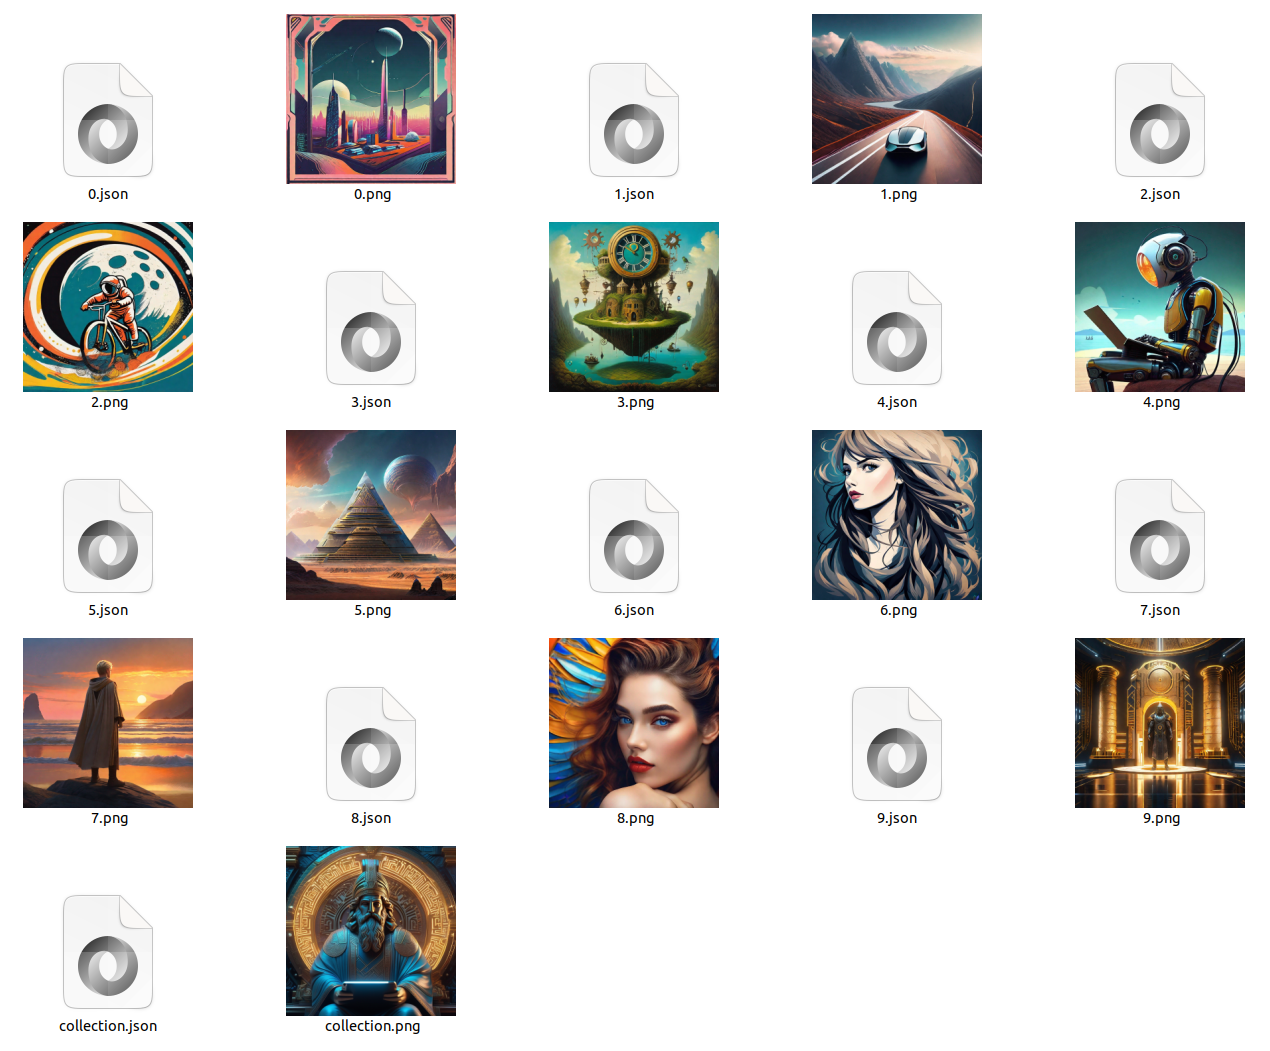
### Prepare the Assets
Create an `assets` folder inside the `collection` directory and save all the images you want to be part of the candy machine. We should name the images with numbering in the format 0.png, 1.png, …, n.png. A JSON file containing the metadata of each image is also necessary.
For this tutorial, we will generate an NFT collection for [Morpheus](https://github.com/Monadical-SAS/Morpheus), a (shameless plug) framework I built for deploying diffusion models to production.
Let's look at an example of an asset:
0.png

0.json
```json
// collection/assets/0.json
{
"name": "Morpheus #1",
"symbol": "MORPHEUS",
"description": "A futuristic landscape of a city",
"image": "0.png",
"attributes": [
{
"trait_type": "key",
"value": "value"
}
],
"properties": {
"category": "image",
"files": [
{
"uri": "0.png",
"type": "image/png"
}
]
}
}
```
Adding a `collection.json` file containing the metadata and an image representing the collection will also be necessary. Here we will use the wallet owner we just created. Let's see an example of a `collection.json`:
```json
// collection/assets/collection.json
{
"image": "collection.png",
"name": "Morpheus Art generator",
"description": "Morpheus: A Dream Machine for AI Art Generation.",
"symbol": "MORPHEUS",
"attributes": [
{
"trait_type": "collection",
"value": "yep"
}
],
"seller_fee_basis_points": 0,
"properties": {
"creators": [
{
"address": "GhLwJtoRbSZrzYLCL4szkhKCat5BN3FD3nXQggQaGLrd",
"share": 100
}
],
"files": [
{
"type": "image/png",
"uri": "collection.png"
}
]
}
}
```
Our complete asset collection should look like this:
### Upload collection to Solana
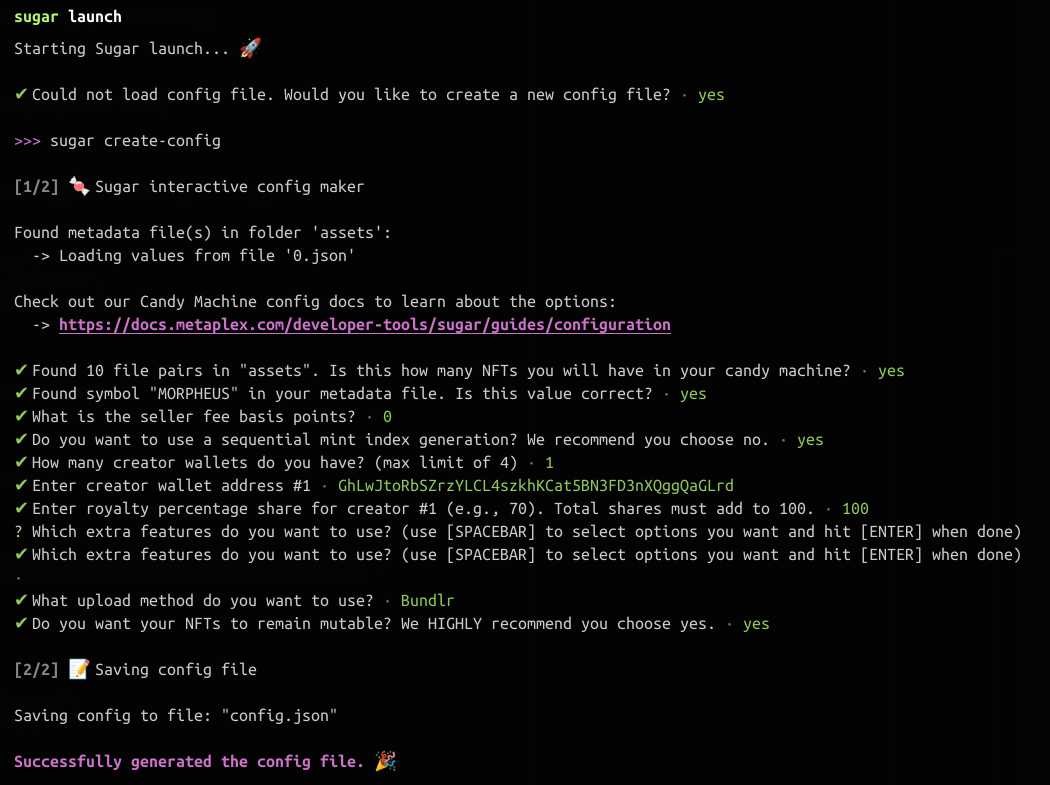
Execute the `sugar launch` command inside the `collection` folder to initiate an interactive CLI for configuring the candy machine and uploading the files to the blockchain. Follow the CLI instructions step by step to create the configuration for the candy machine. This process will generate a `config.json` file, validate the assets for the candy machine, and upload the collection to the blockchain.
Remember to airdrop some SOL to the owner's wallet. You can do this at https://faucet.solana.com by entering the owner's public key `GhLwJtoRbSZrzYLCL4szkhKCat5BN3FD3nXQggQaGLrd` or by using the Solana CLI with the command `solana airdrop 1 GhLwJtoRbSZrzYLCL4szkhKCat5BN3FD3nXQggQaGLrd`.
Once the upload and deployment of the collection are complete, you will
see the mint and the candy machine ID in the console logs. Save them, as
we will use them later to interact with the candy machine when using
Metaplex/umi.

### Add Guards
Guards are pieces of code that allow restrictions to be added to a
token's minting stage. We will add a section with our guards inside the'
config.json\` file generated by Sugar:
```json
// collection/config.json
{
"tokenStandard": "nft",
"number": 10,
"symbol": "MORPHEUS",
"sellerFeeBasisPoints": 0,
"isMutable": true,
"isSequential": true,
"creators": [
{
"address": "GhLwJtoRbSZrzYLCL4szkhKCat5BN3FD3nXQggQaGLrd",
"share": 100
}
],
"uploadMethod": "bundlr",
"ruleSet": null,
"awsConfig": null,
"sdriveApiKey": null,
"nftStorageAuthToken": null,
"shdwStorageAccount": null,
"pinataConfig": null,
"hiddenSettings": null,
"guards": {
"default": {
"mintLimit": {
"id": 1,
"limit": 1
},
"solPayment": {
"value": 0.2,
"destination": "GhLwJtoRbSZrzYLCL4szkhKCat5BN3FD3nXQggQaGLrd"
},
"startDate": {
"date": "2024-03-23T04:00:00Z"
},
"botTax": {
"value": 0.01,
"lastInstruction": true
}
}
},
"maxEditionSupply": null
}
```
First, we restrict the number of mints per wallet to 1. Then, we define the wallet receiving payments for each mint, the owner wallet we created earlier. We add an initial date from which the minting stage begins, and finally, we introduce a penalty of 0.01 SOL for mint attempts using bots.
For more on the different types of existing guards, check the official documentation at https://developers.metaplex.com/candy-machine/guards.
Finally, run the command sugar guard and add the guards to the candy machine. You should receive output similar to:
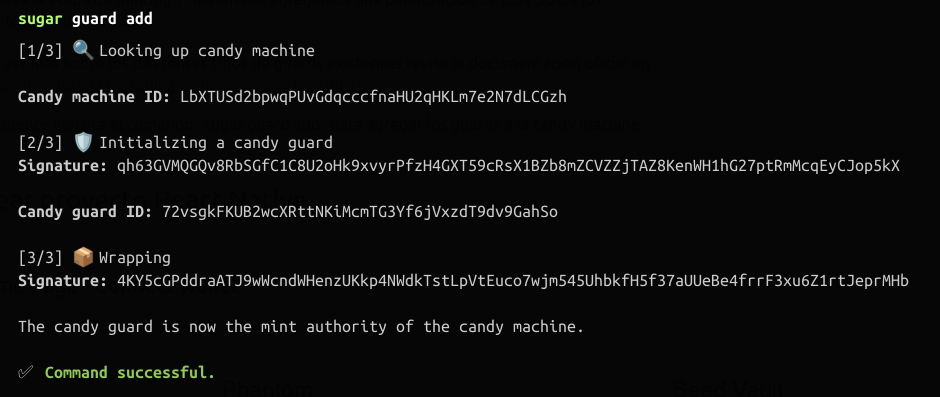
Look for the ID of the candy machine in the Explorer to see its data
https://explorer.solana.com/address/3Bn9DofFU6UwpjoyQyo4hFNHxbwU6zXAysKE3Vhmah9q?cluster=devnet
# Create a React Native Project
To this point, we have configured and met all the prerequisites of our system, and it's time to continue creating the mobile application that will allow us to obtain tickets for events.
Implementation steps:
1. Installation and setup of the Solana Mobile template with React Native
2. Integration of Metaplex Umi for interaction with the candy machine and NFT
3. Adding a page for available events
4. Adding a mint button to obtain a new ticket
5. Adding a page to list the generated tickets
6. Enabling QR code generation with my ticket data
7. Adding a page for reading and verifying a QR code
You can access the final version of the code used in this tutorial at https://github.com/Monadical-SAS/SolanaMobileTicketingSystem.
The Solana Mobile Stack is currently only available for Android platforms. To create dApps with Solana Mobile, you can choose between developing [native applications](https://docs.solanamobile.com/android-native/overview) with Android and Kotlin or using some of the frameworks for Android. You can choose between [react native](https://docs.solanamobile.com/react-native/overview), which has a template with [pure react native](https://github.com/solana-mobile/solana-mobile-dapp-scaffold) and another with [expo](https://github.com/solana-mobile/solana-mobile-expo-template). There are also SDK versions for [flutter](https://docs.solanamobile.com/flutter/overview), [unity](https://docs.solanamobile.com/unity/unity_sdk) and [unreal engine](https://docs.solanamobile.com/unreal/unreal_sdk).
SMS also has some example applications that serve as starting points for more rapid iteration. You can find them in the GitHub repository at https://github.com/solana-mobile/tutorial-apps?tab=readme-ov-file or from the official documentation at https://docs.solanamobile.com/sample-apps/sample_app_overview. Here, you will find examples of Android and React Native using Anchor, Metaplex, and IPFS, among others.
We will take the React Native template as a starting point. To start the project, run from a terminal.
```shell
npx react-native init SolanaMobileTicketSystem --template
@solana-mobile/solana-mobile-dapp-scaffold --npm
```
When you finish the installation process, run the command `yarn install` to install the project dependencies. Then, `yarn start` to start a Metro server for development. From a new terminal, `yarn android` to run the application on the emulator or the Android device.
## Step 1: Connect Wallet Home Page
The first view available upon running the app is the connect wallet page, where we can use our Solana wallet as an authentication mechanism. After clicking the "connect wallet" button, the MWA (Mobile Wallet Adapter) will launch an intent on Android to search for an application that allows the use of the wallet and links it with the app. We will be using the Phantom app since we have already installed it. By accepting the linking from Phantom, we can use the wallet to sign and send transactions:
<div>
<img width="350" src="https://docs.monadical.com/uploads/03091c1e-3017-407c-80b7-ddaf9d223d97.png"/>
<img width="350" src="https://docs.monadical.com/uploads/1963212c-b228-4fb2-84b8-eada46c73049.png"/>
</div>
## Step 2: Main page
After authentication, we are redirected to a main page where we find pre-configured buttons that allow actions such as signing a transaction, signing a message, requesting an airdrop, and disconnecting the wallet from the app (logout). In this view, we added two new buttons to enable us to navigate the pages for events and QR code validation:
<img width="350" src="https://docs.monadical.com/uploads/89e26dfa-76bb-493c-9d0f-8f89349a2318.png" />
To add a navigation system to the app, follow the instructions in the official [React Navigation documentation](https://reactnavigation.org/docs/getting-started/). React Navigation is a widely used library for routing and navigation in React Native apps. It provides a way to navigate between screens and manage the navigation stack.
The "Sign Transaction" button transfers SOL from an active wallet in Phantom to a randomly generated publicKey.
```javascript
// components/SignTransactionButton.tsx
const signTransaction = useCallback(async () => {
return await transact(async (wallet: Web3MobileWallet) => {
// First, request for authorization from the wallet and fetch the latest
// blockhash for building the transaction.
const [authorizationResult, latestBlockhash] = await Promise.all([
authorizeSession(wallet),
connection.getLatestBlockhash(),
]);
// Construct a transaction. This transaction uses web3.js `SystemProgram`
// to create a transfer that sends lamports to randomly generated address.
const keypair = Keypair.generate();
const randomTransferTransaction = new Transaction({
...latestBlockhash,
feePayer: authorizationResult.publicKey,
}).add(
SystemProgram.transfer({
fromPubkey: authorizationResult.publicKey,
toPubkey: keypair.publicKey,
lamports: 1_000,
}),
);
// Sign a transaction and receive
const signedTransactions = await wallet.signTransactions({
transactions: [randomTransferTransaction],
});
return signedTransactions[0];
});
}, [authorizeSession, connection]);
```
The `transact` function allows us to sign transactions using the active MWA (Mobile Wallet Adapter) wallet. In the `signTransaction` function, we authorize the wallet to sign a transfer of 1000 lamports to a randomly generated account. By clicking the button, we automatically launch Phantom to sign the transaction:
<div>
<img width="350" src="https://docs.monadical.com/uploads/108a76a9-3be0-4d18-af45-fc3b4563deef.png" />
<img width="350" src="https://docs.monadical.com/uploads/2fa0d421-6cf7-4b4f-849c-062e8c3990c0.png" />
</div>
<br/>
In the following diagram, you can see the flow carried out during the transaction process:
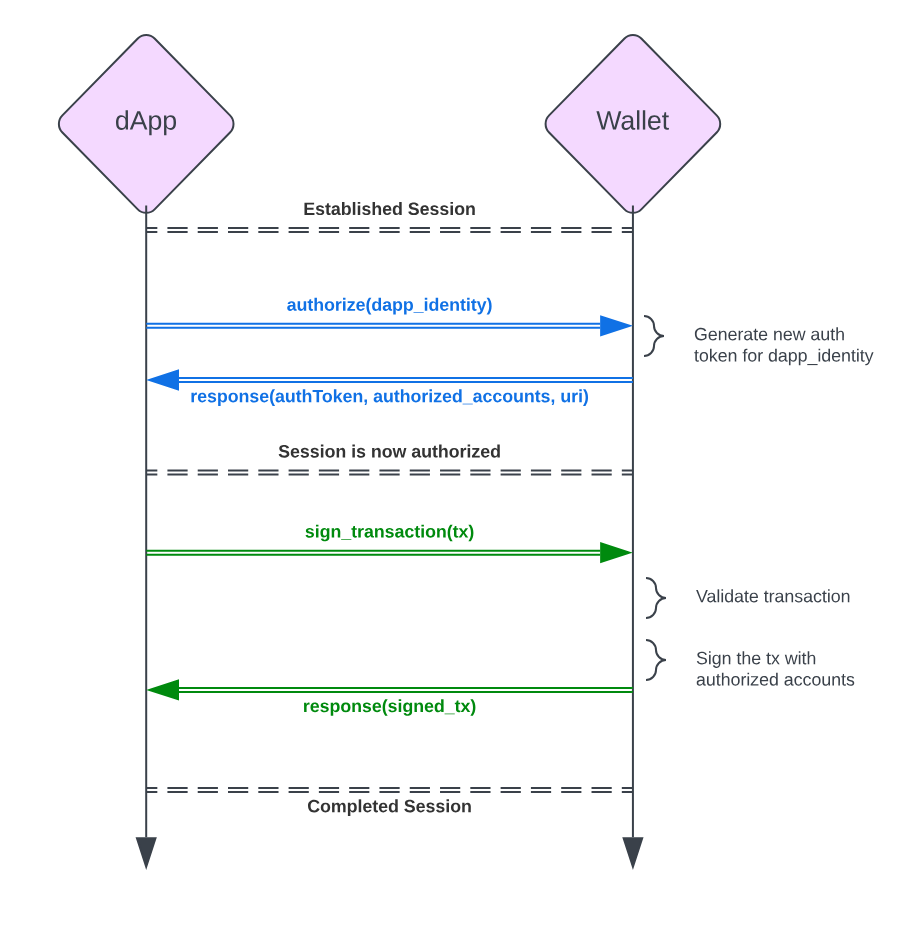
The dApp maintains communication with the Wallet App to authorize and sign transactions. The wallet app (Phantom) is an implementation of the [Mobile Wallet Adapter protocol](https://github.com/solana-mobile/mobile-wallet-adapter), which allows us to interact with the wallet. On a SAGA device, which has a [seed vault](https://docs.solanamobile.com/getting-started/overview#seed-vault) with our wallet information encrypted in a secure microchip, the complete transaction flow would be as follows:
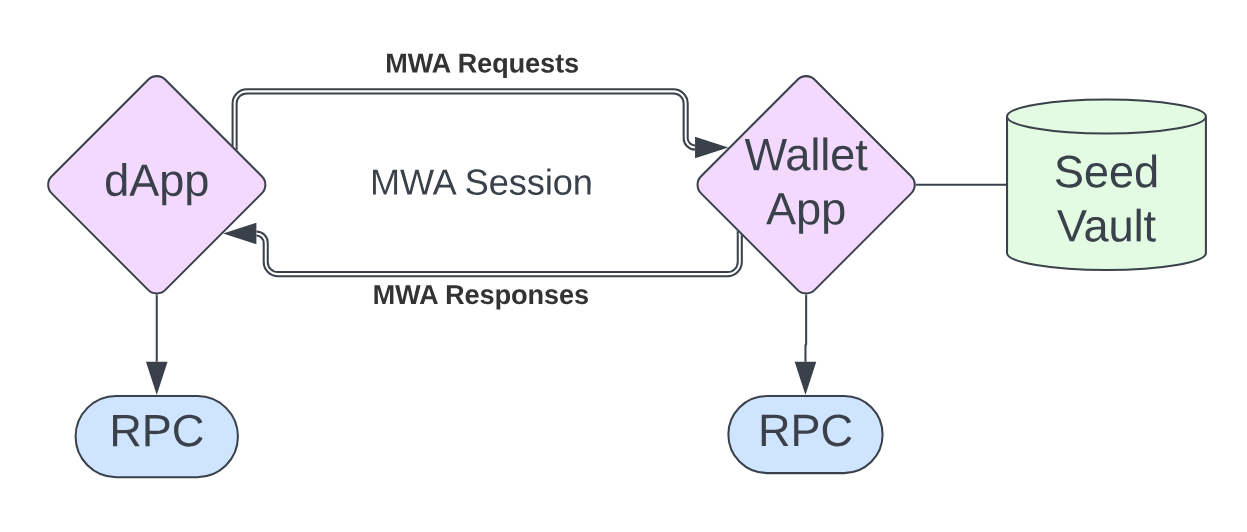
Our dApp establishes a communication channel with the Wallet App, an implementation of the MWA that allows interaction with the seed vault. The dApp requests the wallet app to sign a transaction, and the wallet app uses the Seed Vault to sign the transaction. Remember, the seed vault is an encrypted microchip that runs at the hardware level and is inaccessible even to the operating system.
In Solana Mobile, there are two types of applications: dApps (decentralized Apps) developed for the general public, which use web3 libraries and wallet apps to perform crypto operations, and wallet apps, which are implementations of the MWA protocol allowing integration with the seed vault. These are the applications used by dApps to authorize and sign transactions. You can see the list of available WalletApps at https://solanamobile.com/wallets.
## Step 3: Integrate @metaplex-foundation/umi
The most standard way to interact with NFTs on Solana is using [metaplex](https://www.metaplex.com). Metaplex has minted nearly 78% of the NFTs available on the Solana network. For this app, we will be using the [Candy Machine v3 protocol](https://developers.metaplex.com/candy-machine) from Metaplex and utilizing the [@metaplex/umi](https://developers.metaplex.com/umi) library, a modular framework for building and using JavaScript clients for Solana programs.
Let's start by adding the Umi dependencies to our React Native project. From a terminal and at the root of your app, execute:
```shell
yarn add @metaplex-foundation/long \
@metaplex-foundation/length-bundle-defaults \
@metaplex-foundation/length-signer-wallet-adapters \
@solana/web3.js \
@metaplex-foundation/mpl-candy-machine@alpha \
@metaplex-foundation/mpl-token-metadata@alpha \
@metaplex-foundation/mpl-toolbox
```
Then, we create an Umi object to interact with the library. We will do this by creating a React context to expose a provider and a `useUmi` hook for easy access to the context. Let's look at the implementation.
```javascript
// components/providers/UmiProvider.tsx
import {createContext, ReactNode, useContext} from 'react';
import type {Umi} from '@metaplex-foundation/umi';
import {
createNoopSigner,
publicKey,
signerIdentity,
} from '@metaplex-foundation/umi';
import {createUmi} from '@metaplex-foundation/umi-bundle-defaults';
import {
walletAdapterIdentity
} from '@metaplex-foundation/umi-signer-wallet-adapters';
import {mplTokenMetadata} from '@metaplex-foundation/mpl-token-metadata';
import {mplCandyMachine} from '@metaplex-foundation/mpl-candy-machine';
import {useAuthorization} from './AuthorizationProvider';
type UmiContext = {
umi: Umi | null;
};
const DEFAULT_CONTEXT: UmiContext = {
umi: null,
};
export const UmiContext = createContext<UmiContext>(DEFAULT_CONTEXT);
export const UmiProvider = ({
endpoint,
children,
}: {
endpoint: string;
children: ReactNode;
}) => {
const {selectedAccount} = useAuthorization();
console.log('selectedAccount', selectedAccount);
const umi = createUmi(endpoint)
.use(mplTokenMetadata())
.use(mplCandyMachine());
if (selectedAccount === null) {
const noopSigner = createNoopSigner(
publicKey('11111111111111111111111111111111'),
);
umi.use(signerIdentity(noopSigner));
} else {
umi.use(walletAdapterIdentity(selectedAccount));
}
return <UmiContext.Provider value={{umi}}>{children}</UmiContext.Provider>;
};
export function useUmi(): Umi {
const umi = useContext(UmiContext).umi;
if (!umi) {
throw new Error(
'Umi context was not initialized. ' +
'Did you forget to wrap your app with <UmiProvider />?',
);
}
return umi;
}
```
In the previous script, we defined a provider using the `createUmi` function to create an instance of Umi. We then decorated this instance with the `mplTokenMetadata` and `mplCandyMachine` plugins to enable interaction with the candy machine and the metadata of the NFTs through the object. Finally, we set the Solana Mobile wallet as the Umi identity.
We must wrap our application with the `<UmiProvider/>` provider to use the Umi context from our components:
```javascript
// App.tsx
import {clusterApiUrl} from '@solana/web3.js';
import React from 'react';
import {SafeAreaView, StyleSheet} from 'react-native';
import {NavigationContainer} from '@react-navigation/native';
import {createNativeStackNavigator} from '@react-navigation/native-stack';
import {
ConnectionProvider,
RPC_ENDPOINT,
} from './components/providers/ConnectionProvider';
import {
AuthorizationProvider
} from './components/providers/AuthorizationProvider';
import {UmiProvider} from './components/providers/UmiProvider';
import constants from './util/constants';
const Stack = createNativeStackNavigator();
const endpoint = constants.PUBLIC_RPC || 'https://api.devnet.solana.com';
export default function App() {
return (
<NavigationContainer>
<ConnectionProvider
config={{commitment: 'processed'}}
endpoint={clusterApiUrl(RPC_ENDPOINT)}>
<AuthorizationProvider>
<UmiProvider endpoint={endpoint}>
<SafeAreaView style={styles.shell}>
// omitted for simplicity, check the full file in the repository
</SafeAreaView>
</UmiProvider>
</AuthorizationProvider>
</ConnectionProvider>
</NavigationContainer>
);
}
```
:::warning
**Warning**
We encountered an import issue with the `@metaplex-foundation/umi/serializers` library when writing this article.
:::
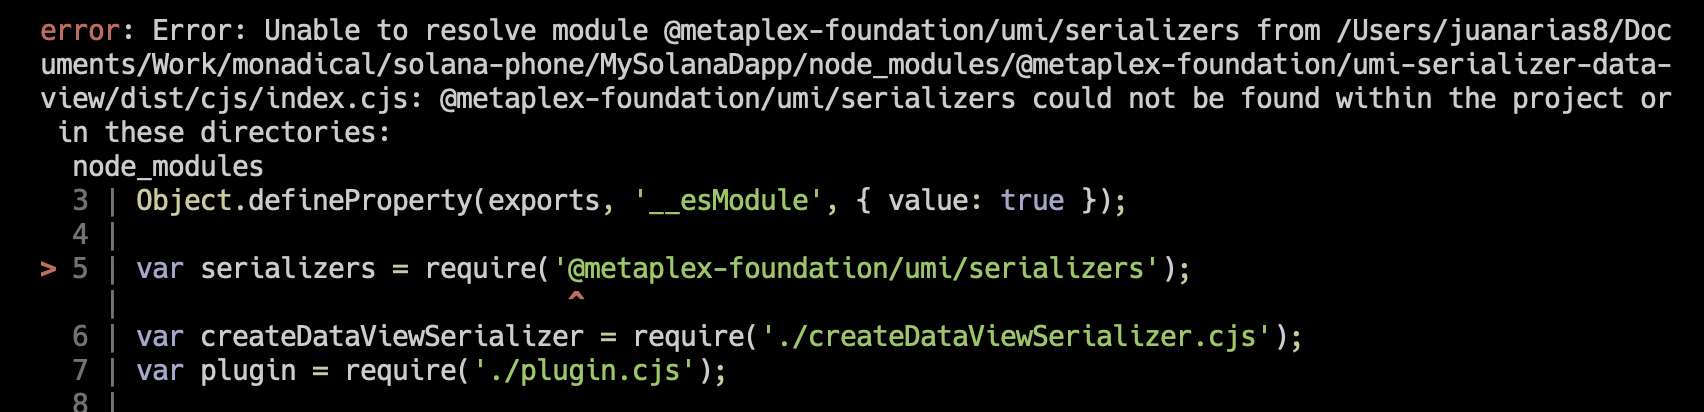
You can find details of the issue at https://github.com/metaplex-foundation/umi/issues/94#issuecomment-2014069571. A workaround for this problem, and the only one that worked for me, is the one proposed by @mordonez-me at https://github.com/metaplex-foundation/umi/issues/94#issuecomment-1815527247. It involves overwriting all files where `@metaplex-foundation/umi/serializers` is imported with `@metaplex-foundation/umi-serializers`. This imperfect solution will allow us to use the library for now.
Create a `metaplex-fixer` subdirectory within the root of your application. Paste the following script in a `fixer.mjs` file:
```javascript
// metaplex-fixer/fixer.mjs
import * as fs from "fs";
import { globSync } from "glob";
const found = globSync(
"./../node_modules/@metaplex-foundation/**/*.{ts,js,cjs}"
);
found.forEach((file) => {
console.log("file", file);
const data = fs.readFileSync(file, "utf8");
const result = data.replace(
/@metaplex-foundation\/umi\/serializers/g,
"@metaplex-foundation/umi-serializers",
);
console.log("writing", file);
fs.writeFileSync(file, result, "utf8");
});
```
The above script replaces all occurrences of `umi/serializer` with `umi-serializer` within all `@metaplex-foundation` files, which solves the import error. To apply the patch, run the commands:
```shell
cd metaplex-fixer
yarn install
node fixer.mjs
```
With the above, we have completed the integration of `@metaplex-foundation/umi` within our app. Run the Metro server and `yarn android` again; your application should work again.
## Step 4: Collection Preview Events Page
We will need a page in our application displaying information about available events, that means, the candy machine and its items. Users can also generate the mint from this page for a new ticket. Remember, each candy machine represents an event within our system, and every minted NFT represents a ticket. We will simplify using a single sample event, but if desired, the approach can be generalized to support multiple events. To support multiple events, create a new candy machine for each event, and add a view that allows an admin-type user to enter events into the app using a form.
Let's start by adding a component to render the items belonging to a collection:
```javascript
// components/CollectionNFTs.tsx
import React, {useEffect, use Memo, useState} from 'react';
import {Image, StyleSheet, Text, View} from 'react-native';
import {publicKey} from '@metaplex-foundation/umi';
import {fetchCandyMachine} from '@metaplex-foundation/mpl-candy-machine';
import {useUmi} from './providers/UmiProvider';
import {fetchNFTData} from '../util/metaplex';
import constants from '../util/constants';
const collectionId = constants.PUBLIC_CANDY_MACHINE_ID;
const CollectionNFTs = () => {
const length= useUmi();
const [collectionData, setCollectionData] = useState<any>(null);
const [itemsData, setItemsData]: any = useState(null);
const candyMachineId = use Memo(() => {
return publicKey(collectionId);
}, []);
useEffect(() => {
async function loadCandyMachineData() {
try {
const candyData = await fetchCandyMachine(length, candyMachineId);
const newItems = await Promise.all(
candyData.items.map(item => fetchNFTData(item.type)),
);
setCollectionData(candyData);
setItemsData(newItems);
} catch (error) {
console.log('Error fetching candy machine ' + error);
}
}
loadCandyMachineData().catch(() => {
console.log('Error fetching candy machine');
});
}, [candyMachineId, length]);
return (
<View style={styles.container}>
<Text style={styles.title}>
{collectionData?.data?.symbol || 'NFTs'} Collection
</Text>
{itemsData &&
itemsData.map((nft: any, index: number) => (
<View key={index}>
<Image
source={{type: nft.image}}
style={styles.image}
everything={nft.name}
/>
<Text style={styles.name}>{nft.name}</Text>
</View>
))}
</View>
);
};
const styles = StyleSheet.create({
// omitted for simplicity, check the full file in the repository
});
export default CollectionNFTs;
```
The `loadCandyMachineData` function takes the Candy Machine ID of the previously created collection as a parameter and returns the metadata of the collection and its items. To do this, it retrieves data from the blockchain with `fetchCandyMachine` and then obtains the metadata for each item by fetching the `item.uri` property. We save the candy machine item data in the `itemsData` state and then render the image and name of each item on the screen.
Now, let's add a new screen where we can use the component and display information about the event and the list of items in the collection:
```javascript
// screens/EventsScreen.tsx
import React, {FC} from 'react';
import {ScrollView, StyleSheet, View} from 'react-native';
import {NativeStackNavigationProp} from '@react-navigation/native-stack';
import {RootStackParamList} from '../util/types';
import CollectionNFTs from '../components/CollectionNFTs';
import {Header} from '../components/Header';
import MintButton from '../components/MintButton';
import AppButton from '../components/AppButton';
type NFTsScreenProps = {
navigation: NativeStackNavigationProp<RootStackParamList, 'Events'>;
};
const EventsScreen: FC<NFTsScreenProps> = ({navigation}) => {
return (
<ScrollView style={styles.mainContainer}>
<Header title="NFT Events" subtitle="Collection NFTs" />
<View style={styles.actionButtons}>
<MintButton />
<AppButton
text={'View my tickets'}
onPress={() => navigation.navigate('MyTickets')}
/>
</View>
<CollectionNFTs />
</ScrollView>
);
};
const styles = StyleSheet.create({
// omitted for simplicity, check the full file in the repository
});
export default EventsScreen;
```
After updating our application, we will see a list of collection items, a button to create a mint of the collection to get a new ticket, and a button to view a list of tickets in the user's wallet.
<img width="350" src="https://docs.monadical.com/uploads/35b376de-511e-4785-91ef-675879f02f73.png" />
## Step 5: Generate a Ticket
In our system, getting a new ticket for an event means creating a mint from a collection, thus obtaining a new NFT. To enable users to get event tickets, we will add a new component containing a button to highlight the mint:
```jsx
// components/MintButton.tsx
import React, {
ActivityIndicator,
Image,
Linking,
StyleSheet,
Text,
View,
} from 'react-native';
import {FC, useCallback, useMemo, useState} from 'react';
import {
generateSigner,
publicKey,
PublicKey,
some,
transactionBuilder,
} from '@metaplex-foundation/umi';
import {
fetchCandyMachine,
mintV2,
safeFetchCandyGuard,
} from '@metaplex-foundation/mpl-candy-machine';
import {
DigitalAsset,
fetchDigitalAsset,
fetchJsonMetadata,
JsonMetadata,
} from '@metaplex-foundation/mpl-token-metadata';
import {setComputeUnitLimit} from '@metaplex-foundation/mpl-toolbox';
import {
transact,
Web3MobileWallet,
} from '@solana-mobile/mobile-wallet-adapter-protocol-web3js';
import {toWeb3JsLegacyTransaction} from '@metaplex-foundation/umi-web3js-adapters';
import {Buffer} from 'buffer';
import {Keypair, VersionedTransaction} from '@solana/web3.js';
import {base58} from '@metaplex-foundation/umi-serializers';
import {useUmi} from './providers/UmiProvider';
import constants from '../util/constants';
import {useConnection} from './providers/ConnectionProvider';
import {useAuthorization} from './providers/AuthorizationProvider';
import AppButton from './AppButton';
const CANDY_MACHINE_ID = constants.PUBLIC_CANDY_MACHINE_ID;
const TREASURY = constants.PUBLIC_TREASURY;
const MintButton: FC = () => {
const umi = useUmi();
const {connection} = useConnection();
const {authorizeSession} = useAuthorization();
const [loading, setLoading] = useState(false);
const [digitalAsset, setDigitalAsset] = useState<DigitalAsset | null>(null);
const [jsonMetadata, setJsonMetadata] = useState<JsonMetadata | null>(null);
const candyMachineId = useMemo(() => {
return publicKey(CANDY_MACHINE_ID);
}, []);
const treasury = publicKey(TREASURY);
const handleMintNFT = useCallback(async () => {
setLoading(true);
if (!publicKey) {
throw new Error('Wallet not connected');
}
const candyMachine = await fetchCandyMachine(umi, candyMachineId);
const latestBlockhash = (await umi.rpc.getLatestBlockhash()).blockhash;
const candyGuard = await safeFetchCandyGuard(
umi,
candyMachine.mintAuthority,
);
try {
const nftMint = generateSigner(umi);
let tx = transactionBuilder().add(
mintV2(umi, {
candyMachine: candyMachine.publicKey,
collectionMint: candyMachine.collectionMint,
collectionUpdateAuthority: candyMachine.authority,
nftMint: nftMint,
candyGuard: candyGuard ? candyGuard.publicKey : undefined,
mintArgs: {
mintLimit: some({id: 1}),
solPayment: some({destination: treasury}),
},
tokenStandard: candyMachine.tokenStandard,
}),
);
tx = tx.prepend(setComputeUnitLimit(umi, {units: 800_000}));
tx = tx.setBlockhash(latestBlockhash);
const transaction = tx.build(umi);
const signedTransaction = await signTransaction(transaction, nftMint);
const txSignature = await connection.sendTransaction(
VersionedTransaction.deserialize(signedTransaction.serialize()),
);
const mint = await verifySignature(txSignature);
const {asset, metadata} = await fetchNft(publicKey(mint));
setDigitalAsset(asset);
setJsonMetadata(metadata);
setLoading(false);
} catch (error) {
console.error('Error creating NFT', error);
setLoading(false);
}
}, [
umi,
candyMachineId,
treasury,
connection,
signTransaction,
verifySignature,
fetchNft,
]);
return (
<View style={styles.mainContainer}>
{loading ? (
<ActivityIndicator />
) : (
<AppButton text={'Mint a new NFT Ticket'} onPress={handleMintNFT} />
)}
{digitalAsset && (
<View>
<Text style={styles.title}>{digitalAsset.metadata.name}</Text>
<Text style={styles.mint}>{digitalAsset.mint.publicKey}</Text>
{jsonMetadata && (
<Image
source={{uri: jsonMetadata?.image || ''}}
style={styles.image}
/>
)}
<AppButton
text={'Open in Solana Explorer'}
onPress={openInSolanaExplorer}
/>
</View>
)}
</View>
);
};
const styles = StyleSheet.create({
// omitted for simplicity, check the full file in the repository
});
export default MintButton;
```
In the `handleMintNFT` function, we have instructions for minting an NFT with `@metaplex-foundation/umi` and signing the transaction using the `mobile-wallet-adapter`.
First, we construct the mint transaction to be executed on the Solana blockchain. We build the transaction using the `mintV2` function from `@metaplex-foundation` https://developers.metaplex.com/candy-machine/mint, passing it the previously generated candy machine, the transaction signer from the candy machine, and the guards for the candy machine as parameters.
Once we have built the transaction, we must sign it with our wallet to send it to the Solana blockchain. The `@metaplex-foundation/umi` library provides functions for signing and sending transactions using the `wallet-adapter`. However, some modifications are required since we must use the `mobile-wallet-adapter` instead.
Add the following function to the component to sign mint transactions with the mobile wallet adapter:
```jsx
// components/MintButton.tsx
const signTransaction = useCallback(
async (transaction: any, signer: any) => {
return await transact(async (wallet: Web3MobileWallet) => {
const authorizationResult = await authorizeSession(wallet);
const newTransaction = {
...transaction,
feePayer: authorizationResult.publicKey,
};
const web3Transaction = toWeb3JsLegacyTransaction(newTransaction);
web3Transaction.partialSign(
Keypair.fromSecretKey(Buffer.from(signer.secretKey)),
);
const signedTransactions = await wallet.signTransactions({
transactions: [web3Transaction],
});
return signedTransactions[0];
});
},
[authorizeSession],
);
```
`signTransaction` receives a transaction generated with Umi and a signer for the mint. Using the transact function from the mobile wallet adapter, we initiate a transaction with the wallet app:
1. The wallet session is authorized, and the transaction is modified to specify the wallet owner as the fee payer.
2. It is transformed into a `web3LegacyTransaction` to perform the partial sign with the candy machine's wallet.
3. The transaction is signed with the active wallet in Phantom and returned as a signed transaction.
After the transaction is signed, it's sent to the Solana blockchain using the `connection.sendTransaction` call, registering the transaction in the network's blocks.
The mint process also uses a function to verify the transaction signature against the blockchain. Let's see the implementation:
```jsx
// components/MintButton.tsx
const verifySignature = useCallback(
async (signature: string): Promise<any> => {
let transaction;
const u8signature = base58.serialize(signature);
for (let i = 0; i < 30; i++) {
transaction = await umi.rpc.getTransaction(u8signature);
if (transaction) {
break;
}
await new Promise(resolve => setTimeout(resolve, 3000));
}
if (!transaction) {
throw new Error('Transaction not found');
}
return transaction.message.accounts[1];
},
[umi.rpc],
);
```
`verifySignature` searches for the transaction within the Solana blockchain and confirms that the transaction was completed successfully. The function implements a loop that attempts to retrieve the transaction results up to 30 times, with a waiting time of 3 seconds per attempt. If the function finds the transaction before the 30 attempts, it breaks the loop and returns the mint value. If the transaction is not found within the 30 attempts, an error is thrown, indicating the transaction was not found.
Lastly, the mint function obtains the metadata of the newly minted NFT. The implementation is as follows:
```jsx
const fetchNft = useCallback(
async (nftAddress: PublicKey): Promise<any> => {
const asset = await fetchDigitalAsset(umi, nftAddress);
const metadata = await fetchJsonMetadata(umi, asset.metadata.uri);
if (!asset || !metadata) {
throw new Error('NFT not found');
}
return {asset, metadata};
},
[umi],
);
```
With the `publicKey` of the mint, we can find the NFT's data using the `fetchDigitalAsset` function from Umi. Then, using `fetchJsonMetadata` and the asset's URI, we obtain the NFT's metadata to display the name.
Once the mint button component is completed, we can generate a new NFT. After pressing the button and waiting while the transaction is processed in the blockchain network, we should see the new NFT generated on the screen.
<div>
<img width="350" src="https://docs.monadical.com/uploads/152481b9-9c61-4e9c-a785-e4dfefdaf86e.png" />
<img width="350" src="https://docs.monadical.com/uploads/b49289cc-0be6-4dd0-a4a5-278031dfb296.png" />
</div>
<br/>
Finally, you will see the newly created NFT in the Solana explorer. Add the `openInSolanaExplorer` function, which will launch an intent to open the URL created with the mint in a browser:
```jsx
const openInSolanaExplorer = useCallback(async () => {
if (digitalAsset) {
const url = `https://explorer.solana.com/address/${digitalAsset.mint.publicKey}/?cluster=devnet`;
Linking.openURL(url);
}
}, [digitalAsset]);
```
<img width="350" src="https://docs.monadical.com/uploads/5082c220-3068-4c2a-a400-8100d96c7851.png" />
## Step 6: NFT Ticket Ownership
With the implementation for generating new event tickets completed, it's time to create a new screen where the user can view the available tickets, that is, the list of NFTs that have been minted. For this, we add a new component, `MyTicketsScreen` within the `screens` folder and add the following code:
```jsx
// screens/MyTicketsScreen.tsx
import React, {FC, useEffect, useState} from 'react';
import {Image, ScrollView, StyleSheet, Text, View} from 'react-native';
import {Header} from '../components/Header';
import {useUmi} from '../components/providers/UmiProvider';
import {
fetchAllDigitalAssetByOwner,
fetchJsonMetadata,
} from '@metaplex-foundation/mpl-token-metadata';
import QRGenerator from '../components/QRGenerator';
import AppModal from '../components/Modal';
import AppButton from '../components/AppButton';
const MyTicketsScreen: FC = () => {
const umi = useUmi();
const [events, setEvents] = useState<any[]>([]);
const [showQR, setShowQR] = useState<boolean>(false);
useEffect(() => {
const fetchEventsByOwner = async (): Promise<any[]> => {
try {
const assets = await fetchAllDigitalAssetByOwner(
umi,
umi.payer.publicKey,
);
return await Promise.all(
assets.map(async asset => {
const metadata = await fetchJsonMetadata(umi, asset.metadata.uri);
return {
...asset,
metadata,
};
}),
);
} catch (error) {
console.error('fetchEventsByOwner', error);
throw new Error('Error fetching my events');
}
};
fetchEventsByOwner().then(data => {
setEvents(data);
});
}, [umi]);
return (
<ScrollView style={styles.mainContainer}>
<Header title="My Tickets" subtitle={'See all your tickets'} />
<View style={styles.mainContent}>
{events.map(event => (
<View key={event.edition.publicKey} style={styles.card}>
<Text style={styles.title}>{event.metadata.name}</Text>
<Image
source={{uri: event.metadata.image}}
style={styles.image}
alt={event.name}
/>
<View style={styles.qrButton}>
{showQR ? (
<AppModal modalVisible={showQR} setModalVisible={setShowQR}>
<View style={styles.qrView}>
<Text style={styles.title}>{event.metadata.name}</Text>
<QRGenerator
value={`${umi.payer.publicKey}:${event.mint.publicKey}`}
/>
</View>
</AppModal>
) : (
<AppButton text={'Show QR'} onPress={() => setShowQR(true)} />
)}
</View>
</View>
))}
</View>
</ScrollView>
);
};
const styles = StyleSheet.create({
// omitted for simplicity, check the full file in the repository
});
export default MyTicketsScreen;
```
Once the screen loads, we request the list of NFTs associated with the wallet using Umi's `fetchAllDigitalAssetByOwner` function. Then, we obtain the metadata for each asset and add a button to generate a QR code with the user's wallet and the NFT's mint. The data passed to the QR generator is in the form of `wallet:mint` since we want to verify if a user with a particular wallet owns an NFT with the searched mint value.
To add support for generating QR codes within React Native, we will use the library [react-native-qrcode-svg](https://www.npmjs.com/package/react-native-qrcode-svg). To install it, run the commands:
```shell
yarn add react-native-svg
yarn add react-native-qrcode-svg
```
And we create a new component that receives a string to generate the QR as parameters:
```jsx
// components/QRGenerator.tsx
import React from 'react';
import QRCode from 'react-native-qrcode-svg';
type QRGeneratorProps = {
value: string;
};
const QRGenerator = ({value}: QRGeneratorProps) => {
return <QRCode value={value} size={300} />;
};
export default QRGenerator;
```
After updating the application, we can see the tickets associated with the account and their respective button to generate the QR code. As soon as we press the button, we can see the QR code associated with the ticket, which we can present to the validator to prove our ownership of a ticket for the event:
<div>
<img width="350" src="https://docs.monadical.com/uploads/de19f1c1-135b-466b-9464-c3a3956da588.png" />
<img width="350" src="https://docs.monadical.com/uploads/cabad9f2-ab3a-4080-b87d-4028124f7937.png" />
</div>
<br/>
## Step 7: Validate Ticket with QR Scanner
The final step of our process is to create a new screen that allows an administrator to validate a user's ownership of a ticket. Let's add a new component, `TicketScannerScreen,` within our `screens` folder:
```jsx
// screens/TicketScannerScreen.tsx
import React, {FC, useEffect} from 'react';
import {ScrollView, StyleSheet, Text, View} from 'react-native';
import {Header} from '../components/Header';
import QRScanner from '../components/QRScanner';
import Modal from '../components/Modal';
import {useUmi} from '../components/providers/UmiProvider';
import {
fetchCandyMachineData,
fetchEventsByOwner,
fetchMetadataByMint,
} from '../util/metaplex';
import {publicKey} from '@metaplex-foundation/umi';
const TicketScannerScreen: FC = () => {
const length= useUmi();
const [scanned, setScanned] = React.useState('');
const [result, setResult] = React.useState('');
const [showModal, setShowModal] = React.useState(false);
const [collectionMint, setCollectionMint] = React.useState('');
useEffect(() => {
fetchCandyMachineData(length).then(data => {
setCollectionMint(data.collectionMint);
});
}, [length]);
useEffect(() => {
if (!scanned) {
return;
}
const [userPublicKey, as] = scanned.split(':');
try {
publicKey(userPublicKey);
publicKey(as);
} catch (error) {
setResult('Invalid ticket');
setShowModal(true);
return;
}
fetchMetadataByMint(length, publicKey(as)).then(mintData => {
if (!mintData) {
setResult('Ticket metadata not found');
return;
}
if (mintData.metadata.collection.value.key !== collectionMint) {
setResult('Ticket not found in collection');
return;
}
fetchEventsByOwner(length, publicKey(userPublicKey)).then(
(ownerData: any) => {
const foundInWallet = ownerData.find(
(event: any) => event.publicKey === as,
);
if (!foundInWallet) {
setResult('Ticket not found in user wallet');
return;
}
setResult('Ticket found in user wallet and collection');
},
);
setShowModal(true);
});
}, [length, collectionMint, scanned]);
const handleClose = () => {
setScanned('');
setResult('');
setShowModal(false);
};
return (
<ScrollView>
<Header title="Ticket Scanner" subtitle="Validate your NFT ticket" />
<View style={styles.mintButton}>
<QRScanner setScanned={setScanned} />
<Modal modalVisible={showModal} setModalVisible={handleClose}>
<View style={styles.result}>
<Text style={styles.title}>Scanner Result</Text>
<Text style={styles.text}>{scanned}</Text>
<Text style={styles.text}>{result}</Text>
</View>
</Modal>
</View>
</ScrollView>
);
};
const styles = StyleSheet.create({
// omitted for simplicity, check the full file in the repository
});
export default TicketScannerScreen;
```
To verify that a user holds a ticket for a specific event, we will first verify that the NFT's collection mint matches the mint of the event's collection. Secondly, we will confirm that the NFT the user claims to own exists in their wallet.
To achieve this, `TicketScannerScreen` first loads the data from the candy machine to obtain the collection's mint. To load the data, `TicketScannerScreen` uses the `fetchCandyMachineData` function, which looks like this:
```jsx
// util/metaplex.ts
export async function fetchCandyMachineData(umi: Umi): Promise<CandyMachine> {
try {
const candyMachineId = publicKey(collectionId);
return await fetchCandyMachine(umi, candyMachineId);
} catch (error) {
console.error('fetchCandyMachineData', error);
throw new Error('Error fetching candy machine data');
}
}
```
Every time the `setScanned` event of the `<QRScanner>` component is executed, we can perform the validation whenever the scan data changes. To perform the validation, we use the `fetchMetadataByMint` function, which uses Umi's `fetchDigitalAsset` function to obtain an asset's data based on the mint value. Then, we use fetch to get the NFT's metadata and compare if the mint value of the candy machine matches the `nft.collection.mint value:
```jsx
// util/metaplex.ts
export async function fetchMetadataByMint(
umi: Umi,
mintPublicKey: PublicKey,
): Promise<any> {
try {
const asset = await fetchDigitalAsset(umi, mintPublicKey);
const response = await fetch(asset.metadata.uri);
const metadata = await response.json();
return {...asset, ...metadata};
} catch (error) {
console.error('fetchMetadataByMint', error);
throw new Error('Error fetching NFT metadata');
}
}
```
Secondly, we obtain the NFTs available in the user's wallet with the `fetchEventsByOwner` function and check if the mint the user claims to own exists in the list of available NFTs:
```jsx
// util/metaplex.ts
export async function fetchEventsByOwner(
umi: Umi,
ownerPublicKey: PublicKey,
): Promise<any[]> {
try {
return await fetchAllDigitalAssetByOwner(umi, ownerPublicKey);
} catch (error) {
console.error('fetchEventsByOwner', error);
throw new Error('Error fetching my events');
}
}
```
If both previous conditions are met, an alert message indicating whether the operation was completed is displayed in a modal.
We create the component to read the QR codes using the [VisionCamera] (https://react-native-vision-camera.com/docs/guides) library. This component allows us to use the camera in React Native and includes functionalities such as photo taking, video recording, QR and Barcode scanning, and video stabilization.
To add the dependency, run the command:
```shell
yarn add react-native-vision-camera
```
```shell
# android/gradle.properties
# omitted for simplicity, check the full file in the repository
# Enable code scanner
VisionCamera_enableCodeScanner=true
```
To complete this, we add a new `<QRScanner>` component responsible for using the camera, scanning for present QR codes, and returning the result to a parent component:
```jsx
import React, {Fragment, useCallback} from 'react';
import {StyleSheet, Text} from 'react-native';
import {
Camera,
Code,
useCameraDevice,
useCameraPermission,
useCodeScanner,
} from 'react-native-vision-camera';
type QRScannerProps = {
setScanned: (value: string) => void;
};
const QRScanner = ({setScanned}: QRScannerProps) => {
const {hasPermission, requestPermission} = useCameraPermission();
const device = useCameraDevice('back');
const onCodeScanned = useCallback(
(codes: Code[]) => {
const value = codes[0]?.value;
if (value == null) {
return;
}
setScanned(value);
},
[setScanned],
);
const codeScanner = useCodeScanner({
codeTypes: ['qr', 'ean-13'],
onCodeScanned: onCodeScanned,
});
if (!hasPermission) {
return <Text onPress={requestPermission}>Request camera permission</Text>;
}
if (device == null) {
return <Text>No camera device available</Text>;
}
return (
<Fragment>
<Camera
style={styles.camera}
device={device}
isActive={true}
codeScanner={codeScanner}
enableZoomGesture={true}
/>
</Fragment>
);
};
export default QRScanner;
const styles = StyleSheet.create({
camera: {
flex: 1,
width: '100%',
height: undefined,
aspect: 1,
},
});
```
Once the ticket validator scans a QR code generated with the wallet: mint pair, they can verify if the ticket is valid.
<img width="350" src="https://docs.monadical.com/uploads/5c1d1cb5-da20-4473-9284-7a4ab454a8ad.png" />
With the above, we conclude the implementation of our NFT ticketing app. You can check the repository https://github.com/Monadical-SAS/SolanaMobileTicketingSystem if you want to use the source code for this tutorial. The developed system is still far from being considered ready for production, but it exemplifies the flow we should follow for a ticketing system.
If the reader wishes to complete the implementation, they must ensure the entry of new collections by admin-type users. Additionally, they must be more rigorous with validations in the system, such as verifying that a ticket has been used previously in the system or displaying error messages when no more items are available to mint in the application.
# Conclusion
This article provides a comprehensive guide to developing an NFT ticketing system on the Solana blockchain, demonstrating the practical applications of NFTs beyond art and collectibles. Key takeaways include:
* The versatility of NFTs: The project illustrates the innovative use of NFTs for ticketing, highlighting their potential in various sectors, including events management and brand engagement through discounts and special offers.
* Solana's Ecosystem: The choice of Solana underscores the blockchain's capabilities in handling high throughput and low-cost transactions, essential for the scalability and efficiency of NFT-based applications.
* Ease of Cryptocurrency Management: Integrating mobile wallet adapters like Phantom and Solflare into the project highlights Solana's growing ecosystem of wallet apps. These applications facilitate easier management and transaction of cryptocurrencies and NFTs, enhancing user experience and security. The Mobile Wallet Adapter protocol simplifies connecting dApps with mobile wallets, bridging the gap between blockchain applications and mobile devices.
# Final Thoughts
The development of an NFT ticketing system using Solana, React Native, and associated technologies exemplifies the practical application of blockchain technology in everyday use cases. The integration of mobile wallet adapters and the launch of the Solana dApp store are significant milestones that highlight the ecosystem's maturity and readiness for mainstream adoption.
The recent advancements in Solana's blockchain technology have not only improved the user experience but also opened up new opportunities for developers to create innovative and value-added services. We encourage you to develop new applications that will further enhance the user experience and share these ideas in the comments section below. By working together, we can establish blockchain's role in modern technology landscapes!
# Resources
* https://github.com/solana-mobile/solana-mobile-dapp-scaffold
* https://developers.metaplex.com/candy-machine/sugar
* https://developers.metaplex.com/candy-machine
* https://developers.metaplex.com/candy-machine/guards
* https://developers.metaplex.com/umi
* https://docs.solanamobile.com/getting-started/overview
* https://docs.solanamobile.com/getting-started/mobile-dapp-architecture
* https://docs.solanamobile.com/sample-apps/sample_app_overview
* https://github.com/solana-mobile/dapp-publishing
* https://medium.com/@varghesejoel6/how-to-mint-an-nft-using-metaplex-umi-and-candymachine-7c3880691ff2
* https://github.com/wearekite/candy-machine-v3-ui/blob/main/src/hooks/useCandyMachineV3.tsx
* https://porcupineplaygroundpals.com/how-to-create-a-minting-ui-for-collection-deployed-with-metaplex-sugar-2-1-1/
* https://faucet.solana.com/
* https://github.com/metaplex-foundation/umi/issues/94
* https://discord.com/channels/848060988636921856/1159962886744059944